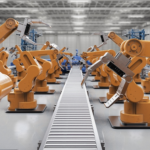
Robots are supporting human behaviors, activities, and jobs in several notable ways. From robotic arms and hands to robots that provide surveillance and maintenance tasks, this technology is rapidly advancing to assist in ways that make certain tasks safer, quicker, or more accessible.
Such robots are either automatic — meaning they can operate automatically without any human intervention — or controlled remotely, so that they operate manually from a remote location. Remote-controlled robots are typically wireless.
Examples of remote-controlled robots include:
- Snake robots – can enter into extremely narrow or small tunnels or pipelines, these robots are mainly used to find problems (such as a leak in a pipeline) but can also be used for search and rescue operations.
- Fire-fighting robots – are used as a fire extinguisher that sprays water or CO2 on a fire. An operator controls this robot from a safe place and tries to extinguish the fire so that a firefighter does not have to put his or her life in danger.
- Mine diffusing robots – are used to diffuse live bombs or mines in a battlefield. An operator can control its movements from a remote and safe distance, diffusing bomb (or mine) without risking a life.
The Bluetooth-controlled robot
As robots advance, so is the ability to communicate with them. Today’s remote-controlled robot are often wireless, which is typically done by using a smartphone via Bluetooth communication. This means anyone can control the robot’s movements with the touch of the fingers.
One industry that has benefitted from robotic support is the agricultural sector. These robots can be wirelessly controlled or programmed to automate slow or repetitive tasks for farmers, allowing them instead to focus more on improving overall production yields. Some of the most common robots in agriculture are used for seeding, spraying, harvesting, picking, and weed control.
The project
For our purposes, let’s build a robot that can help with basic plant growth. Four conditions must be ideal for a plant to grow healthy.
1. Temperature
2. Humidity
3. Soil moisture
4. Ambient light (light intensity).
Three sensors will be used in our robot to monitor those conditions.
Additionally, for this project, the operator will be:
- Capable of maneuvering the robot in a radius of 10-30 meters while taking measurements and selecting the ideal best place for plantation.
- Able to attain the measurements of temperate, humidity, soil moisture, and ambient light after plantation.
- Able to take corrective actions to alter either of those four conditions.
Although this robot will be built for plant care, it’s important to note that the concept could easily be used for different applications by altering the sensors. For example, if we equipped the robot with MQ2, MQ3, or a similar gas sensor, the robot could be used to detect gas leakage of any GAS like CO2, CO, LPG, etc.
But, for now, let’s concentrate on developing a robot for plant care.
The system block diagram
The major building blocks of the system are three sensors for:
1. Soil moisture: used to measure moisture content in soil and provides the analog voltage output as per the measured moisture level. Its output voltage decreases as the moisture content increases.
2. DHT11-temperature and humidity sensor: measures atmospheric temperature and humidity. It gives direct digital values for temperature in Celcius and for humidity in % RH. It is a smart sensor.
3. LDR, Arduino UNO development board, Bluetooth module, two DC motors, and motor-driver chip.
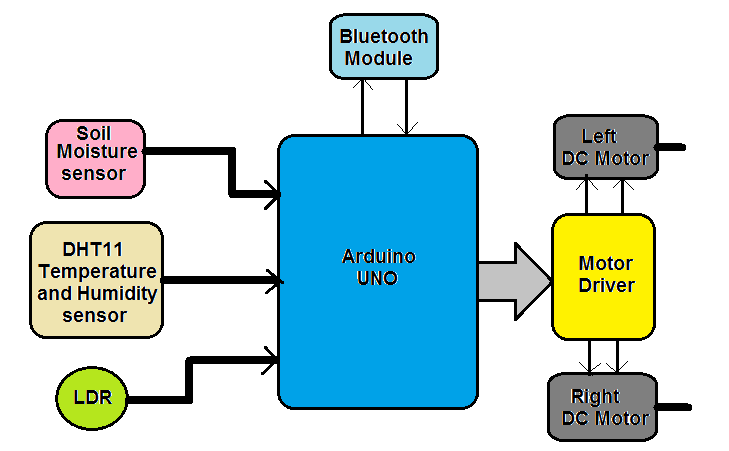 The Bluetooth module is used for command purposes (to move the robot forward, reverse, left, and right) from a smartphone. It provides this data, serially, to the Arduino UNO microcontroller.
The Arduino UNO board performs the following tasks:
- Reads analog output voltage from the soil moisture sensor and converts it to digital. Then, it calibrates it between a 0 – 100% moisture level.
- Reads the temperature and humidity values from the DHT11 sensor.
- Reads the analog voltage output from the LDR and calibrates the light intensity between 0-100%.
- Gets different commands from the Bluetooth module and rotates the two DC motors to move the robot forward, reverse, left, or right.
- Sends (transmits) these readings of all three of the sensors to a smartphone via the Bluetooth module.
The motor driver provides sufficient voltage and current to both motors to rotate them. It also amplifies the output of the Arduino board and drives the motors.
The DC motors drive the left and right wheels of the robot and move the robot forward, reverse, left and right.
Now, let us see how the circuit is built from this block diagram.
The circuit diagram
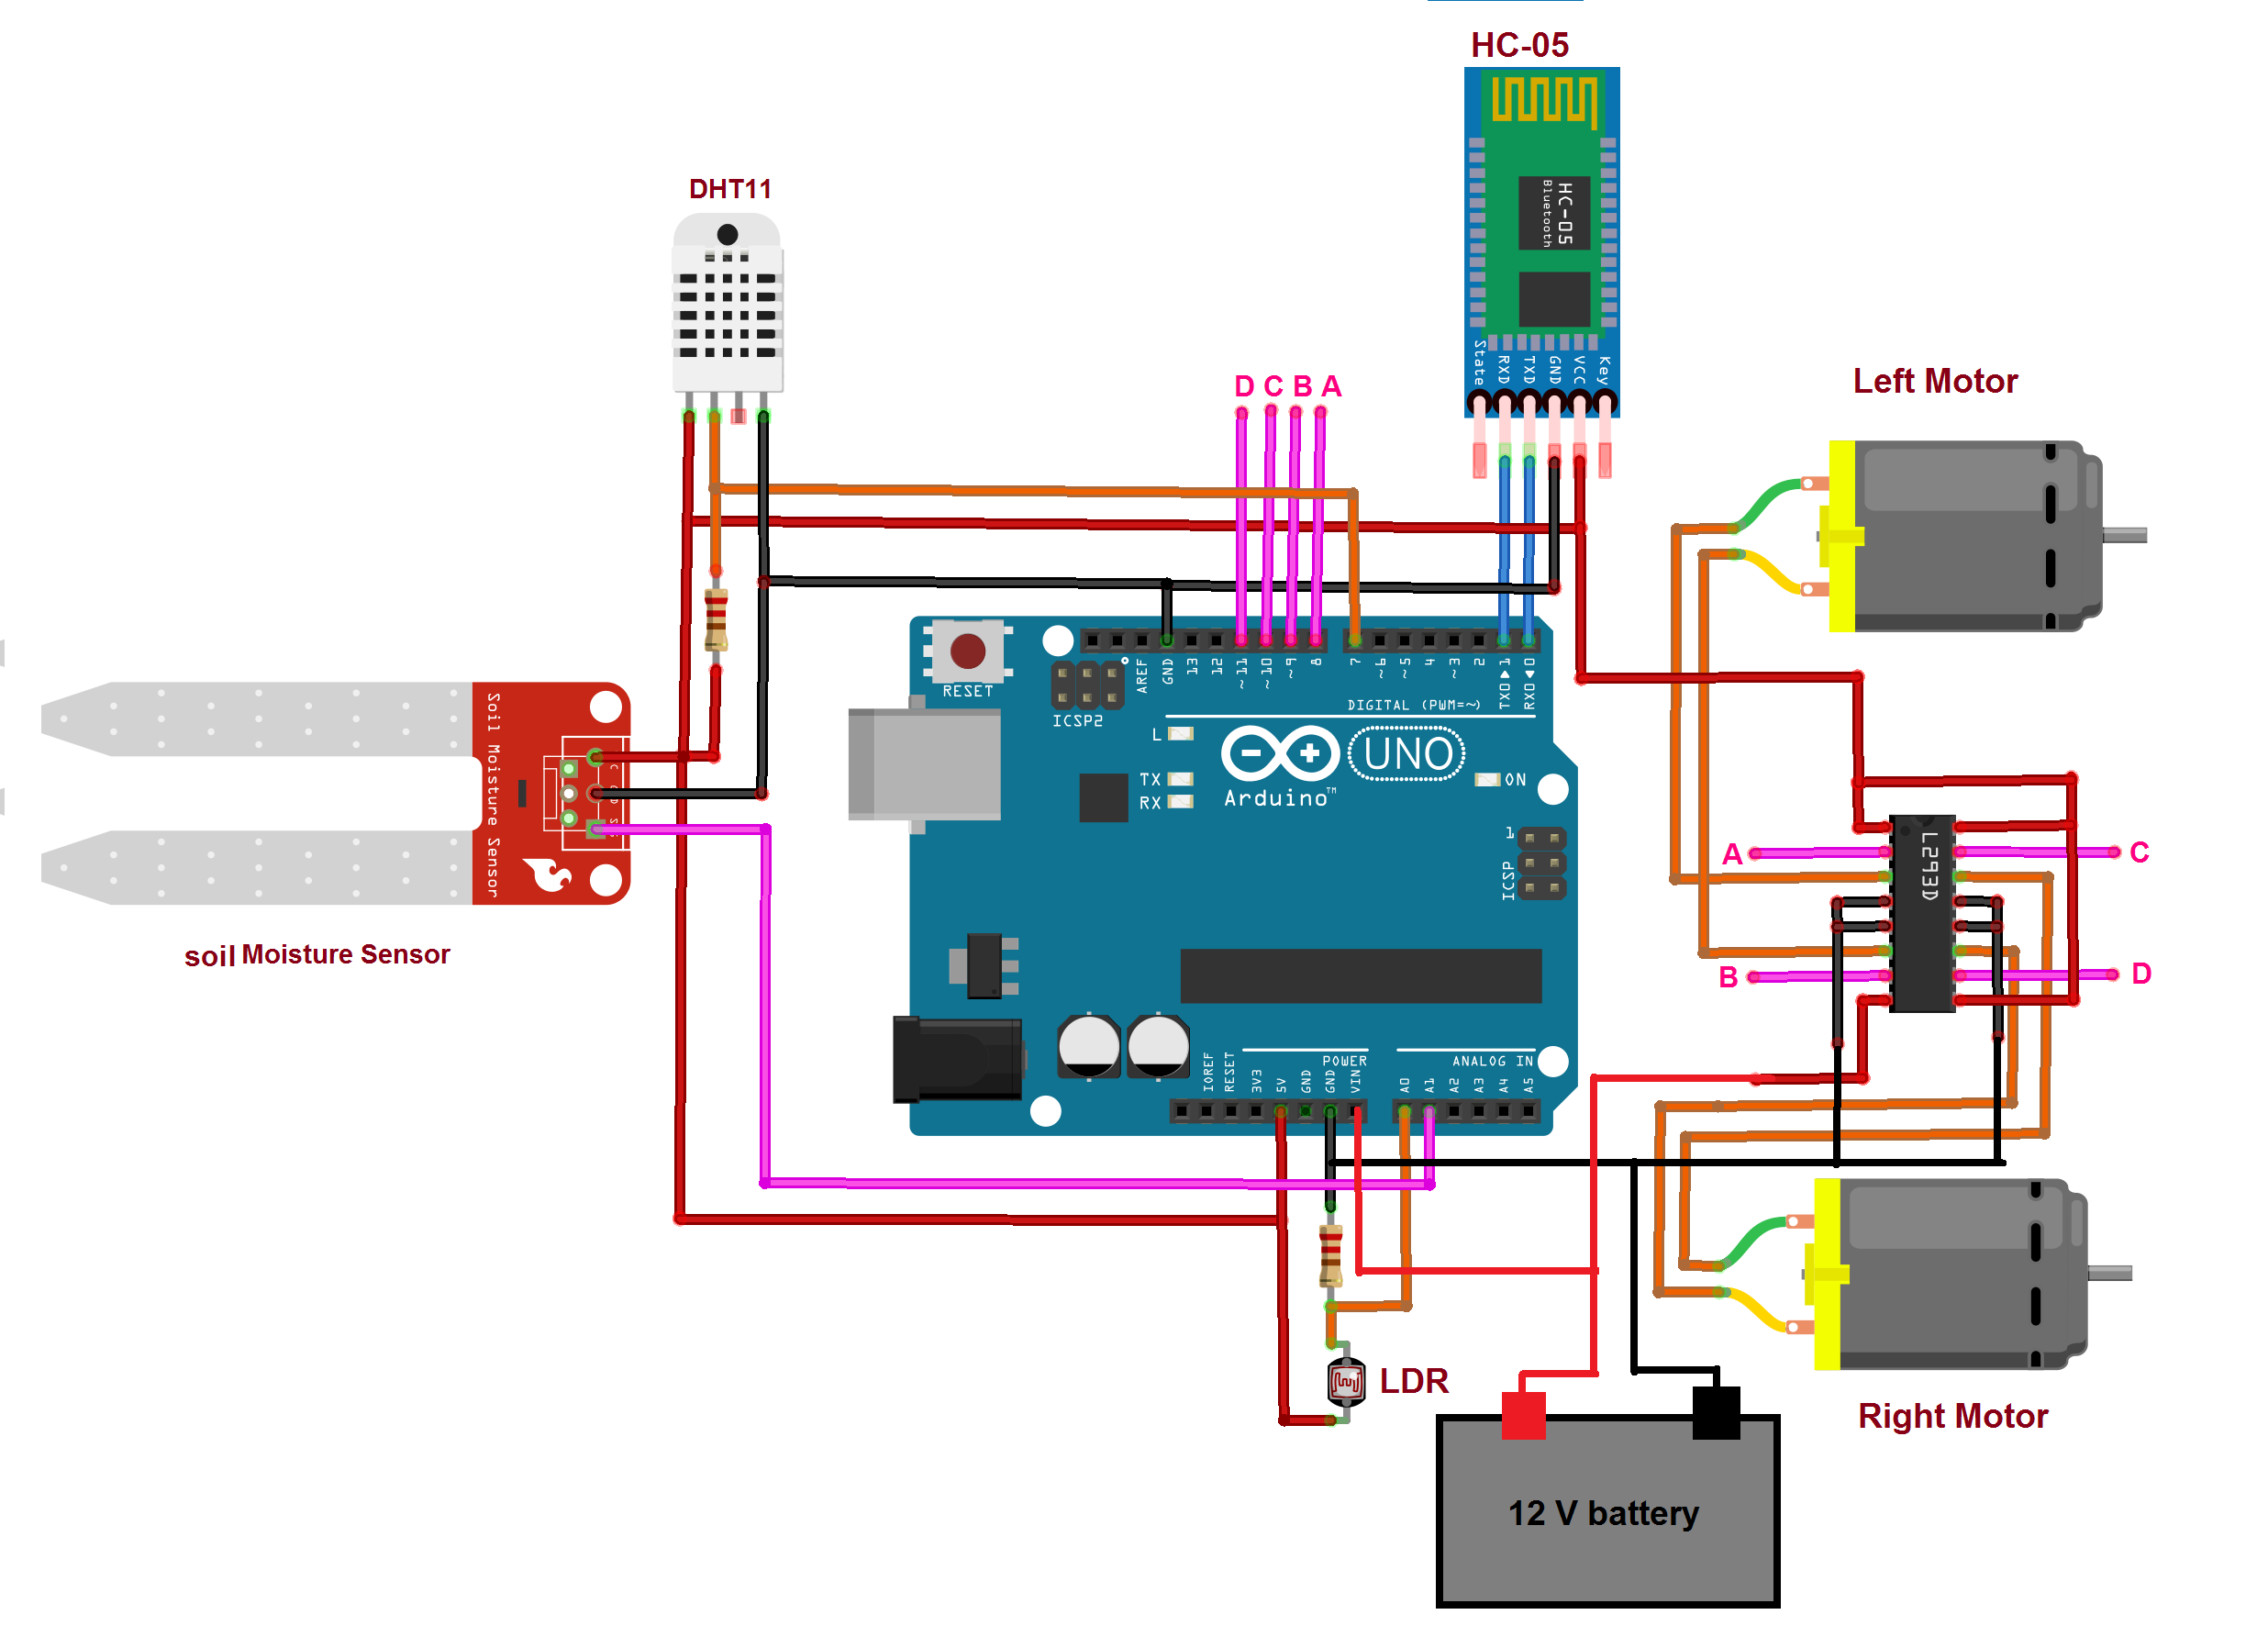
The circuit description
- The HC-05 module operates on the 5V that’s provided by the Arduino board. It communicates with the Arduino board with the USART pins Tx-Rx. This means its Tx pin is connected with the Rx pin of the Arduino board and vice versa.
- The DHT11 sensor also provides the 5V supply from the Arduino board. Its digital output is connected to digital pin D7 of the Arduino board.
- The analog output of the soil-moisture sensor is connected to the analog input pin A1 from the Arduino board. It requires 5V biasing voltage from the Arduino board.
- The LDR is configured in the pull-down mode with the 10 KΩ pull-down resistor. Its analog output is given to the analog input pin A0.
- the digital pins D8, D9, D10, and D11 drive the two DC motors using the L293D chip. These pins are connected to the inputs of L293D and the two motors are connected with the output of the chip.
- The motor supply pin Vss of L293D (pin num 8) receives 12V from the battery.
- The Arduino board also receives 12V input to its Vin pin from the battery. It gets 12V input and provides 5V of output to all of the other components.
Circuit working and operation
The circuit operation starts when the 12V battery is connected with the Arduino UNO board and the L293D chip.
- Initially, both motors are stopped and the robot is also at rest.
- To move the robot in any direction, we have to give commands from the smartphone through the Bluetooth-based Android application.
- To do this, we have to open (start) the Bluetooth Android application in the smartphone and then search for the HC05 Bluetooth module. Once the smartphone detects the HC05 module, it’s required to pair the module with the application so that it can send commands from the smartphone via the Bluetooth to the HC05 module (note: it’s required to enter the passkey “1234” the first time to pair with the HC05 module).
- Now, we can send commands to the robot to move forward, reverse, left, or right via the smartphone through the application.
These commands are used to move the robot (all these commands are set in the Android application):
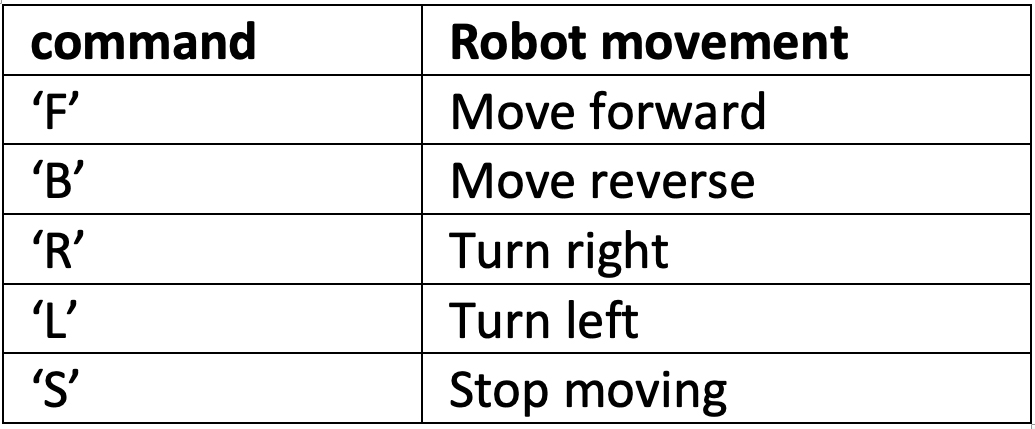
- When any of the above commands are sent (by sending direct character or pressing the button in the application), it’s received by the HC05 module. The module further gives this command to Arduino, serially, through the Tx-Rx pins.
- Arduino receives this command and compares it with the set commands. If it finds a match, it will rotate the left and right motors accordingly to move the robot in any of the appropriate four directions.
- Once the robot starts its motion, it will continuously move until we send the command ‘S’ to stop.
- When the robot stops, it will start reading the sensor values from the DHT11, soil moisture, and LDR. It will read the analog voltage output from the soil moisture sensor and the LDR, and convert it in a range of 0 – 100%. It will also read the digital values of the temperature and humidity from the DHT11 sensor.
- Then it transmits all four values of soil moisture, light intensity, temperature, and humidity to the smartphone via the Bluetooth module, it will continuously transmit these four values after every two seconds until it is stopped.
- When given the command to start moving again, it will stop transmitting the values.
- The operator can take this robot to the required place and measure these four conditions. He or she will get the readings on his or her smartphone while moving the robot with the touch of a finger.
- It should be easy to program the ambient conditions of temperature, humidity, soil moisture, and light intensity in the nearby area
The software program
The program is written in C / C++ language using the Arduino IDE software tool. It’s also compiled and downloaded in the internal memory (FLASH) of the ATMega328 microcontroller using this same software.
Here’s the program code:
#include <Servo.h>
#include <LiquidCrystal.h>
#include “DHT.h”
#define LDR_pin A0
#define soil_moisture_sensor_pin A1
#define DHTPIN 2
#define DHTTYPE DHT11
Servo soil_moisture_servo;
int light_intensity, soil_moisture;
LiquidCrystal lcd(12, 13, 8, 9, 10, 11);
DHT dht(DHTPIN, DHTTYPE);
int motor1Pin1 = 4; // pin 2 on L293D IC
int motor1Pin2 = 5; // pin 7 on L293D IC
int motor2Pin1 = 6; // pin 10 on L293D IC
int motor2Pin2 = 7; // pin 15 on L293D IC
int moisture_sensor_servo_pin = 3;
int state;
int stopflag = 0;
void setup()
{
// sets the pins as outputs:
pinMode(motor1Pin1, OUTPUT);
pinMode(motor1Pin2, OUTPUT);
pinMode(motor2Pin1, OUTPUT);
pinMode(motor2Pin2, OUTPUT);
soil_moisture_servo.attach(moisture_sensor_servo_pin);
soil_moisture_servo.write(0);
Serial.begin(9600);
lcd.begin(16, 2);
lcd.clear();
lcd.setCursor(2, 0);
dht.begin();
lcd.print(“Data logger”);
lcd.setCursor(6, 1);
lcd.print(“Robot”);
delay(5000);
lcd.clear();
lcd.print(” t*C H % L % M %”);
}
void loop()
{
int h = dht.readHumidity();
int t = dht.readTemperature();
light_intensity = analogRead(LDR_pin);
light_intensity = map(light_intensity, 750, 50, 5, 100);
lcd.setCursor(9, 1);
lcd.print(light_intensity);
lcd.setCursor(1, 1);
lcd.print(t);
lcd.setCursor(5, 1);
lcd.print(h);
if (stopflag == 1)
{
soil_moisture = analogRead(soil_moisture_sensor_pin);
soil_moisture = map(soil_moisture, 1015, 100, 0, 100);
lcd.setCursor(13, 1);
lcd.print(soil_moisture);
Serial.print(“Humidity:”);
Serial.println(h);
Serial.print(“temp:”);
Serial.println(t);
Serial.print(“light:”);
Serial.println(light_intensity);
Serial.print(“moisture:”);
Serial.println(soil_moisture);
delay(1000);
}
if (Serial.available() > 0)
{
state = Serial.read();
// if the state is ‘1’ the DC motor will go forward
if (state == ‘1’)
{
digitalWrite(motor1Pin1, HIGH);
digitalWrite(motor1Pin2, LOW);
digitalWrite(motor2Pin1, HIGH);
digitalWrite(motor2Pin2, LOW);
stopflag = 0;
soil_moisture_servo.write(0);
}
else if (state == ‘2’)
{
digitalWrite(motor1Pin1, HIGH);
digitalWrite(motor1Pin2, LOW);
digitalWrite(motor2Pin1, LOW);
digitalWrite(motor2Pin2, LOW);
stopflag = 0;
soil_moisture_servo.write(0);
}
// if the state is ‘3’ the motor will Stop
else if (state == ‘3’)
{
digitalWrite(motor1Pin1, LOW);
digitalWrite(motor1Pin2, LOW);
digitalWrite(motor2Pin1, LOW);
digitalWrite(motor2Pin2, LOW);
stopflag = 1;
delay(500);
soil_moisture_servo.write(90);
delay(500);
}
// if the state is ‘4’ the motor will turn right
else if (state == ‘4’)
{
digitalWrite(motor1Pin1, LOW);
digitalWrite(motor1Pin2, LOW);
digitalWrite(motor2Pin1, HIGH);
digitalWrite(motor2Pin2, LOW);
stopflag = 0;
soil_moisture_servo.write(0);
}
}
}
You may also like:


Filed Under: Electronic Projects, Featured Contributions, Microcontroller Projects

Questions related to this article?
👉Ask and discuss on Electro-Tech-Online.com and EDAboard.com forums.
Tell Us What You Think!!
You must be logged in to post a comment.