Engineers Garage

  • Electronic Projects & Tutorials
    • Electronic Projects
      • Arduino Projects
      • AVR
      • Raspberry pi
      • ESP8266
      • BeagleBone
      • 8051 Microcontroller
      • ARM
      • PIC Microcontroller
      • STM32
    • Tutorials
      • Audio Electronics
      • Battery Management
      • Brainwave
      • Electric Vehicles
      • EMI/EMC/RFI
      • Hardware Filters
      • IoT tutorials
      • Power Tutorials
      • Python
      • Sensors
      • USB
      • VHDL
    • Circuit Design
    • Project Videos
    • Components
  • Articles
    • Tech Articles
    • Insight
    • Invention Stories
    • How to
    • What Is
  • News
    • Electronic Product News
    • Business News
    • Company/Start-up News
    • DIY Reviews
    • Guest Post
  • Forums
    • EDABoard.com
    • Electro-Tech-Online
    • EG Forum Archive
  • DigiKey Store
    • Cables, Wires
    • Connectors, Interconnect
    • Discrete
    • Electromechanical
    • Embedded Computers
    • Enclosures, Hardware, Office
    • Integrated Circuits (ICs)
    • Isolators
    • LED/Optoelectronics
    • Passive
    • Power, Circuit Protection
    • Programmers
    • RF, Wireless
    • Semiconductors
    • Sensors, Transducers
    • Test Products
    • Tools
  • Learn
    • eBooks/Tech Tips
    • Design Guides
    • Learning Center
    • Tech Toolboxes
    • Webinars & Digital Events
  • Resources
    • Digital Issues
    • EE Training Days
    • LEAP Awards
    • Podcasts
    • Webinars / Digital Events
    • White Papers
    • Engineering Diversity & Inclusion
    • DesignFast
  • Guest Post Guidelines
  • Advertise
  • Subscribe

Arduino audio player

By Usman ali Butt December 10, 2024

This tutorial is about building a DIY audio player using Arduino. Today audio players can commonly be found across many electronic products. Almost every mobile has an audio player. Audio technology gets a drastic improvement with rapid development in silicon technology. Previously audio data was stored on tape devices and CDs. But now, Flash memories are cheaper, store huge amounts of data, consume less power, and are much faster than CDs and tapes. This improvement in technology knockouts the tapes and CD’s out of the market. They are obsolete.

So, let’s go deep and learn about the components and science behind the audio players. The main components of the audio player are

  • DAC (Digital to analog converter) – Takes digital data (bitstream) as input and outputs an equivalent analog signal.
  • Solid state memory – In which audio data can be stored. Data is stored in the form of bits. Digital audio player means data is in solid state device as digital represents 1’s and 0’s. Sloid state devices can be SD cards, EEPROM and Flash.
  • Controller circuit – Reads data from solid state device and input it to DAC.
  • Amplifier- Amplifies the signal. Increases the strength of the signal. Digital signal strength is low. It is elevated for the speaker (Depending on speaker characteristics) using an amplifier.
  • Speaker – Outputs the audio, which is read from solid state device as bitstream. Inputted to DAC and from DAC output analog signal enters the amplifier and finally the speaker outputs it.

Two ways by which audio files can be played using Arduino.

  1. PWM (Pulse width modulation) – Arduino does not have a DAC. PWM signal is used as a substitute for DAC by accepting some degradation in performance.
  2. External DAC – An external DAC interfaced with Arduino for proper audio signal conversion.

PWM audio signal

Arduino has PWM gpio’s. We can easily output an audio signal data stream as a PWM signal. The idea is to output the audio as PWM, which is then fed to a transistor. Transistor, after some gain, inputs the signal to the speaker, and finally, we can hear the audio.

Can we play all the audio files (mp3, wav, mp4, wma, etc.) using Arduino?

The answer is no. We can only play files whose contents are aligned as linear binary data. Arduino can read files. It can’t decode files. So, if the file content is encoded, it can’t be read by Arduino. Also, Arduino is an 8-bit microcontroller. It can read data which is 8-bit wide. By analyzing the above constraints, only wav audio files are found to be suitable for Arduino.

Wav audio files can be sampled between 8KHz to 44.1KHz. Sampling means that particular audio is recorded at this rate. Bit per sample is another characteristic for wave file is 8 and 16. The number of channels is mono (1) or stereo (2).  For other parameters, you can see the file format stack. The above three are of our concern.

Arduino Uno’s max clock frequency is 16MHz. To play the .wav file, we must decrease the .wav file sampling rate to 25KHz or lower (considering the Arduino machine cycle is 1). This is to avoid hearing something out of order. We can play the wav file, which is sampled at 44.1KHz, but the Arduino machine cycle is increased in our case. We are fetching data from an SD card. Then the timer is converting the data in PWM form, and at the end, we are outputting it on the PWM pin. This whole process increases the time, and we may not play 44.1KHz sampled audio, especially if the frequencies are higher in audio.

Bit per sample must be 8, and lastly, only mono channel guarantees linear bitstream. Many online tools are available through which you can transform wav file according to the above parameters. After transforming the copy, the transformed the wav file in SD card.

A circuit diagram of the project is given below.

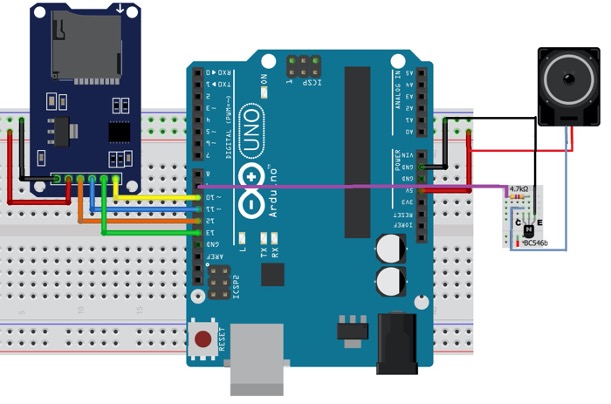
SD card is connected to SPI pins of Arduino. PWM pin 9 is used to output the audio wave. An NPN transistor (BC546) is amplifying the signal and feeding the output to the speaker. The gain of the transistor is 800, and the transition frequency is 150MHz.

Using a dedicated amplifier ic such as LM386 is a good practice. But the gain of the above BC546 transistor is much more than the LM386. For the whole circuit, 5v and 1A  power supply is enough.

Project code:


The project code is above. I used the TMRpcm library in the code. This library fetches the wav file from SD card, transform the bitstream in PWM and output it on Arduino PWM pin. An object of the library is created, and all the library functions are accessed using the object.

Upload the code in Arduino Uno. Upon powerup, the first track will automatically start playing for the second and third track. Open the serial monitor at a 9600 baud rate and send 2 to Arduino to play the second track and 3 for the third track.

Degradation in sound quality:

The audible sound frequency range is between 20Hz to 20KHz.

The sample wav file is at 44.1KHz. Covering all the audible frequencies. But we consider Arduino, which is operating at 16MHz. For data fetching from the SD card, two machine cycles are consumed. For PWM transformation, 2 more machine cycles are consumed. At last, 1 machine cycle is consumed at the output arriving to the speaker. Effectively reducing the frequency, which would result in not playing the 44.1KHz sampled audio file. The time would increase to 60KHz or so. Resulting in delayed audio.

Reducing the wav file sampling rate cuts the larger frequencies, and you could hear the audio in which the loudness is not present.

Let’s DIY the above project: Where to purchase parts?

Arduino Uno: Mouser
SD card: Mouser
Speaker: Mouser

You may also like:


  • Audio Filters: Understanding the filters – Part 5

  • Audio Filters: The working and classification of speakers – Part…

  • Audio Filters: Understanding sound waves – Part 1

Filed Under: Arduino Projects, Microcontroller Projects


Next Article

← Previous Article
Next Article →

Questions related to this article?
👉Ask and discuss on Electro-Tech-Online.com and EDAboard.com forums.


Tell Us What You Think!! Cancel reply

You must be logged in to post a comment.

EE TECH TOOLBOX

“ee
Tech Toolbox: 5G Technology
This Tech Toolbox covers the basics of 5G technology plus a story about how engineers designed and built a prototype DSL router mostly from old cellphone parts. Download this first 5G/wired/wireless communications Tech Toolbox to learn more!

EE Learning Center

EE Learning Center
“engineers
EXPAND YOUR KNOWLEDGE AND STAY CONNECTED
Get the latest info on technologies, tools and strategies for EE professionals.

HAVE A QUESTION?

Have a technical question about an article or other engineering questions? Check out our engineering forums EDABoard.com and Electro-Tech-Online.com where you can get those questions asked and answered by your peers!


RSS EDABOARD.com Discussions

  • Diode recovery test Irrm timing.
  • How to make string LEDs?
  • The Analog Gods Hate Me
  • Battery Deep Discharge – IC Workarounds?
  • Safe Current and Power Density Limits in PCB Copper(in A/m² and W/m³) simulation

RSS Electro-Tech-Online.com Discussions

  • Raise your hand if your car had one of these:
  • Tektronix 2235 channel 1 trace unstable
  • How to make string LEDs?
  • Wideband matching an electrically short bowtie antenna; 50 ohm, 434 MHz
  • The Analog Gods Hate Me

Featured – LoRa/LoRaWan Series

  • What is the LoRaWAN network and how does it work?
  • Understanding LoRa architecture: nodes, gateways, and servers
  • Revolutionizing RF: LoRa applications and advantages
  • How to build a LoRa gateway using Raspberry Pi
  • How LoRa enables long-range communication
  • How communication works between two LoRa end-node devices

Recent Articles

  • Tria modules integrate edge AI processing with multi-core processors
  • pSemi introduces RF switch with 52 dBm PMAX,PEAK and 90-dBm IIP3 linearity
  • XP Power launches 1.3 kW power supply with 58.9 W/cm³ density
  • How to enable Wi-Fi provisioning in ESP32-based IoT products
  • Amphenol RF introduces FAKRA to SMA adapters with 4 GHz operating frequency

EE ENGINEERING TRAINING DAYS

engineering

Submit a Guest Post

submit a guest post
Engineers Garage
  • Analog IC TIps
  • Connector Tips
  • Battery Power Tips
  • DesignFast
  • EDABoard Forums
  • EE World Online
  • Electro-Tech-Online Forums
  • EV Engineering
  • Microcontroller Tips
  • Power Electronic Tips
  • Sensor Tips
  • Test and Measurement Tips
  • 5G Technology World
  • Subscribe to our newsletter
  • About Us
  • Contact Us
  • Advertise

Copyright © 2025 WTWH Media LLC. All Rights Reserved. The material on this site may not be reproduced, distributed, transmitted, cached or otherwise used, except with the prior written permission of WTWH Media
Privacy Policy

Search Engineers Garage

  • Electronic Projects & Tutorials
    • Electronic Projects
      • Arduino Projects
      • AVR
      • Raspberry pi
      • ESP8266
      • BeagleBone
      • 8051 Microcontroller
      • ARM
      • PIC Microcontroller
      • STM32
    • Tutorials
      • Audio Electronics
      • Battery Management
      • Brainwave
      • Electric Vehicles
      • EMI/EMC/RFI
      • Hardware Filters
      • IoT tutorials
      • Power Tutorials
      • Python
      • Sensors
      • USB
      • VHDL
    • Circuit Design
    • Project Videos
    • Components
  • Articles
    • Tech Articles
    • Insight
    • Invention Stories
    • How to
    • What Is
  • News
    • Electronic Product News
    • Business News
    • Company/Start-up News
    • DIY Reviews
    • Guest Post
  • Forums
    • EDABoard.com
    • Electro-Tech-Online
    • EG Forum Archive
  • DigiKey Store
    • Cables, Wires
    • Connectors, Interconnect
    • Discrete
    • Electromechanical
    • Embedded Computers
    • Enclosures, Hardware, Office
    • Integrated Circuits (ICs)
    • Isolators
    • LED/Optoelectronics
    • Passive
    • Power, Circuit Protection
    • Programmers
    • RF, Wireless
    • Semiconductors
    • Sensors, Transducers
    • Test Products
    • Tools
  • Learn
    • eBooks/Tech Tips
    • Design Guides
    • Learning Center
    • Tech Toolboxes
    • Webinars & Digital Events
  • Resources
    • Digital Issues
    • EE Training Days
    • LEAP Awards
    • Podcasts
    • Webinars / Digital Events
    • White Papers
    • Engineering Diversity & Inclusion
    • DesignFast
  • Guest Post Guidelines
  • Advertise
  • Subscribe