Cardiac disease is a concern as people age. In fact, heart problems are fairly common in men over the age of 50 but are increasingly affecting younger adults, regardless of gender. This is attributed, at least partially, to more sedentary and stressful lifestyles and unhealthy habits. But genetics may also play a role.
Electrocardiogram (ECG) is a common medical test for assessing cardiac function by measuring the electrical activity of the heart, although other tests may also be done. ECG is considered a fairly routine and sufficient indication of heart health and is performed with 3, 5, 12, or 15-lead ECG/EKG machines.
Interestingly, it’s also possible to design a low-cost ECG machine using Arduino and an AD8232 ECG sensor.
AD8232 is a cost-effective, ECG analog sensor for measuring the electrical activity of the heart. Essentially, AD8232 is an integrated signal conditioning block for ECG and other biopotential measurements. It’s designed to extract, amplify, and filter small biopotential signals in noisy conditions.
A three-electrode ECG cable can be attached to this sensor board, which easily interfaces with Arduino or Raspberry Pi to efficiently monitor ECG signals — which is what this project entails.
However, please note that AD8232 is not an industry-grade, medical device. It should not be used to diagnose or treat any medical condition. It’s simply an op-amp device that measures biopotential signals and can offer a fairly accurate ECG graph. Be sure to visit your doctor for a true medical assessment.
By interfacing AD8232 with Arduino, it’s also possible to monitor an ECG graph on Arduino IDE’s Serial Plotter in the Processing IDE and on a laptop or PC.
Components required
1. Arduino UNO x1
2. AD8232 ECG module x1
3. Three-electrode ECG cable x1
4. ECG electrode pads x3
5. Connecting or jumper wires
6. A laptop or PC
Software required
Circuit connections
The AD8232 ECG sensor has a six-pin header for interfacing with Arduino, Raspberry Pi, or another similar platform. The header exposes the terminals for a 3.3V supply, GND, Output, LO+, LO-, and SDN. The board also offers three breakout connections for custom sensors/electrodes, including the Right Arm (RA), Left Arm (LA), and Right Leg (RL).
However, instead of using these breakout connections, it’s possible to use a biomedical sensor cable with a 3.5mm connector.
This board is powered by Arduino. To do so properly, be sure to connect:
- AD8232’s 3.3V and GND pins with Arduino UNO’s 3V3 supply and the ground, respectively.
- AD3282’s output terminal with Arduino’s analog input pin. And, for this circuit output, AD8232 is connected with Arduino UNO’s A1 pin.
- AD3282’s LO+ and LO- terminals with Arduino’s GPIO. Here, the LO+ and LO- are connected with Arduino’s pins 10 and 11, respectively. (Note: a sensor cable is used to connect with AD8232’s 3.5 mm jack).
To measure someone’s ECG, electrode pads are plugged into the sensor cable and pads are placed on the body of the subject.
Circuit diagram
ECG lead placement
To ensure an accurate ECG reading, it’s important to correctly place the sensor leads. The three-lead EKG cable has three leads colors in red, green, and yellow.
- The red electrode must be placed under the right clavicle of the subject, which is near the right shoulder and within the rib cage frame.
- The yellow electrode must be placed under the left clavicle of the subject, which is near the left shoulder and within the rib cage frame.
- The green electrode must be placed on the left side of the subject, below the pectoral muscles, near the lower edge of the left rib cage.
For the best results, all of the leads must be placed on the chest wall equidistant from the heart.
Alternatively, the pads can be placed on the limbs — the red electrode on the right arm, the yellow electrode on the left arm, and the green electrode on the right leg.
The three-electrode ECG system is illustrated here…
Arduino sketch
void setup() {
pinMode(10,INPUT);
pinMode(11,INPUT);
}
void loop() {
Serial.begin(9600);
if((digitalRead(10)==1)||(digitalRead(11)==1)){
Serial.println(“Gagal”);
}
else{
Serial.println(analogRead(A1));
}
delay(100);
Serial.end();
delay(100);
}
How it works
ECG is the graphical recording of the electrical signals of the heart. It is useful in determining a person’s heart rate and rhythm. It serves as an indicator of cardiac electrical activities and may point to certain heart-related issues (again, this is not a medical-grade device so please check with a doctor about any concerns).
The ECG graph contains repeating cycles. Each cycle is divided into three parts: P, QRS, and T waves.
A P wave offers information about the impulse propagation time to the heart’s two atria. This is followed by a flat trend, called a PR segment, which indicates the electrical impulse propagation from the atria to the ventricles.
What follows is a complex QRS wave, comprising of a small Q wave, a high R wave, and a small S wave. The QRS segment offers information about the ventricular systole in relation to the impulse propagation of the ventricles (Q wave).
The transmission to the whole tissue is caused by the R and S waves.
ECG also provides information about the heart’s fibrillation and arrhythmias, which can be helpful for analyzing heart attacks. The ST interval is followed by the T wave, which indicates ischemia occurrences. The T segment is helpful in analyzing cardiac hypertrophy, heart attacks, and ischemia.
The ECG signal ends with a small peak, called a U wave. Different segments of the graph are useful in assessing different potential pathologies.
The AD8232 ECG sensor is useful for measuring heart rate and can be used as a portable cardiac monitor. It’s optimized for use as a two or three-lead ECG/EKG machine.
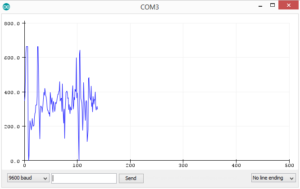
This device offers analog output, which is received by Arduino’s A1 pin in the circuit. The analog signal can be monitored on Arduino IDE’s Serial Monitor or plotted on its Serial Plotter.
If the electrodes are correctly placed on a subject, the plotted graph provides fairly accurate results (but check with your doctor for a proper medical assessment). The LO+ and LO- offer the leads-off detection.
How the code works
The AD8232 is an analog ECG sensor with a single lead heart-rate monitor. The Arduino sketch simply reads the analog signal from the sensor board and prints it to the serial port. If there’s a leads-off detection, the exclamation character is sent to the printer.
The ECG graph can be plotted to Arduino IDE’s Serial Plotter.
Results
You may also like:
Filed Under: Electronic Projects, Tutorials


Questions related to this article?
👉Ask and discuss on Electro-Tech-Online.com and EDAboard.com forums.
Tell Us What You Think!!
You must be logged in to post a comment.