Environment sensors are of great importance in embedded applications. Many temperature sensors measure the ambient temperature or temperature of a surface. For measuring water temperature and other fluids, waterproof temperature sensors are required. One of such temperature sensors is DS18B20. This sensor can measure the temperature of the air, liquids like water, and ground. The sensor comes in two form-factors, of which one is a waterproof module. It can be used to sense temperature in applications like electric steam cookers, electric kettles, and temperature-controlled water storage.
In this project, we have demonstrated the working of DS18B20 by interfacing it with Arduino. The sensor does not require any external components to interface with a controller/computer. It uses a one-wire interface for two-way data communication with a controller that makes its interfacing hassle-free. The sensor comes in a TO-92 package. It is available in two form-factors – in one, it comes in a simple transistor-like package, and in other, it is enclosed within a waterproof probe.
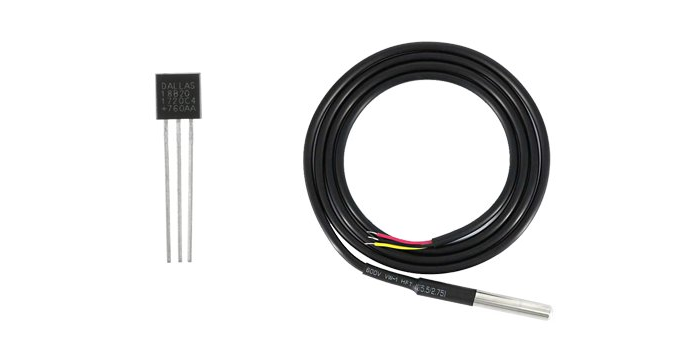
Examples of DS18B20 1-Wire Digital Thermometer
For a demonstration on a breadboard, we are using the transistor-like form-factor in this project. The temperature readings from the sensor are read by the Arduino, which are displayed over the SSD1306 OLED display.
Components required
- Arduino UNO x1
- DS18B20 1-wire temperature sensor x1
- SSD1306 OLED display x1
- Resistor 4.7K x1
- Breadboard
- Connecting wires/jumper wires
DS18B20 1-wire temperature sensor
DS18B20 is a 1-wire digital thermometer from Dallas Semiconductor Corp. It is based on a 1-wire interface that requires only one pin for circuit connections. The sensor has a 64-bit unique serial code for addressing a 1-wire interface. It has multi-drop capability enabling interfacing of many DS18B20 sensors on a single data line as a distributed network. It is even possible to power the sensor from the data line itself.
The sensor outputs a temperature measurement with scales from 9-bit to 12-bit resolution. The operating temperature range of DS18B20 is -55˚C to 125˚C with an accuracy of +/-0.5˚C. The default resolution of the sensor is 12-bit which lets it measure temperature with a precision of 0.0625˚C. This temperature sensor takes less than 750 ms for converting a reading. Therefore, it is easily possible to fetch temperature measurements at an interval of 1 second from the sensor network.
The operating voltage of DS18B20 is 3.3~5V, and current consumption is around 1mA. Therefore, it can be easily interfaced to any microcontroller or microcomputer, provided a software library for a 1-wire interface is available for that platform. With such minimal current consumption and a straightforward 1-wire interface, it is even possible to interface DS18B20 with low-power microcomputers like the Raspberry Pi.
DS18B20 has the following pin diagram:
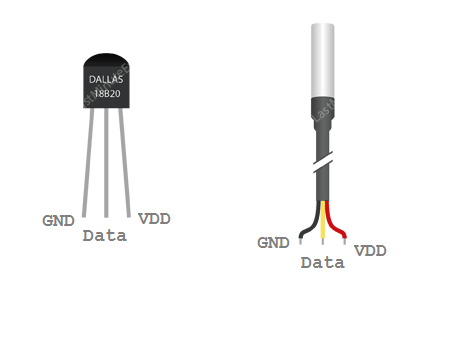
Pin diagram of DS18B20 1-wire temperature sensor
In the waterproof version of the sensor, the pins are identified by color-coding. The GND, Data, and VDD lines are identified by black, yellow, and red wires. It should be noted that there are also some Chinese models of the sensor available. In these models, the pin configuration is reversed, i.e., in the front view, the left pin is VDD, then Data and the rightmost is GND.
Circuit connections
In this project, we interface a DS18B20 and SSD1306 OLED with Arduino UNO. For interfacing DS18B20, connect the GND and VDD pins of the sensor to ground and 5V out pins of the Arduino, respectively. The data pin of the sensor can be connected to any GPIO. In this project, the data pin is connected to D2 of Arduino. To stabilize the data line, a pull-up resistor of 4.7K is recommended to communicate between the data pin and the supply pin. The Arduino’s built-in pull-up resistors are insufficient for implementing a 1-wire protocol. If an external resistor is not connected while interfacing with the Arduino, the board may not correctly read from the sensor. It is also important to ensure the right connections for voltage supply. A reverse voltage applied to the sensor can easily heat it to permanent breakdown.
The OLED display is connected to show temperature readings. The SSD1306 is interfaced with Arduino using the physical SPI port of Arduino. For interfacing SSD1306 OLED via physical SPI port, connect the D0/SCK and D1/MOSI pins of SSD1306 OLED to pins D13 and D11 of Arduino, respectively. Connect pins DC, RESET, and CS of SSD1306 to pins D9, D10, and D8 of Arduino, respectively.
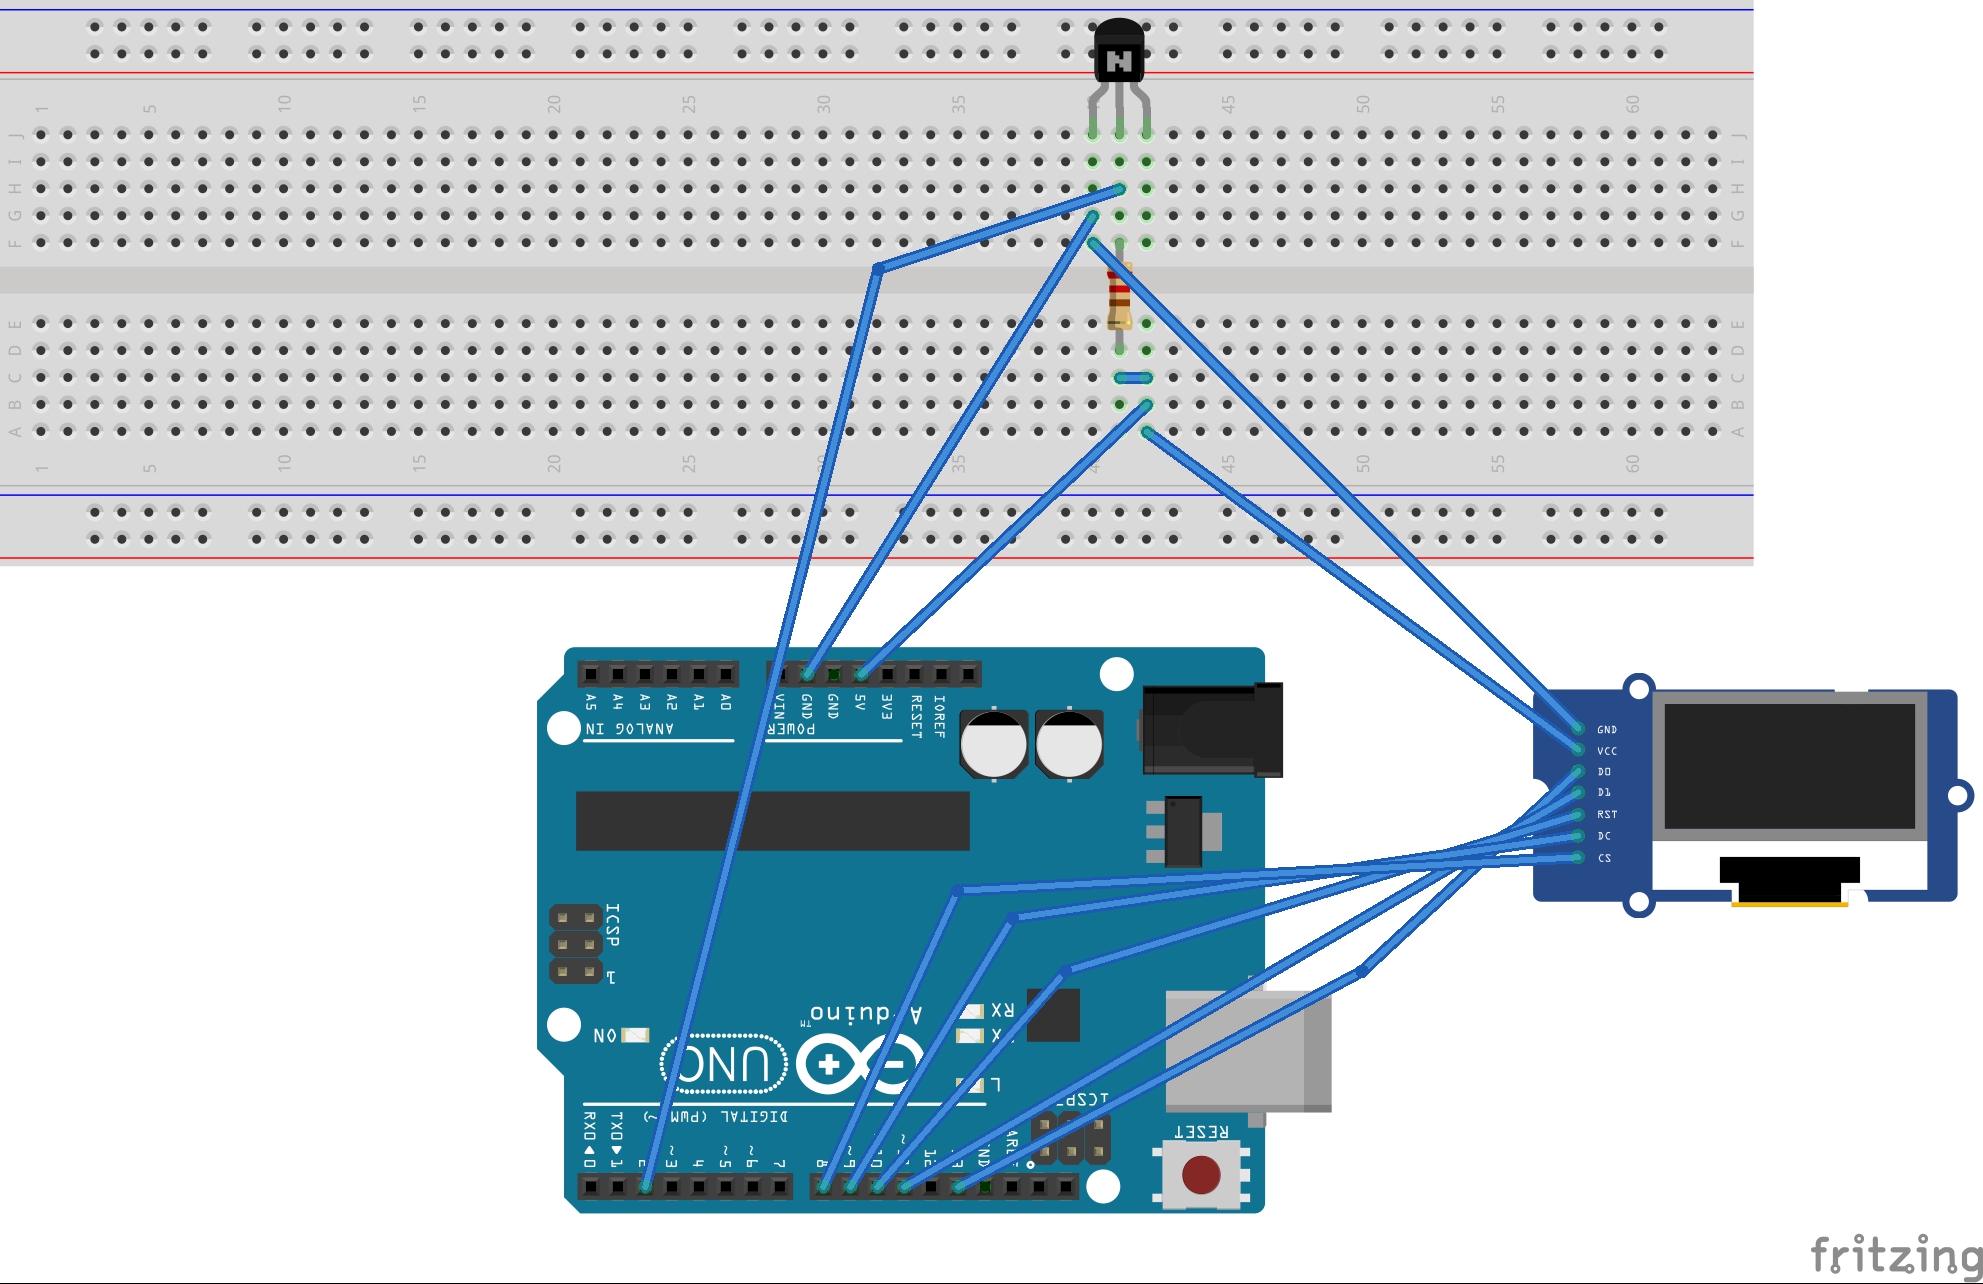
Circuit diagram of Arduino based DS18B20 water temperature monitor
Arduino libraries for DS18B20
First of all, for working with DS18B20, one wire library is required. It can be found from the Arduino IDE’s library manager. It can also be manually downloaded as ZIP from this link. The one-wire library is for managing data communication on a 1-wire interface. The other library required for DS18B20 is a hardware-specific library for implementing the Dallas 1-wire protocol. It can be found in library manager as DallasTemperature or downloaded as a ZIP file from this link.
Arduino sketch
How it works
The sensor has its hardware-specific 1-wire protocol, which the Dallas Temperature library implements. Arduino communicates with DS18B20 over the 1-wire protocol. The protocol can be implemented on any GPIO. Arduino reads the temperature from the sensor by detecting the protocol-specific signals at its data pin and storing the value in a variable. The read temperature measurement is then displayed on SSD1306 OLED.
Programming guide
The sketch begins by importing OneWire and DallasTemperature libraries for working with the DS18B20 temperature sensor. Next, SPI, Wire, Adafruit_GFX, and Adafruit_SSD1306 libraries are imported for working with OLED display. A constant is defined to indicate the data line for the temperature sensor. An object of OneWire class is instantiated, and the same object is used to instantiate an object of DallasTemperature class. The constants for screen resolution and pin connections of OLED display are defined. An object of the Adafruit_SSD1306 class is instantiated with SPI explicitly specified as interfacing protocol. A global variable ‘temp’ is declared to store temperature values. A bitmap is stored in PROGMEM for site loge, and an array is defined for the same.
In the setup() function, the DS18B20 is initialized by calling sensors.begin() method. The baud rate for data communication is 9600 bps by calling the Serial.begin() method. The OLED display is initialized by calling display.begin() method, and the site logo is flashed to the OLED screen by calling display.drawBitmap() method.
In the loop() function, the temperature reading from DS18B20 is taken by calling sensors.requestTemperatures() method and the fetched value is accessed in a variable through sensors.getTempCByIndex(0) method. The read temperature measurement is transferred to the serial port and displayed on the OLED display.
Result

Circuit of Arduino-based DS18B20 water temperature monitor.
Demonstration video
You may also like:


Filed Under: Arduino, Arduino., Electronic Projects, Sensors, Tutorials, Video

Questions related to this article?
👉Ask and discuss on EDAboard.com and Electro-Tech-Online.com forums.
Tell Us What You Think!!
You must be logged in to post a comment.