Engineers Garage

  • Projects and Tutorials
    • Electronic Projects
      • 8051
      • Arduino
      • ARM
      • AVR
      • PIC
      • Raspberry pi
      • STM32
    • Tutorials
    • Circuit Design
    • Project Videos
    • Components
  • Articles
    • Tech Articles
    • Insight
    • Invention Stories
    • How to
    • What Is
  • News
    • Electronic Products News
    • DIY Reviews
    • Guest Post
  • Forums
    • EDABoard.com
    • Electro-Tech-Online
    • EG Forum Archive
  • Digi-Key Store
    • Cables, Wires
    • Connectors, Interconnect
    • Discrete
    • Electromechanical
    • Embedded Computers
    • Enclosures, Hardware, Office
    • Integrated Circuits (ICs)
    • Isolators
    • LED/Optoelectronics
    • Passive
    • Power, Circuit Protection
    • Programmers
    • RF, Wireless
    • Semiconductors
    • Sensors, Transducers
    • Test Products
    • Tools
  • EE Resources
    • DesignFast
    • LEAP Awards
    • Oscilloscope Product Finder
    • White Papers
    • Webinars
  • EE Learning Center
    • Design Guides
      • WiFi & the IOT Design Guide
      • Microcontrollers Design Guide
      • State of the Art Inductors Design Guide
  • Women in Engineering

Arduino Traffic Light Project for beginners

By Samidha Verma

If you are new to Arduino and wants to do some experiment on it for experience, then this project is perfect for you. It is a simple tutorial, which involves amalgamation of a friendly code and an easy circuit to build an Arduino based Traffic light circuit. It will introduce you to the basic concept of Arduino.


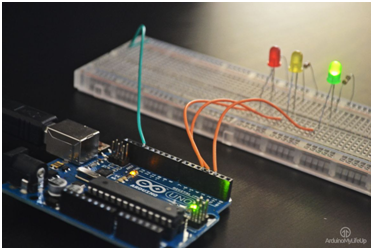
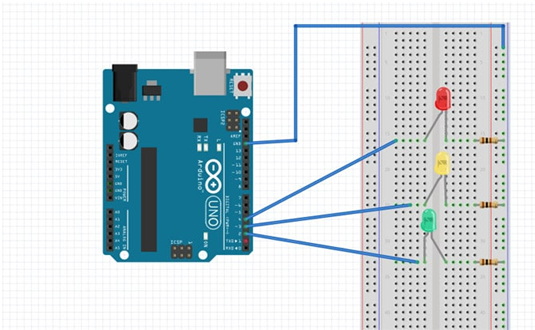
The equipment required for this project includes Arduino Uno, Red, Yellow and green LED, 3 x 100 Ohm resistors of Brown Black Brown color, four Breadboard wires and a Breadboard. The circuit required for Arduino Traffic Light is indeed simple and non-time consuming. The following diagram can assist you to complete your circuit but if you are searching for an advanced program to prototype and design diagrams, then check out Fritzing.


The code will help you to light up the LEDs and bring life to this project. They are basic if you’re a programmer but if you are new in this field of programming, then it’s a great platform to learn. It is prominent to declare the variables before initiating the writing. For example, the GREEN variable represents the pin to which the green LED is connected to and same concept is applied to other variables. 
 
After the variables are set, the pins are arranged as they act as an output and not as an input. Further, we understand that the pinMode function admits two parameters i.e. the pin number and the mode. The role of this function is to create a loop for the program to run through it. Hence, whenever the function is called, it will turn the lights on and afterward we can set a delay to avoid changes until that time is up.
 
The same procedure is followed and a function is created for each light. In the end, you will see that the green light () function will turn the green light on and simultaneously turn the yellow and red LEDS off. After the code is completed and tested using verify button, it is uploaded to Arduino with the help of a USB cable. The lights must begin to blink in the defined pattern using the function calls and the delays. If not, there must be some errors in your code. 
 
This is a great beginner project if you are just introduced to your first Arduino or looking at buying one. Check out the video to cover what you will need to do from start to finish in this project. For codes and other details, visit the following link. 

Filed Under: Reviews


Questions related to this article?
👉Ask and discuss on EDAboard.com and Electro-Tech-Online.com forums.


Tell Us What You Think!! Cancel reply

You must be logged in to post a comment.

HAVE A QUESTION?

Have a technical question about an article or other engineering questions? Check out our engineering forums EDABoard.com and Electro-Tech-Online.com where you can get those questions asked and answered by your peers!


Featured Tutorials

  • Introduction to Brain Waves & its Types (Part 1/13)
  • Understanding NeuroSky EEG Chip in Detail (Part 2/13)
  • Performing Experiments with Brainwaves (Part 3/13)
  • Amplification of EEG Signal and Interfacing with Arduino (Part 4/13)
  • Controlling Led brightness using Meditation and attention level (Part 5/13)
  • Control Motor’s Speed using Meditation and Attention Level of Brain (Part 6/13)

Stay Up To Date

Newsletter Signup

Sign up and receive our weekly newsletter for latest Tech articles, Electronics Projects, Tutorial series and other insightful tech content.

EE Training Center Classrooms

EE Classrooms

Recent Articles

  • What are the battery-selection criteria for low-power design?
  • Key factors to optimize power consumption in an embedded device
  • EdgeLock A5000 Secure Authenticator
  • How to interface a DS18B20 temperature sensor with MicroPython’s Onewire driver
  • Introduction to Brain Waves & its Types (Part 1/13)

Most Popular

5G 555 timer circuit 8051 ai Arduino atmega16 automotive avr bluetooth dc motor display Electronic Part Electronic Parts Fujitsu ic infineontechnologies integratedcircuit Intel IoT ir lcd led maximintegratedproducts microchip microchiptechnology Microchip Technology microcontroller microcontrollers mosfet motor powermanagement Raspberry Pi remote renesaselectronics renesaselectronicscorporation Research samsung semiconductor sensor software STMicroelectronics switch Technology vishayintertechnology wireless

RSS EDABOARD.com Discussions

  • Slope compensation ramp calculation for UCC38084
  • Parts storage / inventory best practices and organization
  • Unusual gap shape of ETD59 ferrite core?
  • Vco cadencd
  • WH-LTE-7S1 GSM module and SIM card problem

RSS Electro-Tech-Online.com Discussions

  • HV Diodes
  • intro to PI
  • Very logical explanation on low calue C3
  • Need help working with or replacing a ferrite tube
  • Help wanted to power an AC120v induction motor ( edited from Brushless motor - thank you @SHORTBUS= )
Engineers Garage
  • Analog IC TIps
  • Connector Tips
  • DesignFast
  • EDABoard Forums
  • EE World Online
  • Electro-Tech-Online Forums
  • Microcontroller Tips
  • Power Electronic Tips
  • Sensor Tips
  • Test and Measurement Tips
  • 5G Technology World
  • About Us
  • Contact Us
  • Advertise

Copyright © 2022 WTWH Media LLC. All Rights Reserved. The material on this site may not be reproduced, distributed, transmitted, cached or otherwise used, except with the prior written permission of WTWH Media
Privacy Policy | Advertising | About Us

Search Engineers Garage

  • Projects and Tutorials
    • Electronic Projects
      • 8051
      • Arduino
      • ARM
      • AVR
      • PIC
      • Raspberry pi
      • STM32
    • Tutorials
    • Circuit Design
    • Project Videos
    • Components
  • Articles
    • Tech Articles
    • Insight
    • Invention Stories
    • How to
    • What Is
  • News
    • Electronic Products News
    • DIY Reviews
    • Guest Post
  • Forums
    • EDABoard.com
    • Electro-Tech-Online
    • EG Forum Archive
  • Digi-Key Store
    • Cables, Wires
    • Connectors, Interconnect
    • Discrete
    • Electromechanical
    • Embedded Computers
    • Enclosures, Hardware, Office
    • Integrated Circuits (ICs)
    • Isolators
    • LED/Optoelectronics
    • Passive
    • Power, Circuit Protection
    • Programmers
    • RF, Wireless
    • Semiconductors
    • Sensors, Transducers
    • Test Products
    • Tools
  • EE Resources
    • DesignFast
    • LEAP Awards
    • Oscilloscope Product Finder
    • White Papers
    • Webinars
  • EE Learning Center
    • Design Guides
      • WiFi & the IOT Design Guide
      • Microcontrollers Design Guide
      • State of the Art Inductors Design Guide
  • Women in Engineering