 The previous tutorial included a discussion about the tools and components necessary to get started with Arduino. However, before starting with Arduino UNO (or any other Arduino board) — and experimenting with hardware projects on various sensors, actuators, and modules — it’s important to get through the basics of Arduino sketches and the embedded C for Arduino-compatible coding.
The term “Arduino-compatible coding” refers to all Arduino and Arduino-compatible microcontroller boards that can be programmed and uploaded using Arduino IDE.
Arduino boards are programmed in “C.” C is a popular system programming language that has minimal execution time on hardware in comparison to other high-level programming languages. It’s the reason most of the operating systems and several programming languages are built on C.
Much like other microcontrollers, the AVR microcontrollers housed in Arduino boards are programmed in a subset of C. A general term for such subsets is “Embedded C” because they apply to programming embedded controllers. The language in which Arduino is programmed is a subset of C and it includes only those features of standard C that are supported by the Arduino IDE.
This does not mean that Arduino C lags anywhere because it is a subset of C. Most of the missing features of standard C can be easily worked around. Rather, Arduino C is a hybrid of C and C++, meaning it is functional and object-oriented.
The structure of sketches
Essentially, a blank Arduino sketch has two functions:
1. Setup()
2. loop()
As the Arduino sketch starts executing, the setup() function is called first. It’s executed only once and must be used to initialize variables, set pinModes, make settings for hardware components, use libraries, etc.
The loop() function is next to the setup() function and it is iterated infinitely. Any other user-defined functions must be called inside the loop function. This is how microcontrollers execute their firmware code by repeating their code for an infinite number of times while they remain powered on.
If users have programmed other microcontrollers (such as 8051, AVR, PIC, or RX), it’s possible to compare the code inside the setup() function with the one outside of the main() loop of an embedded C program — which may have been written to initialize variables and make hardware settings. The setup() and loop() functions have void return types.
A program for a microcontroller must be structured in the same manner as it functions. A microcontroller must be “aware” of its hardware environment and know how to interact with it.
A microcontroller can interact with other hardware components or devices only through these five ways:
1. Digital Input. This may be received in digital LOW or HIGH from other devices. These will be TTL logic levels or voltages converted to TTL logic levels before being applied to the GPIO.
2. Digital Output. This may be output that’s digital LOW or HIGH compared to other devices. Again, the output will be TTL logic levels.
3. Analog Input. It may “sense” analog voltage from other devices. The sensed voltage is converted to a digital value using a built-in, analog-to-digital converter.
4. Analog Output. It may output analog voltage to other devices. This analog output is not analog voltage but a PWM signal that approximates analog voltage levels.
5. Serial Communication. It may transmit, receive, or transceive data with other devices in serial, according to a standard serial data protocol such as UART, USART, I2C, SPI, microwire, 1-wire, and CAN, etc. The serial communication with other devices can be peer-to-peer (UART/USART), half-duplex (I2C), or full-duplex (SPI).
Users that know how to perform these five types of microcontroller interactions can interface any hardware with it.
An Arduino program or any microcontroller program must first have code for initialization. This may include:
- Defining variables and constants
- Setting up pinModes
- Setting up ADC/PWM channels
- Initializing settings for serial communications
A microcontroller simply intercepts incoming data, processes it according to programmed instructions, and outputs data through its I/O peripherals. This means the program must be organized in specific sections that can handle input data, process data, and control output.
Unlike desktop applications, µc programs are not designed to terminate. These programs keep iterating for an infinite number of times until the system is shut down or it meets failure. After a power shutdown, Arduino or any microcontroller resets on the “power resume” and begins execution of its program from the beginning.
The program includes code to handle failures when possible. So, any Arduino program can be visualized as a four-step program as follows:
1. Initialization
2. Input – this should include code for data validation and to handle incorrect or unexpected incoming data
3. Processing – this should include code for unexpected failures or exceptions raised while data processing
4. Output – this may include code for verification of expected results if the interfaced device can also communicate back to the microcontroller
Comments
The comments in Arduino C are similar to the comments in standard C. Single-line comments start with a pair of slashes (//) and finish at the end of the line (EOL). Multi-line comments start with a slash-asterisk pair (/*) and ends as an asterisk-slash pair (*/).
These are examples of single and multi-line comments:
// This is a single-line comment
/* This
is
a
multi-line
comment */
Arduino C data types
These data types are supported in Arduino C.

It’s worth noting that “string” and “string objects” are different. The string data type defines a simple character array while the string data type defines a string object.
Arduino C supports these built-in functions for manipulation of string objects:

Identifiers
Identifiers are names given to variables, functions, constants, classes, methods, and other objects in a program. In Arduino C, identifiers should contain only alphanumeric characters, dash (-), or underscore(_). An identifier can only start from an underscore or a letter.
Keywords
Keywords are constants, variables, or function names that cannot be used as identifiers.
Arduino C has the following keywords:

Variables
Variables are references in a program with values that can change during the execution of the program. Variables can have names that must be identifiers.
For example, in Arduino C, each variable must be explicitly defined with a specified data type before it’s used in the code.
- If, in a code statement, a variable has been instantiated by a data type but there’s no value assigned to it, the variable is said to be defined but not declared.
- If it’s also assigned a value in the same statement or another statement, it’s said to be declared.
The memory location where the value of a variable is stored at runtime is called its “lvalue” or location value. The value stored in the memory location of the variable is called its “rvalue” or register value.
A defined variable has a lvalue but no rvalue. A declared variable has a lvalue and rvalue.
This is a valid definition of a variable:
int num1;
This is a valid declaration of a variable:
int num1 = 0;
Or…
int num1;
num1 = 0;
Constants
Constants are references in a program with a value that does not change during the execution of the program. The integer and floating-point constants can be declared in Arduino C using const keyword or #define directive. T
This is an example of a valid declaration of an integer constant:
const int RXPIN = 0;
Some built-in constants are HIGH, LOW, INPUT, OUTPUT, INPUT_PULLUP, LED_BUILTIN, true, and false. The #define directive allows for declaring constants before the compilation of the program.
This is a valid declaration of a constant using #define directive:
#define LEDPin 3
Operators
These operators are available in Arduino C:
1. Arithmetic – addition (+), multiplication (*), subtraction (-), division (/), and modular division (%)
2. Assignment (=)
3. Comparison – equal to (==), not equal to (!=), less than (<), greater than (>), less than or equal to (<=), and greater than or equal to (>=)
4. Bitwise – bitwise and (&), bitwise or (|), bitwise xor (^), bitwise not (~), left bitshift (<<), and right bitshift (>>)
5. Boolean – and (&&), or (||) and not (!)
6. Compound – increment (++), decrement (–), compound addition (+=), compound subtraction (-=), compound multiplication (*=), compound division (/=), compound bitwise and (&=), and compound bitwise or (|=)
7. Cast – These operators translate current type of a variable to another type. Type casting can be applied to a variable by indicating the new data type in parenthesis, before the appearance of the variable.
For example:
i = (int) f
8. sizeof – The sizeof operator returns the size of an array in the number of bytes.
9. Ternary (:?)
10. Pointer – dereference operator (*) and reference operator (&)
Statements and statement blocks
A statement is a complete C instruction for the processor. All C statements end with a semicolon (;). A block of statements is a group of statements enclosed within braces ({, }). A block of statement is also viewed as a single statement by the compiler.
Operator precedence
This table shows the precedence of operators in Arduino C in descending order:

Control Structures
Arduino C supports these control structures:
- if
- if …else…
- for
- switch case
- while
- do… while…
- break
- continue
- goto
- return
User-defined functions
Functions are callable blocks of statements. Programmers can also write their own functions. Functions are an ideal way to organize code according to the functionality of statement blocks in the program.
A function definition has this syntax:
function_type function_name(arguments){
function_body
}
The type of a function can be any data type including void. The function is expected to return a value of the same type via a return statement. This statement should be the last one in a function body (any statements made after a return statement will fail to execute).
The function exits after the return statement. If the type of a function is void, it should not return any value. The function name can be any identifier, and may or may not need arguments. The arguments are variables that are bound to the function.
The body of a function is a block of statements. Whenever the function is called, this block of statements is executed.
This is a valid example of user-defined C function:
int add_inputs(int a, int b, int c) {
return a+b+c;
}
A function is called by its name and followed by a parenthesis. Any positional arguments must be passed within parenthesis.
This is a valid example of calling a function:
add_inputs(5, 2, 14)
Built-in functions
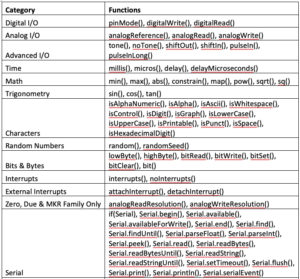
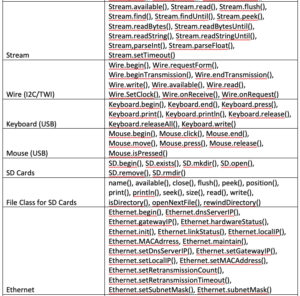
Arduino supports several built-in functions that make programming Arduino boards much easier. The commonly used built-in Arduino functions are listed in this table.

Variable scope
The scope of a variable refers to visibility and lifetime of a variable in the program. For example, variables that are:
- Only visible inside a function have a local scope.
- Visible to all functions of the program have a global scope.
A variable having global scope must be defined or declared outside of any function, including setup() and loop() functions. If a local variable is defined as static (using the static keyword), it remains visible to only one function. However, it’s not destroyed and will persists beyond the function call, preserving its data between function calls.
If a variable (local or global) is defined as volatile, it’s stored in RAM instead of storage registers. A variable must be defined as volatile if it’s likely to be changed beyond the control of the code (such as in the case of an interrupted service routine).
In the next tutorial, we will discuss how to perform digital output. Also, through the digital output from Arduino, we will build an LED driver.
You may also like:
Filed Under: Arduino., Featured Contributions, Tutorials





Questions related to this article?
👉Ask and discuss on Electro-Tech-Online.com and EDAboard.com forums.
Tell Us What You Think!!
You must be logged in to post a comment.