In my last tutorial i added the atmega32 microcontroller support for arduino ide. All the interfaces worked perfect but the serial interface does not respond properly. It only sends some odd characters to the receiving channel also uart is unable to receive the characters. I was unable to use the serial commands Seial.begin(), Serial.receive(), Serial.available() etc. The error is in the atmega32 microcontroller uart pins initialization. Arduino uart default pins library has uart on pin#0,1. I tried to make changes in the atmega32 pins_arduino.h header file but it did not worked for me. So i decide to initialize the registers associated with the uart in the arduino code it self. This way i can use the atmega32 uart to be programmed with arduino ide. Before beginning any further please be sure that you installed the atmega32 microcontroller support for arduino ide. The link is below in case if you did not installed the support libraries.
Atmega32A Programmed with Arduino IDE
Atmega32A Programmed with Arduino IDE
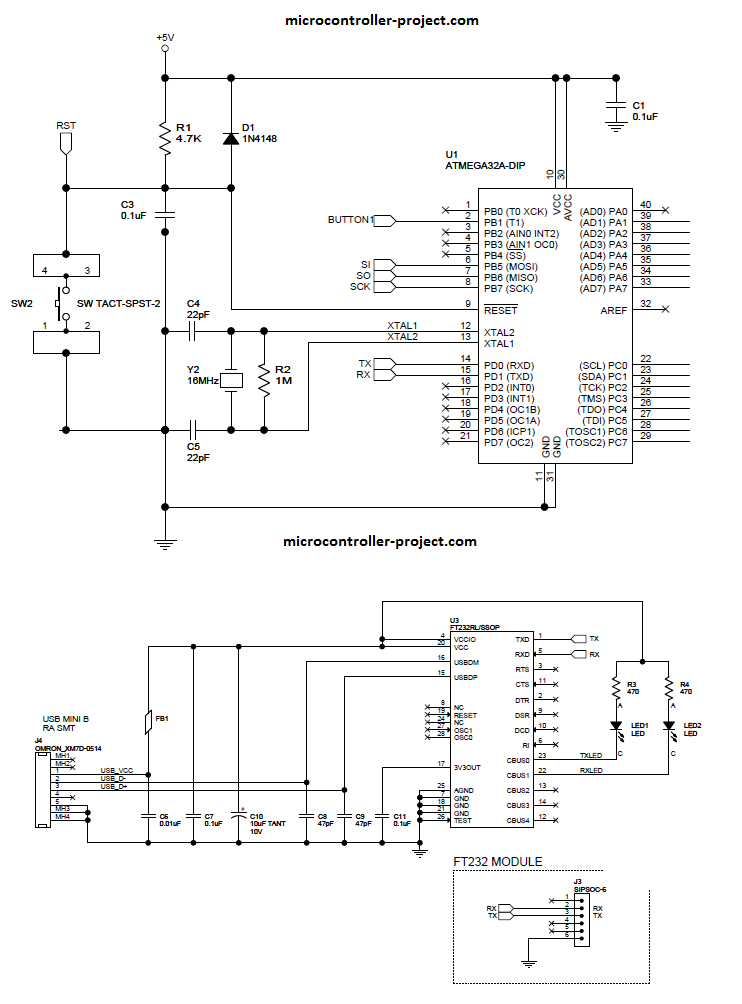
The code which i have written is tested by max232 uart to rs232 level converter. Atmega32 uart is connected to input of max232 and max232 output to DB-9 port of my old desktop computer. I used putty to check the serial communication and its works fine. I also tested the code with ft232 usb to uart driver on my laptop and it also gave me 100% result. The circuit diagram of both the circuits are given below.Atmega32A Microcontroller with Max232 and Arduino Ide
Atmega32A Microcontroller with ft232 USB to Uart and Arduino Ide
|
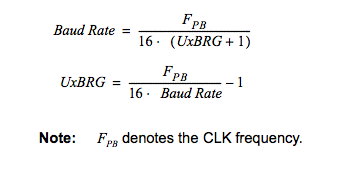
Important register in initializing Uart of Atmega32 is UBRR. Its a 16 bit register, divided in to two 8-bit registers UBRRL and UBRRH respectively. UBRR must be initialize the correct value to achieve the desired baud rate at uart port. The formula for calculating the value is given on right side. “Baud Rate” is the desired baud rate that we need. Fpb is the clock/crystal frequency on which the microcontroller is working. UxBRG is UBRR 16-bit register. After calculating the value, upload the higher 8-bits in UBRRH and lower 8-bits in UBRRL.
|
The uart pins of atmega32 are at pin#14 RXD and pin#15 TXD. In the code below i am sending my website name as output. At the receiving side we must receive “microcontroller-project.com”. The baud rate on which i send the data is 600. A status led is connected to pin#21 of the atmega32 microcontroller. It blinks every 1 second, shows if the system is working or not. USART_init() function is initializing the uart. Uart communication is taking place in asynchronous mode, baud rate 600bps, 8 data bits, 2 stop bits and with no parity. Be sure to set these settings correctly at the receiving side.
To upload the code to microcontroller i used and external programmer USBasp. Since their is no boot loader written for atmega32 so we can not program it directly from arduino ide. Please take the above “Atmega32 Programmed with Arduino Ide” if you are facing problems in uploading the code to atmega32 using arduino ide.
Note: At 9600 baud rate i am getting errors i could not figure out why. So I set the baud rate for serial communication to 600bps, its not a big speed. 4800 bps also worked for me.
Download the project “Atmega32a Programmed with Arduino IDE” .ino file/folder and give us your valuable feed back on the project. Your feed back helps us improving the post, any bug found in code or circuit will be highly appreciated. For more projects related to Uart and serial communication please search the site. Don’t forget to like our face book page.
More projects related to Serial Uart communication using different microcontrollers are listed below. Each project circuit diagram and source code is open source, you can modify code according to your needs.
Filed Under: Arduino, Microcontroller Projects


Questions related to this article?
👉Ask and discuss on EDAboard.com and Electro-Tech-Online.com forums.
Tell Us What You Think!!
You must be logged in to post a comment.