As the name suggests, this is a demonstration of one military application in which the system automatically launches a missile when any object is detected and it comes within the range. In the actual system, there is microwave RADAR that detects any object and immediately fires the missile to shoot the target.
Here in given system, it uses an ultrasonic sensor to detect any object. The sensor scans complete 360o circle by rotating continuously and when it detects any object that is within 2 feet (60 cm) range, it launches the missile. It is built using an AT89C51 microcontroller. It also uses LCD to display a different message as well as the distance of an object.

Fig. 1: Prototype of 8051 Microcontroller based Automatic Missile Launcher with UDM RADAR
Circuit description
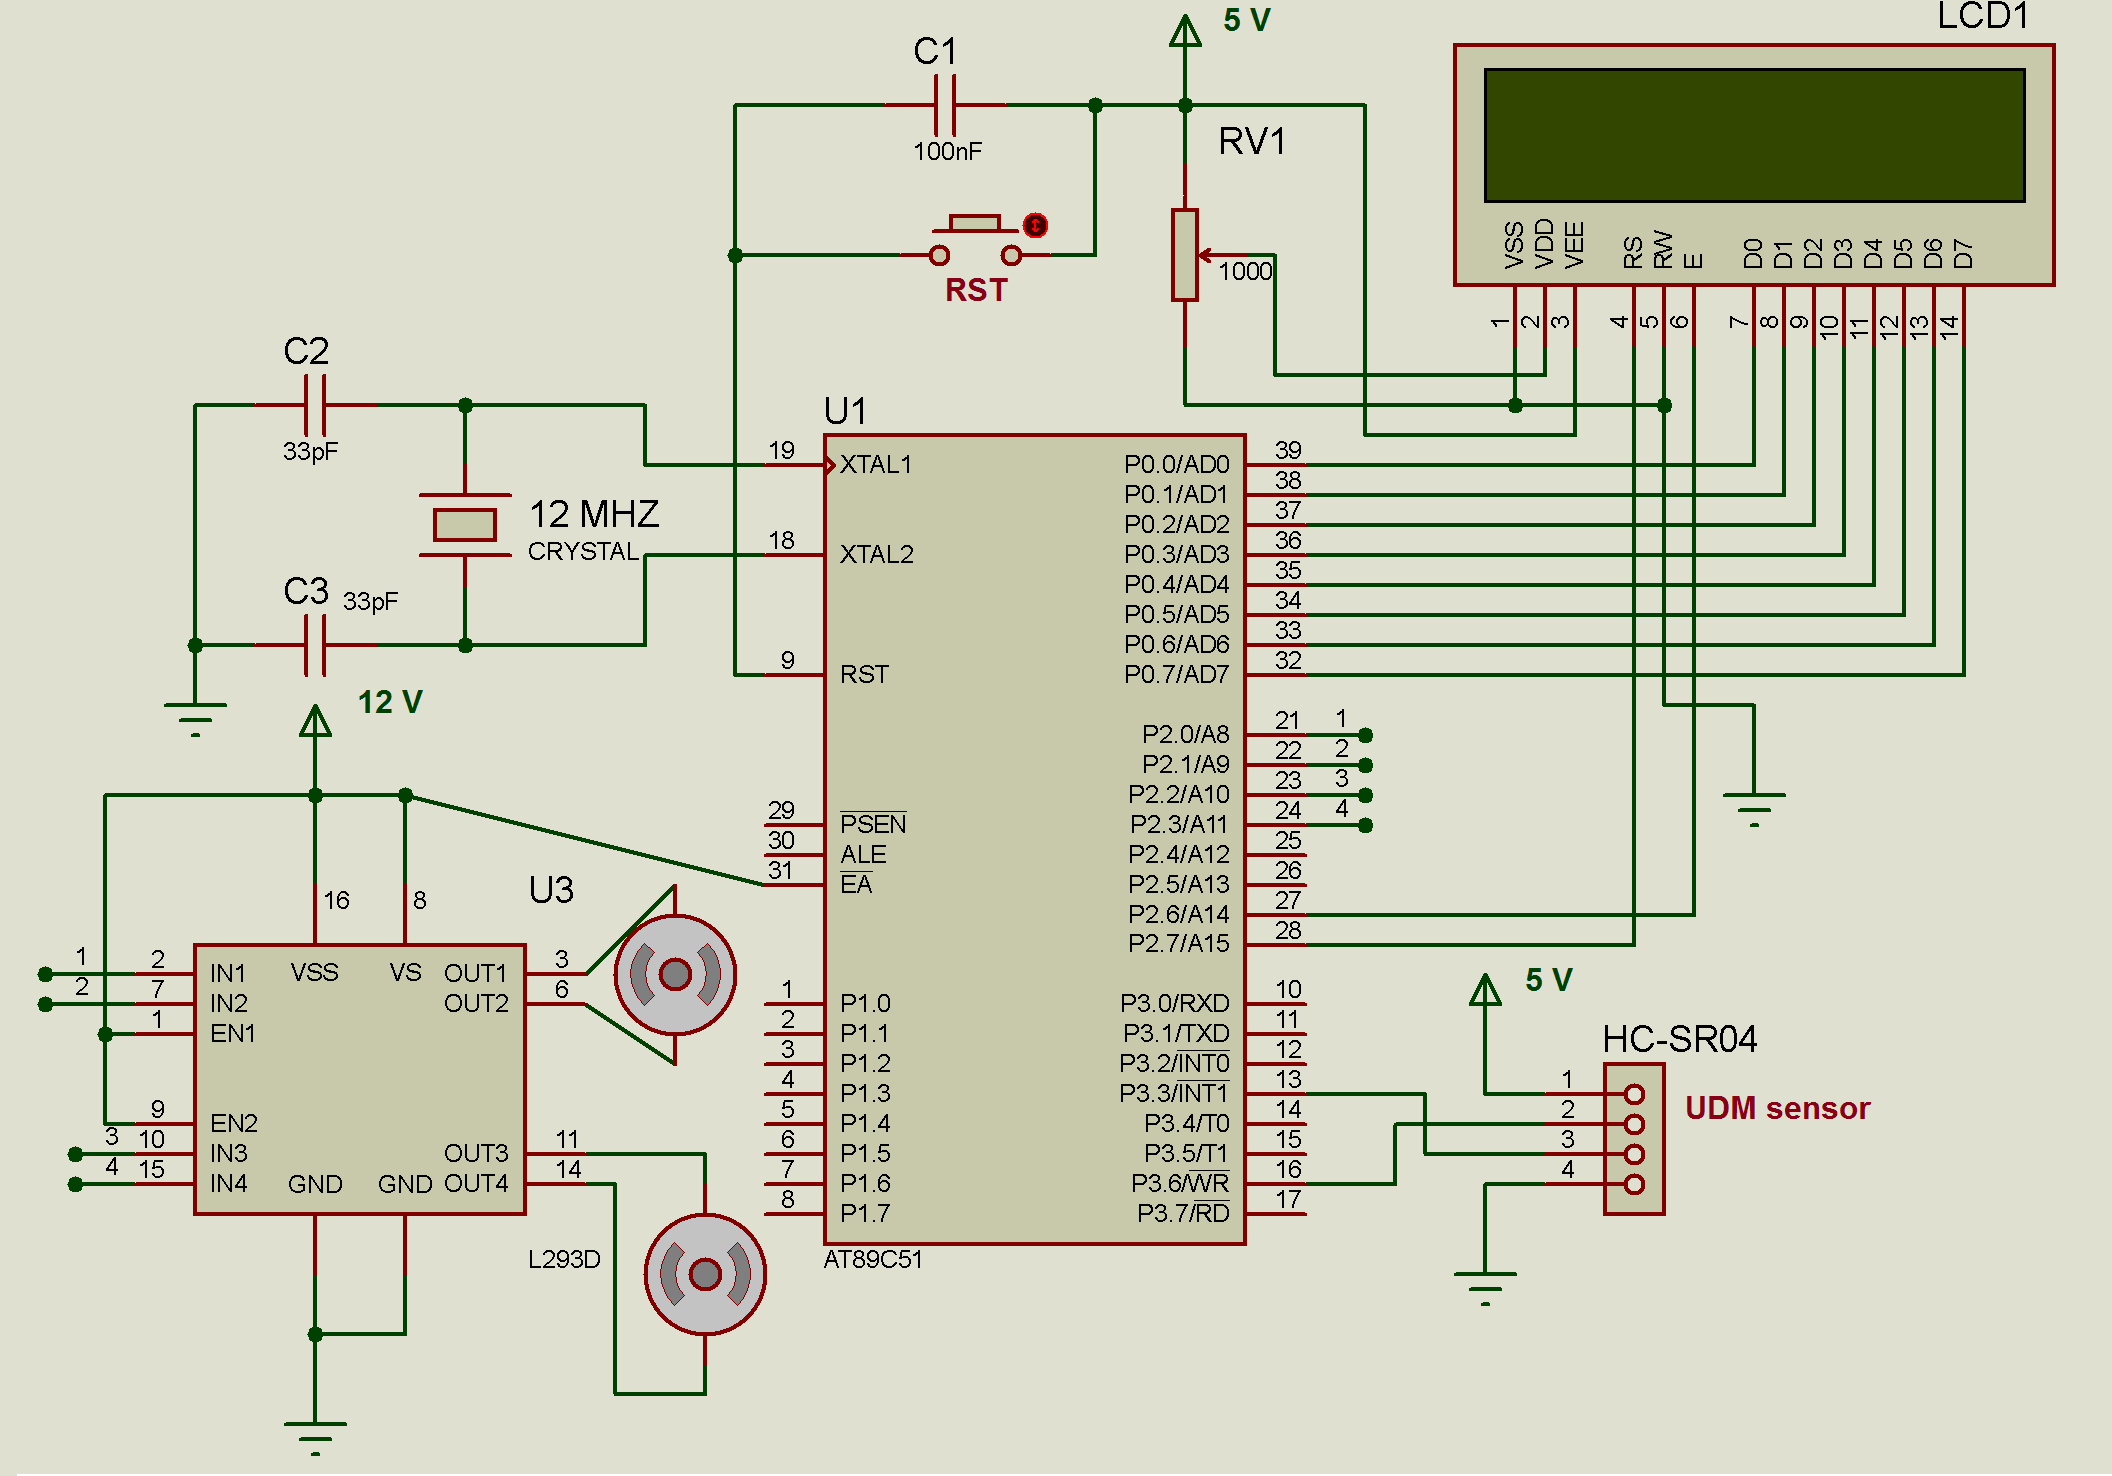
As shown in the figure the circuit is built with four major components microcontroller AT89C51, motor driver chip L293D, 16×2 LCD and ultrasonic sensor HC-SR04.
• HC-SR04 has 4 wire interface (1) Vcc (2) Gnd (3) Trigger input and (4) echo output. Vcc pin is given +5 V, Ground is connected with ground. Trigger input is connected with P3.6 pin and echo pin is connected to P3.4 pin
• Port P2 pins P2.0 to P2.3 pins drives two DC motors through L293D chip. All four inputs IN1 to IN4 of L293D are connected with P2.0 to P2.3 and outputs OUT1 to OUT4 are driving two motors as shown
• Data pins of LCD D0 – D7 are connected to port P0. Control pins Rs and En are connected to P2.6 and P2.7 respectively. RW pin is connected to ground to enable LCD write always
• A 1K pot is connected to VEE pin as shown to vary LCD contras
• A 12 MHz crystal is connected to crystal input pins along with two 33 pF capacitors
• One 100 nF capacitor is connected between Vcc and reset pin to provide power on reset and one push button is connected in parallel with capacitor to provide manual reset
Here are the snaps of the circuit and other arrangements.

Fig. 2: Image of 8051 Microcontroller based Automatic Missile Launcher with UDM RADAR

Fig. 3: Image showing main parts of 8051 Microcontroller based Automatic Missile Launcher with UDM RADAR
Circuit operation:
• When the circuit is given power the initial message displayed on LCD as automatic missile launcher
• Then the UDM sensor is continuously given 10 us trigger pulse input at a rate of 5 Hz. The sensor transmits ultrasonic sound burst of 40 KHz and tries to receive echo of transmitted burst
• The lower DC motor starts rotating clockwise and counterclockwise continuously. It rotates one revolution CW and one revolution CCW and thus UDM sensor mounted on DC motor scans complete 360o area in 6 sec
• When UDM sensor gets reflected echo from any object it gives echo signal to the microcontroller. The microcontroller calculates the distance of the object from the output pulse from sensor
• Then microcontroller checks the distance of the object and if it is less than 60 cm it displays object distance on LCD with message intruder detected. It stops rotating lower DC motor
• Immediately after this, the microcontroller rotates 2nd DC motor one revolution to trigger the missile. DC motor triggers the missile and missile is launched within 2 seconds. The message is displayed on LCD as- Missile Launched………
• Once again lower DC motor starts rotating CW-CCW to detect a new object and above process continues.
Project Source Code
###
//Program to#include<reg51.h> #include<intrins.h> #include <string.h> #define ON 0; #define OFF 1; sbit trig = P3^6; sbit echo_ip = P3^3; sbit object_det_led = P1^2; sbit rs = P2^7; sbit rw = P2^6; sbit en = P2^5; sbit motor_ip1 = P2^0; sbit motor_ip2 = P2^1; sbit missile_trig_motor_ip1 = P2^2; sbit missile_trig_motor_ip2 = P2^3; unsigned long echo_pulse_time,distance,trig_count=0,motor_rev_count=0,motor_rev=0; void delay_sec(unsigned int t) { unsigned int x,y; for(x=0;x<20*t;x++) for(y=0;y<10000;y++); } void delay_10us() { _nop_(); _nop_(); _nop_(); _nop_(); _nop_(); _nop_(); _nop_(); _nop_(); _nop_(); _nop_(); } void delay() { int i; for(i=0;i<2000;i++); } void writecmd(unsigned char a) { delay(); // check for LCD is busy or not rs = 0; // clear rs pin for command P0 = a; // send command character en = 1; // strob LCD en = 0; } void writedat(unsigned char b) { delay(); // check for LCD is busy or not rs = 1; // set rs pin for data P0 = b; // send data character en = 1; // strob LCD en = 0; } void writestr(char *s) { unsigned int l,z; l = strlen(s); for(z=0;z<l;z++) { writedat(*s); s++; } } void display_value(unsigned int time) { unsigned int tmp,tmp1,tmp2,tmp3,x; float t; unsigned char ASCII[3]; if(time>1000) { //ms_flag=1; t = time/1000; if(t<10.0) { tmp = t*10; tmp1 = tmp % 10; ASCII[2] = tmp1 + 48; tmp2 = tmp/10; ASCII[0] = tmp2 + 48; ASCII[1] = '.'; } else if((t>=10.0) && (t<100.0)) { tmp = t*1; tmp1 = tmp % 10; ASCII[2] = tmp1 + 48; tmp2 = tmp/10; ASCII[1] = tmp2 + 48; ASCII[0] = ' '; } else if(t>=100.0) { tmp = t*1; tmp1 = tmp % 10; ASCII[2] = tmp1 + 48; tmp = tmp/10; tmp2 = tmp % 10; ASCII[1] = tmp2 + 48; tmp3 = tmp/10; ASCII[0] = tmp3+48; } } else { //ms_flag=0; tmp1 = time % 10; ASCII[2] = tmp1 + 48; time = time/10; tmp2 = time % 10; ASCII[1] = tmp2 + 48; tmp3 = time/10; ASCII[0] = tmp3+48; } for(x=0;x<3;x++) writedat(ASCII[x]); } void timer0_ISR() interrupt 1 { trig_count++; motor_rev_count++; TH0 = 0x3C; TL0 = 0xAF; if(trig_count==4) { trig_count=0; //trig_led = ON; trig = 1; delay_10us(); trig = 0; } if(motor_rev_count==100) { motor_rev_count=0; motor_rev++; if((motor_rev%2)==1){motor_ip1=0;motor_ip2=1;} else {motor_ip1=1;motor_ip2=0;} } } unsigned long get_timer_value() { unsigned char t1,t2,t3,t4; unsigned long t; t1 = TL1 & 0x0F; t2 = TL1 & 0xF0; t2 = t2>>4; t3 = TH1 & 0x0F; t4 = TH1 & 0xF0; t4 = t4>>4; t = t4*16*16*16 + t3*16*16 + t2*16 + t1; return t; } void missile_trig() { missile_trig_motor_ip1=1; missile_trig_motor_ip2=0; delay_sec(6); missile_trig_motor_ip1=0; missile_trig_motor_ip2=0; writecmd(0x01); writestr("missile launched"); writecmd(0xC0); writestr("........"); delay_sec(2); } void main() { TMOD = 0x11; IE = 0x82; TH0 = 0x3C; TL0 = 0xAF; P0 = 0x00; P1=0x00; P1 = 0xFF; P2=0x00; trig = 0; echo_ip = 1; writecmd(0x3C); // initialize LCD writecmd(0x0E); writecmd(0x06); writecmd(0x01); writestr("AutomaticMissile"); writecmd(0xC4); writestr("Launcher"); delay_sec(3); motor_ip1 = 1; motor_ip2 = 0; trig = 1; delay_10us(); trig = 0; while(1) { TR0 = 1; TH1 = 0x00; TL1 = 0x00; while(echo_ip==0); TR1 = 1; while(echo_ip==1); TR1 = 0; echo_pulse_time = get_timer_value(); distance = echo_pulse_time/58; if(distance<=60) { object_det_led = ON; motor_ip1 = 0; motor_ip2 = 0; TR0 = 0; writecmd(0x01); writestr("IntruderDetected"); writecmd(0xC0); writestr("distance:"); display_value(distance); writestr(" cm"); missile_trig(); writecmd(0x01); writestr("AutomaticMissile"); writecmd(0xC4); writestr("Launcher"); if((motor_rev%2)==1){motor_ip1=0;motor_ip2=1;} else {motor_ip1=1;motor_ip2=0;} TR0 = 1; } } }###
Circuit Diagrams
Project Video
Filed Under: Electronic Projects
Filed Under: Electronic Projects

Questions related to this article?
👉Ask and discuss on EDAboard.com and Electro-Tech-Online.com forums.
Tell Us What You Think!!
You must be logged in to post a comment.