Requirements:
1. Bread Board
2. Arduino Uno with Atmega328p
3. LCD JHD162A
4. Push Button
5. 1k Resistor
6. Jumper Wires
Summary
Liquid Crystal Displays are important in projects where human interaction is involved. LCD JHD162A is a small display unit that can be used with atmega328p. It has 32 segments spread across 16 columns and 2 rows. Each segment is composed of 8 rows of 5 dots. Although this module is very versatile and handy, it’s very tricky to use. Arduino IDE has a library which contains important functions to get this module up and running. I wanted to build a library for Atmega328p which does almost similar functions as LiquidCrystal Library in Arduino IDE. Interfacing with LCD is a task in itself as one has to learn and understand the working of LCD in order to use it even for a simple project. This library doesn’t require any in-depth knowledge of LCD JHD162A and its working. Just include lcd.h in your source code and you are ready to go.
How I am uploading code into arduino:
f = <source_code’s_file_name>
h = <header_file_name>
avr-gcc -g -mmcu=atmega328p -Wall -Os $(h).c $(f).c -o $(f).elf
avr-objcopy -j .text -j .data -O ihex $(f).elf $(f).hex
sudo avrdude -F -V -c arduino -p m328p -P /dev/ttyUSB* -b 57600 -e -U flash:w:$(f).hex
Just type these four commands, in the same order, in your terminal and remember to put the source code’s filename in variable “f” and header filename in variable “h”. These commands are for Linux users only.
First command stores the filename in variable “f”, second command is used to convert source code to .elf file, third command is used to convert that .elf file to .hex file which can be uploaded on atmega328p, and fourth command is used to upload that .hex file.
Interfacing LCD JHD162A:
So, LCD JHD162A can be used in either 8-bit mode or in 4-bit mode. As we are using Atmega328p, I prefer not to waste precious input/output pins on LCD, so I’ll be using 4-bit mode to interface with LCD. Although interfacing in 4-bit mode comes with a cost of time. Same 8-bit data takes twice the time in 4-bit mode than in 8-bit mode but this difference in time is in milliseconds and most of our applications require more i/o pins over that millisecond difference.
Input can be classified into two types:
1) command: These are instructions given to LCD, to initialize and manipulate data.
2) data: As the name suggests, this can be anything which user wants to display
Both commands and data are of 8-bits, therefore, to complete a single transmission two 4-bit cycles are required.

Fig. 1: Image showing messages flashing on Character LCD Module from Arduino
To distinguish whether 1 byte of data is transmitted or 1 byte of command is being transmitted, one more input is used, i.e. Register Select bit. Whenever Register Select bit is set, transmitted 8-bits are interpreted as data and whenever Register Select bit is cleared (not set), transmitted 8-bits are interpreted as commands.
transmitted 8-bits are interpreted as commands.
Now, LCD is lot slower than our microcontroller, therefore, we need to check whether lcd is free and can take input from our microcontroller, for this Read/Write bit is used. Whenever R/W bit is set we can read LCD busy status on pin D7, if D7 is High then LCD is busy in processing some stuff and if D7 is low then LCD is ready to accept new instructions or data, we can clear R/W bit to initialize writing process.
<————————————————–OR——————————————>
As seen above, usage R/W pin is very complex, what we can do is instead of reading LCD’s status we can permanently clear R/W bit (ie, connect R/W pin to ground) and give substantial amount of delay in which any instruction can be processed. In this way we are again compromising in terms of time but complexity of our code decreases with huge factor, with respect to the extra time (generally it’s in microseconds).
Again most of our applications don’t even require this amount of precision in terms time.
We need to tell LCD whenever we want to transmit a command or data. This is done using enable bit. Whenever enable bit set, LCD is able to see the data present on data lines in our case data line is 4-bit wide.

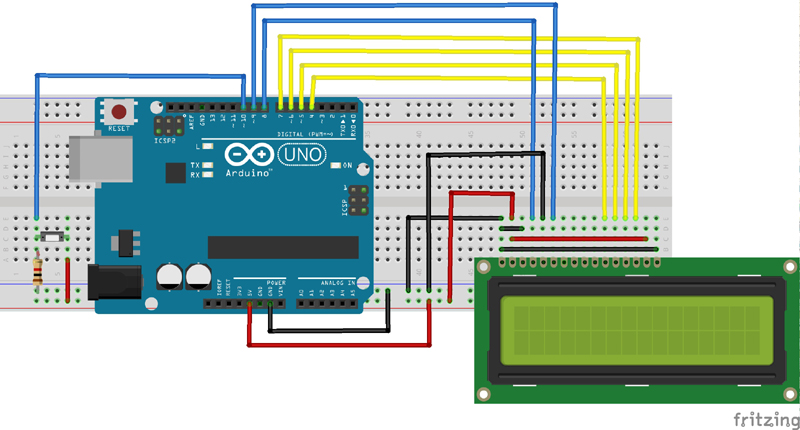
Fig. 2: Prototype of Arduino Uno and Character LCD interfacing
So, now sequence of transmitting a 4-bit Data* will be:
1) Put the information on the Data* line
2) Select whether it’s a command or data
3) Tell LCD Data* is ready to read (by setting enable bit)
4) Give sufficient amount of time to read
5) Clear enable bit
6) Give sufficient amount of time to process
* I have used Data* to represent data+command combined
For more information you can refer the Datasheet of JHD162A.
Explanation of Functions in this Library:
I tried to keep the library similar to LiquidCrystal library in Arduino IDE. I included some functions from my side too command(): Takes in an 8-bit command breaks it in chunks of 4-bit and transmit it to LCD. data(): Takes in an 8-bit data(generally ASCII characters) breaks it in chunks of 4-bit and transmits it to LCD. start(): It initializes the LCD with most suitable configuration
a) LCD in 5×8 and 4-bit mode
b) Display ON cursor OFF
c) Increment cursor by one after every byte of data
d) Don’t shift display after every byte of data
e) No auto scrolling
Send_A_String(): Takes a string that is to be displayed as an input, breaks it and then transmits each character using data().
NOTE:- maximum character in a string should be less than 16, after 16th character everything will be ignored.
cut(): Works same as Send_A_String(), except maximum number of character is 32. After 16th character, 17th character starts from second row.
Send_An_Integer(): Takes input an integer of long type, converts it into a string and then displays it on LCD. It uses Send_A_String() for displaying.
setCursor(): Indexing starts from 0. Therefore, 0<=row<=1 and 0<=column<=15. If arguments are outside the specified range, then function will not work and ignore the values.
clearScreen(): Clears the screen and returns cursor to (0,0) position.
home(): Returns cursor to (0,0) position.
10) cursor(): Shows cursor as an underscore.
11) noCursor(): Hides the cursor.
12) blink(): Shows cursor as a blinking black spot.
13) noBlink(): Hides the cursor.
14) display(): Turns ON the display with cursor OFF.
15) noDisplay(): Turns display OFF.
16) scrollDisplayLeft(): Scrolls the contents of the display(text and cursor) one space to the left.
17) scrollDisplayRight(): Scrolls the contents of the display(text and cursor) one space to the right.
18) autoscroll(): This causes each character output to the display to push previous characters over by one space in right to left direction.
19) noAutoscroll(): Turns off automatic scrolling of the LCD.
20) changeChar(): Takes input two arguments
a) 1st is a number between 0-7, which maps to seven base addresses
b) 2nd is an array of 8 integers, each integer is formed by 5 bits which determines the pixels in the row similar to the index of that integer.
NOTE:- Before printing the character, one must set cursor else cursor won’t get printed.
To print Created Character, one can use data() function. Just pass a number between 0-7 as an argument in data() function.
Example: To print value stored at zero
data(0); CORRECT
data(‘0’); INCORRECT
Getting started with this Library:
There are three files:
1) main.c contains the source code of your application(In this case this example).
2) lcd.c contains definition of all the functions that are included in the library
3) lcd.h contains prototype of the functions in lcd.c
For my source code to work, one needs to put all three files in same directory. You can modify it and put these three files anywhere you want.
Connections:
In this example I’ve added a push button as seen in circuit diagram; you can remove it and add anything depending on your application.
Project Source Code
###main.c/************** START **************/#define F_CPU 16000000UL#include<avr/io.h>#include<util/delay.h>#include<string.h>#include<stdlib.h>#include "lcd.h"//D4-D7 connected to D4-D7#define rs PB0 //pin8#define en PB1 //pin9/**** Decimal Values to Display Special Characters ****/unsigned int s1[]={10,21,17,17,17,10,4,0};unsigned int s2[]={0,10,0,4,4,17,10,4};unsigned int s3[]={0,10,0,4,4,0,14,17};unsigned int s4[]={1,3,5,9,9,11,27,24};unsigned int s5[]={0,17,10,17,4,0,14,17};unsigned int s6[]={0,10,0,4,4,0,31,0};unsigned int s7[]={10,0,4,0,14,17,17,14};unsigned int s8[]={0,10,0,31,17,14,0,0};/******************************************************/int main(){int i;DDRB = 0x03;DDRD = 0xF0;_delay_ms(200);start();while(1){clearScreen();Send_A_String("Send_A_String()");_delay_ms(100);//////while(!(PINB & (1<<PB2))){}clearScreen();cut("cut() is used to display this.");_delay_ms(100);//////while(!(PINB & (1<<PB2))){}clearScreen();cut("Send_An_Integer");setCursor(1,0);Send_An_Integer(sizeof(int));_delay_ms(100);//////while(!(PINB & (1<<PB2))){}clearScreen();setCursor(0,0);data('s');setCursor(1,1);data('e');setCursor(0,2);data('t');setCursor(1,3);data('C');setCursor(0,4);data('u');setCursor(1,5);data('r');setCursor(0,6);data('s');setCursor(1,7);data('o');setCursor(0,8);data('r');setCursor(1,9);data('(');setCursor(0,10);data(')');_delay_ms(100);//////while(!(PINB & (1<<PB2))){}clearScreen();cursor();Send_A_String("Cursor is ON");_delay_ms(100);//////while(!(PINB & (1<<PB2))){}noCursor();clearScreen();blink();Send_A_String("Blinking is ON");_delay_ms(100);//////while(!(PINB & (1<<PB2))){}noBlink();clearScreen();Send_A_String("Display will");setCursor(1,0);Send_A_String("Flicker 5 times");for(i=0;i<5;i++){_delay_ms(500);noDisplay();_delay_ms(500);display();}_delay_ms(100);//////while(!(PINB & (1<<PB2))){}clearScreen();setCursor(0,5);Send_A_String("Scroll");setCursor(1,6);Send_A_String("Left");_delay_ms(1000);scrollDisplayLeft();_delay_ms(1000);scrollDisplayLeft();_delay_ms(1000);scrollDisplayLeft();_delay_ms(1000);scrollDisplayLeft();_delay_ms(1000);while(!(PINB & (1<<PB2))){}clearScreen();setCursor(0,5);Send_A_String("Scroll");setCursor(1,5);Send_A_String("Right");_delay_ms(1000);scrollDisplayRight();_delay_ms(1000);scrollDisplayRight();_delay_ms(1000);scrollDisplayRight();_delay_ms(1000);scrollDisplayRight();_delay_ms(1000);while(!(PINB & (1<<PB2))){}clearScreen();autoscroll();char autos[]={'a','u','t','o','s','c','r','o','l','l','(',')',' ',' ',' '};setCursor(0,15);for(i=0;i<15;i++){data(autos[i]);_delay_ms(100);}noAutoscroll();_delay_ms(100);//////while(!(PINB & (1<<PB2))){}clearScreen();createChar(0,s1);setCursor(0,0);data(0);createChar(1,s2);setCursor(0,2);data(1);createChar(2,s3);setCursor(0,4);data(2);createChar(3,s4);setCursor(0,6);data(3);createChar(4,s5);setCursor(0,8);data(4);createChar(5,s6);setCursor(0,10);data(5);createChar(6,s7);setCursor(0,12);data(6);createChar(7,s8);setCursor(0,14);data(7);_delay_ms(100);//////while(!(PINB & (1<<PB2))){}}return 0;}/*********************************************************** END *******************************************************************/Lcd.c#define F_CPU 16000000UL#include<avr/io.h>#include<util/delay.h>#include<string.h>#include<stdlib.h>#include "lcd.h"//D4-D7 connected to D4-D7#define rs PB0 //pin8#define en PB1 //pin9int base_address[8]={64,72,80,88,96,104,112,120};void start(){DDRB = 0x03; // PB0 and PB1 declared as outputDDRD = 0xF0; // PD4,PD5,PD6,PD7 declared as outputcommand(0x28); // To initialize LCD in 2 lines, 5X8 dots and 4bit mode.command(0x0C); // Display ON cursor OFF. E for cursor ON and C for cursor OFFcommand(0x06); // Entry mode-increment cursor by 1command(0x01); // Clear screencommand(0x80); // Sets cursor to (0,0)}void command(char LcdCommand) // Basic function used in giving command{ // to LCDchar UpperHalf, LowerHalf;UpperHalf = LcdCommand & 0xF0; // upper 4 bits of commandPORTD &= 0x0F; // flushes upper half of PortD to 0, but retains lower half of PortDPORTD |= UpperHalf;PORTB &= ~(1<<rs);PORTB |= (1<<en);_delay_ms(10);PORTB &= ~(1<<en);_delay_ms(10);LowerHalf = ((LcdCommand<<4) & 0xF0); //lower 4 bits of commandPORTD &= 0x0F; // flushes upper half of PortD to 0, but retains lower half of PortDPORTD |= LowerHalf;PORTB &= ~(1<<rs);PORTB |= (1<<en);_delay_ms(10);PORTB &= ~(1<<en);_delay_ms(10);}void data(char AsciiChar) // Basic function used in giving data{ // to LCDchar UpperHalf, LowerHalf;UpperHalf = AsciiChar & 0xF0; // upper 4 bits of dataPORTD &= 0x0F; // flushes upper half of PortD to 0, but retains lower half of PortDPORTD |= UpperHalf;PORTB |= (1<<rs);PORTB |= (1<<en);_delay_ms(10);PORTB &= ~(1<<en);_delay_us(400);LowerHalf = ((AsciiChar<<4) & 0xF0); //lower 4 bits of dataPORTD &= 0x0F; // flushes upper half of PortD to 0, but retains lower half of PortDPORTD |= LowerHalf;PORTB |= (1<<rs);PORTB |= (1<<en);_delay_ms(10);PORTB &= ~(1<<en);_delay_us(400);}void Send_A_String(char *StringOfCharacters) // Takes input a string and displays it{ // max character in a string should bewhile(*StringOfCharacters > 0) // less than 16, after 16th character{ // everything will be ignored.data(*StringOfCharacters++);}}void cut(char *str) // It's a souped up version of Send_A_String{ // It takes a string, if number of charactersint i=0; // is greater than 16, it moves the cursor toif(strlen(str)<16) // next line and starts printing there{Send_A_String(str);} //// It has its own limitations, maximum numberelse // of character is 32, after 32nd character{ // it'll ignore the rest.while(i<16){data(str[i]);i=i+1;}command(0xC0);while(str[i]!='�' && i<32){data(str[i]);i=i+1;}}}void Send_An_Integer(int x) // Takes an integer as input and displays it{ // value of integer should be in betweenchar buffer[8]; // the range of "int",itoa(x,buffer,10); // else it'll print garbage values.Send_A_String(buffer); // It use Send_A_String() for displaying.}void setCursor(int row,int column) // Indexing starts from 0.{ // Therefore,switch(row) // 0<=row<=1 and 0<=column<=15.{ //case 0: // If arguments are outside theswitch(column) // the specified range, then function{ // will not work and ignore the valuescase 0:command(0x80);break;case 1:command(0x81);break;case 2:command(0x82);break;case 3:command(0x83);break;case 4:command(0x84);break;case 5:command(0x85);break;case 6:command(0x86);break;case 7:command(0x87);break;case 8:command(0x88);break;case 9:command(0x89);break;case 10:command(0x8A);break;case 11:command(0x8B);break;case 12:command(0x8C);break;case 13:command(0x8D);break;case 14:command(0x8E);break;case 15:command(0x8F);break;default:break;}break;case 1:switch(column){case 0:command(0xC0);break;case 1:command(0xC1);break;case 2:command(0xC2);break;case 3:command(0xC3);break;case 4:command(0xC4);break;case 5:command(0xC5);break;case 6:command(0xC6);break;case 7:command(0xC7);break;case 8:command(0xC8);break;case 9:command(0xC9);break;case 10:command(0xCA);break;case 11:command(0xCB);break;case 12:command(0xCC);break;case 13:command(0xCD);break;case 14:command(0xCE);break;case 15:command(0xCF);break;default:break;}break;default:break;}}void clearScreen() // Clears the screen and{ // returns cursor to (0,0) positioncommand(0x01);}void home() // Returns cursor to (0,0) position{command(0x02);}void cursor() // Shows cursor as an underscore{command(0x0E);}void noCursor() // Hides the cursor{command(0x0C);}void blink() // Shows cursor as a blinking black spot{command(0x0F);}void noBlink() // Hides the cursor{command(0x0C);}void display() // Display ON with Cursor OFF{command(0x0C);}void noDisplay() // Display OFF{command(0x08);}void scrollDisplayLeft() // Scrolls the contents of the{ // display(text and cursor) one space to the leftcommand(0x18);}void scrollDisplayRight() // Scrolls the contents of the{ // display(text and cursor) one space to the rightcommand(0x1C);}void autoscroll() // This causes each character output to the display to push previous{ // characters over by one space in right to left directioncommand(0x07);}void noAutoscroll() // Turns off automatic scrolling of the LCD.{command(0x06);}void createChar(int num,unsigned int *charArray)// Takes input two arguments{ // 1st is a number between 0-7,int i=0; // which maps to eight base addresscommand(base_address[num]); // 2nd is an array of 8 integers,while(i<8) // each integer is formed by 5 bits{ // which determine the pixels in thedata(charArray[i]); // row same as the index of that integeri++; //} // Before printing the character, one must} // set cursor else cursor won't get printed.// To print Created Character, one can use data() function.// Just pass a number between 0-7 as an argument in data() function.//// Example: To print value stored at zero// data(0); CORRECT// data('0'); INCORRECTLcd.hvoid start();void command(char);void data(char);void Send_A_String(char *StringOfCharacters);void cut(char *str);void Send_An_Integer(int x);void setCursor(int row,int column);void clearScreen();void home();void cursor();void noCursor();void blink();void noBlink();void display();void noDisplay();void scrollDisplayLeft();void scrollDisplayRight();void autoscroll();void noAutoscroll();void createChar(int num,unsigned int *charArray);/************** END **************/###
Circuit Diagrams
Project Video
Filed Under: Electronic Projects
Filed Under: Electronic Projects

Questions related to this article?
👉Ask and discuss on Electro-Tech-Online.com and EDAboard.com forums.
Tell Us What You Think!!
You must be logged in to post a comment.