In this project, we will be creating a single control center for all of our IoT devices. We will control all of our IoT devices with just one single tool and get the status of all of them live on a single screen.
We can implement these types of control centers for most of the protocol. In this article, we will be using MQTT to control and monitor.
Tools Required/ libraries required
Python 2.7
Python library for MQTT – paho
Technical Insights
Basically, we will be working with MQTT protocol and python methods to create our dashboard.
In this project, we will create a control system to control our IoT devices using python and MQTT. Setting up IoT devices can be easy if they are set up in a controlled manner. All the devices need a controlling station.
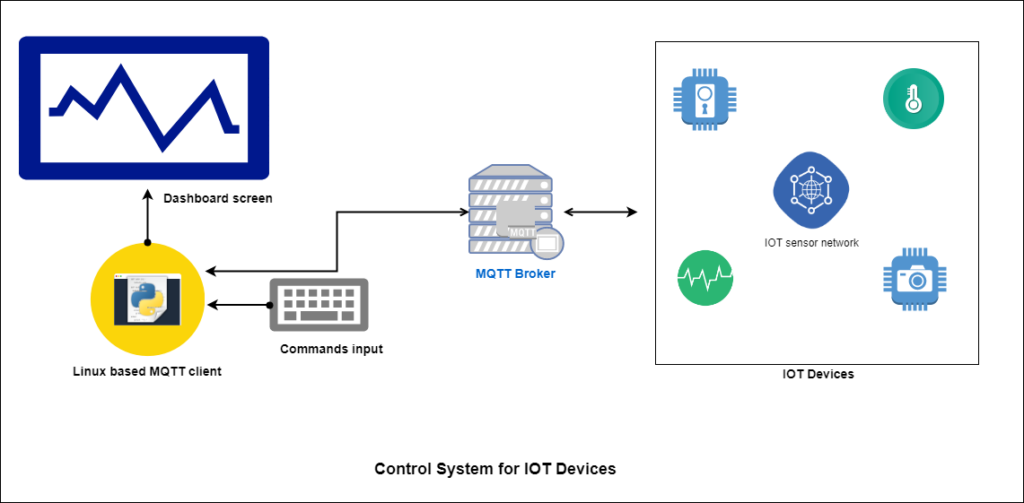
Block Diagram
All the sensors and IoT devices are connected to a broker, “broker.hivemq.com” on different and unique topics of their own.
The IoT dashboard is also connected to the same broker, but it is subscribed to all the topics on which the devices are subscribed.
How the system works
- All the devices are subscribed to some topics. We make entries of those devices in a python file “devices.py”.
- From that file, our main code imports the names and topics of the devices.
- Then it subscribes our script to receive messages to those topics
- Now we add callbacks for each topic with their names; it must be done manually, then the method also needs to be made.
- After adding callbacks and writing the function definitions (fn_callbacks.py), we send data from each device to the display function, which shows the data to the screen.
- Executing the dashboard script “py” also launches a script for sending the commands to the devices called “Command_control.py” by using this script, we can send data to those devices.
- The controlling script gives us full access to those devices, and it also imports the device information from the file “py”.
- So, we can select the device with their ID number and interact with them on the screen.
Understanding the source code:
To understand the python code, we must first understand how MQTT is implemented in python for receiving and publishing the data from and to the broker.
- MQTT Implementation
- Creating Devices entries
- Creating multiple subscriptions
- Displaying the data
- Sending the data to devices
- Saving data to database
MQTT Implementation
First of all, we will import libraries that are necessary for MQTT communication.
import paho.mqtt.client as mqtt
import paho.mqtt.publish as publish
now we will declare a variable named client with mqtt client entity.
client = mqtt.Client()
We will connect to the MQTT broker on a port and start the client inside a nonblocking loop
client.connect(“broker.hivemq.com”, 1883, 60)
The MQTT connects the broker, and for receiving, it gives us a way in which we can add one callback function for one receiving topic.
client.on_message = on_message
client.message_callback_add(“topic”,method_name)
Also, if we want to send a message to any client, we can do that by calling the publish method anywhere in the code.
publish.single(topic_pub, command, hostname=broker)
So, this was about MQTT and the features we will be using in this code.
Now let’s learn about adding device entries to the dashboard and subscribe to topics dynamically.
Creating Devices entries
First of all, we will create a file named devices.py and declare our devices as variables and, then make a List of those variables.
device_1 = “Device_1”
device_2 = “Device_2”
devices_names = [device_1,device_2]
This is the only way we can easily add device names in the code. They must be added before we run the code.
Creating multiple subscriptions
Subscription can be done at any time in the process, but we do it inside the method we reach just after the connection is made.
There we run a loop until the devices are present
for topic in devices_names:
client.subscribe(topic)
After we have subscribed to each device’s topic, we need to add a callback function for each device to receive data for each device.
client.message_callback_add(devices_names[0],Device_1)
client.message_callback_add(devices_names[1],Device_2)
Each functions’ definition is added in a file named “py”, Which is listening for three types of messages.
- Messages containing “debug:” string at the starting of message: This is for devices debug messages.
- Messages containing “sensor” string at the starting point: This is if a device’s sensor is sending some data.
- The third type of message is just a ON or OFF message which tells that if the device is ONLINE or OFFLINE.
Now we at this point, we have enabled our script to listen for messages for each device. Now let’s see how we will show this bulk data in an arranged way on the screen.
Displaying the data
To display the data on the screen, we create a dynamic function which takes the device id and the device data variable, which holds the data about each device.
The above print statement in python always prints the data to the places which are defined.
We call this function in our main while loop to display information about each device.
for i in devices_names:
global device_number
status(i,device_number)
Rest is self-explained in the code.
After that, we start receiving the data from the sensor we now need to send the data to them.
Sending the data to devices
To send the data to devices, we create a separate file that runs with the dashboard.py. The file is “command_control.py”
In this file, we continuously ask the user to select a device and then send the command to that device in a while loop.
send_command(input_cmd,devices_names[i-1])
Now we can also keep records of what is the command we have sent.
Saving data to database
We have created a function which takes data string and save them one by one to a file named database.txt
After we send the command, we make a string which stores the command with the data sent to it, and it is shown in the command.
So this way, we learned how to create a dashboard for our IoT devices using python. We can also use any other protocol in it.
You may also like:
Filed Under: Applications, Electronic Projects, Featured, IoT applications


Questions related to this article?
👉Ask and discuss on Electro-Tech-Online.com and EDAboard.com forums.
Tell Us What You Think!!
You must be logged in to post a comment.