The microphone is a device which is used to capture sound signals and forms an essential part of most of the electronic gadgets. The microphone converts the sound signals in the environment to their corresponding electrical signals. These electrical signals are actually very small in amplitude and they need to be amplified several hundred times before it could be reproduced through a loudspeaker. Hence in between a normal microphone and a normal loudspeaker there comes a multi-staged amplifier section which amplifies both the voltage and power of the weak audio signals generated at a microphone.
This article discusses about a simple circuit that can reproduce the sound signals captured through a microphone on a loudspeaker. This circuit is made with the help of two stage transistor amplifier and a op-amp based loudspeaker driver amplifier. To demonstrate its working, music is played in a mobile phone which is kept near the microphone and the same music with more loudness is generated at the loudspeaker connected to the circuit.
DESCRIPTION:
The microphone is connected to a circuit which helps to couple out the audio signals generated at the microphone so that it can be used for amplification. The microphone coupling circuit is followed by two stages of transistor based amplifier and in between the amplifier there is a volume controller included. The amplified signals may not have enough power to operate the loudspeaker and hence the voltage amplified signals need to be current amplified also. It is done with the help of an op-amp based amplifier circuit with only increases the current sourcing capability of the audio signals.
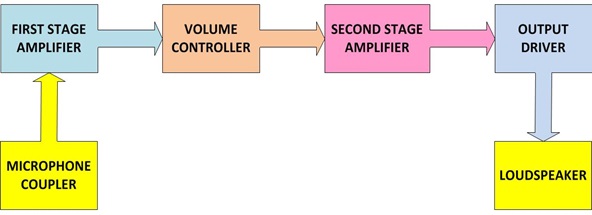
Fig. 1: Block Diagram of Circuit Reproduction of Sound Signals captured through Microphone on Loudspeaker
MICROPHONE COUPLER
The microphone coupler is a circuit which helps to couple out the weak audio signals generated at the microphone. There are different kinds of microphones which have different working principle, but all of them have a diaphragm which vibrates according to the sound signals. As the diaphragm vibrates the current flowing through the microphone varies according to the sound signals amplitude which made the diaphragm to vibrate. Here in this circuit a condenser microphone is used which and the varying current is made to flow through a resistor across which the equivalent voltage get generated due to the current flow. This voltage across the resistor will be having a DC voltage on to which the varying voltage gets added up. This varying voltage is separated out from the DC voltage with the help of a coupling capacitor and fed to the following amplifier circuits.
With a condenser microphone a 10K resistor and a 0.1uF coupling capacitor is used in most of the circuits.
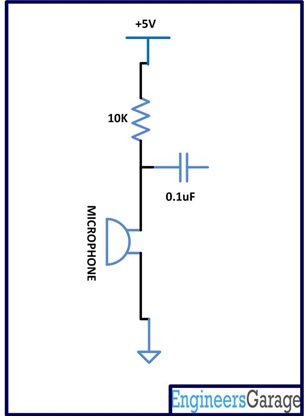
Fig. 2: Circuit Diagram of Microphone Couple
FIRST STAGE AMPLIFIER
Here a single transistor based amplifier circuit is used as the first stage amplifier for the audio signals coupled out from the microphone. This circuit is designed to have extremely high gain so that the audio signals are get amplified enough. The transistor is connected in a common emitter configuration and fixed bias technique is used for biasing the transistor.
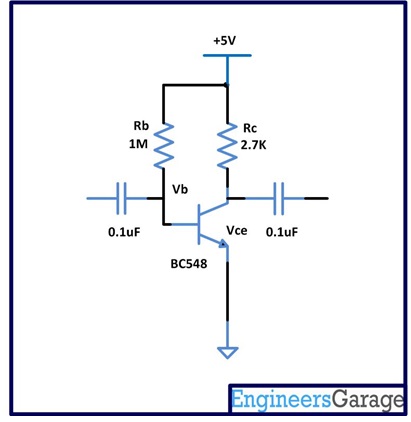
Fig. 3: Circuit Diagram of First Stage Amplifier
As the value of the Rc increases the gain of the circuit increases and it should be taken care of that when there is no input signals present the amplifier must be in its quiescent state, means in case of a transistor based circuit the output voltage without any input signal should be exactly the half of the total supply voltage.
Here a 2.2K ohm resistor is selected, which will allow to flow more than one mille ampere current through the transistor and the resistor itself in series with it, creating around 2.8 volts across Vce.
Vce = 5 – (2200 * 1mA) = 2.8 V; (almost quiescent voltage)
Since the expected output current Ic is fixed at 1mA, the input current at quiescent state that will produce that output current can be calculated with the help of the relation of the hfe of a transistor with the input and the output currents. The hfe is generally called the current gain and is given by the equation
hfe = Ic / Ib; where Ic is the output collector current and the Ib is the input base current
The hfe of the transistor BC548 has a maximum value of 300, and applying the values of Ic and hfe on to the above equation the Ib can be calculated around 4uA.
The voltage Vb across base resistor Rb will be the supply voltage minus 0.7 volts for a silicon transistor at quiescent state. Here since the supply voltage is 5V, the Vb can be calculated as 4.3 V. Now since the voltage Vb across the resistor and the current Ib flowing through the resistor is known, the required value of the resistor can be calculated using the ohms law;
Rb = 4.3 V / 4.3 uA = 1M
A 0.1uF capacitor is commonly used to couple the audio signals in between the amplifier stages.
VOLUME CONTROLLER
The volume controller used here in between the transistor stages is a simple potentiometer which will attenuates the output of the first stage amplifier before it is fed to the second stage amplifier. This volume controller circuit helps to keep the amplitude of the signal within the input range of the second stage amplifier circuit.
A 1K variable resistor is used as the volume controller in this circuit in which the output from the first stage amplifier is connected to one of the terminals and the input to the second stage is coupled out from the variable pin through a capacitor and the third pin is grounded.
SECOND STAGE AMPLIFIER
The second stage amplifier is exactly similar in design with the first stage amplifier. This amplifier simply amplifies the signal more and at the output of this stage one can obtain a good enough voltage amplified signal which is ready to be current amplified by the following current amplifier circuit.

Fig. 4: Circuit Diagram of Second Stage Amplifier

Fig. 5: Circuit of Sound Signals on Breadboard
Output Driver and Loudspeaker
OUTPUT DRIVER
The output driver is basically a current amplifier which keeps the voltage same but increases the current sourcing capability of the output signal. The output signals require very good current sourcing capability especially when the loudspeaker which is a current consuming element is used at the output. Here a common 741 op-amp is wired as a unity gain amplifier which is good enough to source enough current for the loudspeaker.

Fig. 6: Circuit Diagram of Output Driver

Fig. 7: Circuit Setup on Breadboard
LOUDSPEAKER
The loudspeaker used here is a very common 8 ohm loudspeaker which can operate with a maximum power of 0.5W.
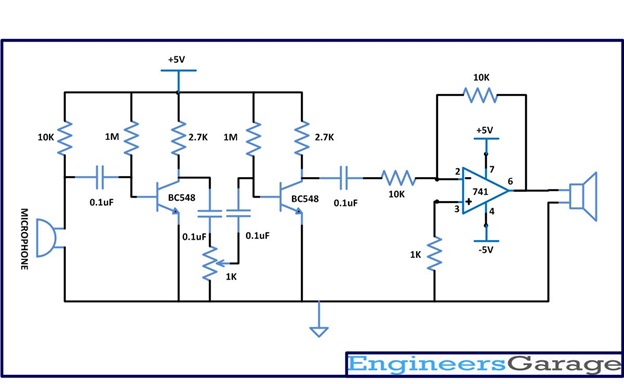
Fig. 8: Circuit Diagram for Reproduction of Sound Signals captured through Microphone on Loudspeaker

Fig. 9: Complete Circuit Design of Sound Signals Captured Through Microphone With Loudspeaker on Breadboard
You may also like:
Filed Under: Circuit Design



Questions related to this article?
👉Ask and discuss on Electro-Tech-Online.com and EDAboard.com forums.
Tell Us What You Think!!
You must be logged in to post a comment.