Engineers Garage

  • Projects and Tutorials
    • Circuit Design
    • Electronic Projects
      • 8051
      • Arduino
      • ARM
      • AVR
      • PIC
      • Raspberry pi
      • STM32
    • Tutorials
    • Components
  • Articles
    • Tech Articles
    • Insight
    • Invention Stories
    • How to
    • What Is
  • News
    • EE Design News
    • DIY Reviews
    • Guest Post
    • Sponsored Content
  • Forums
    • EDABoard.com
    • Electro-Tech-Online
    • EG Forum Archive
  • Digi-Key Store
    • Cables, Wires
    • Connectors, Interconnect
    • Discrete
    • Electromechanical
    • Embedded Computers
    • Enclosures, Hardware, Office
    • Integrated Circuits (ICs)
    • Isolators
    • LED/Optoelectronics
    • Passive
    • Power, Circuit Protection
    • Programmers
    • RF, Wireless
    • Semiconductors
    • Sensors, Transducers
    • Test Products
    • Tools
  • EE Resources
    • DesignFast
    • LEAP Awards
    • Oscilloscope Product Finder
    • Video
    • White Papers
    • Webinars
  • EE Learning Center
  • Women in Engineering

Electronic Smog detection using CD4017 IC

March 1, 2021 By Ashutosh Bhatt


Electrons are invisible to human eye then how can we see the electronic smog existing in our home. Is there any method to see them? Impossible, the only method is to capture the energy from it to activate a circuit for giving a visual indication. When you sit in front of a computer or television, you are being bombarded by harmful waves quietly emanating from it. Even if you turn off the device, your biomagnetic field is still bombarded 24 hours a day, 7 days a week by the EM radiations from power cables, electric and electronic instruments etc. These radiations of different frequencies exist in our environment as ‘Electronic Smog’. Extremely low frequencies waves (ELF) exist wherever electricity flows and radiate it from every electrical item in your environment. Let us try this circuit to give a visual indication of the electronic smog.

Fig. 1: Representational image of an Electronic Smog 
The input section of the circuit is the popular decade counter IC CD4017.It is the 5 stage divide by 10 Johnson decade counter with 10 decoded outputs. The counter advances on the positive edge of the clock signal in its input pin 14 when the clock enable pin 13 is at logic 0. The input of CD4017 is ultra sensitive and readily accepts the RF energy from the atmosphere. Thealternating electromagnetic field near the electric appliances acts as repeating pulses for the input of the IC. By receiving these pulses, IC1 gives high outputs. Out of the 10 outputs of IC1, only 3 outputs are used. These are connected to 3 diodes to give continuous input to IC2.Output 5 is shorted with the reset pin 15 so that when this output becomes high, IC resets and repeats the cycle. Capacitor C1 provides buffering action to the input of IC2. 

Electronic Smog Detector Circuit

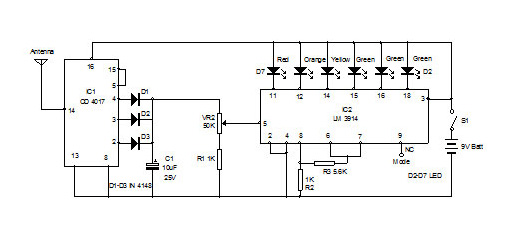
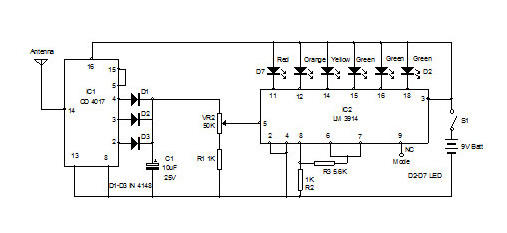
Fig. 2: Image showing Electrosmog Meter Circuit

Output from IC1 passes through VR2 to the input of IC2 LM 3914 which is a 10 output display driver. Only 6 outputs are used to drive LEDs as a meter.IC1 sinks currentand lights the LEDs one by one when the input receives an increment of 125 milli volts. Pin 18 sinks current first and pin10 last. LEDs do not require current limiting resistors since the LED current is programmed by the resistor connected to pin7 and pin8.Pin 9 is not connected to get a dot mode display. If it is connected to positive rail, bar mode display is obtained.
How to set?
After assembling power the circuit with 9 volt PP3 battery. One or more LED will light up.   Take the circuit close to the CRT based computer monitors or TV. LEDs will run very fast. Adjust VR2 till D7 lights. Move away the circuit and see LEDs D7 to D2 lights one by one in the descending order. That is, if the intensity of radiation is very high the Red LED turns on and if it is very low only D2 lights. In this manner you can check the intensity of radiation and it’s radiating distance from these devices.
Check it near TV, Computer, Induction heater, Mains box, UPS, Inverter etc and assess the level of Electronic smog.
 

EMF

Fig. 3: Image showing Electromotive Force
More about LM3914
LM 3914 IC is used in display circuits to drive either individual LED or Matrix LED. These are mainly used in circuits where precision output display is needed. Its each output becomes low one by one with the increment of 125 milli volts in the input.
1.      LM 3914 Internal resistors have equal value. Produce linear response. Used as volt meter.
2.      These ICs have 10 outputs each capable of sinking current to light LEDs brightly.
3.     Up to 4 LEDs can be connected to each output serially if the supply voltage is more than 9 volts.
4.       LED does not require a series resistor since the IC can regulate output current according to the value of the Programme resistor in the pins 6 and 7.
5.      To reduce signal to the input, a variable resistor is needed. Otherwise all LEDs will light (in bar mode) or turn off (in dot mode).
6.      If the input is not connected to the 0 rail through a preset or resistor, Last LED at pin10 will lock on.
7.      Supply voltage It can be as low as 3 volts. It must be at least 1.5 volts more than the reference voltage applied to the “high end” (pin6) of the resistor chain. Standby current is around 3 mA with 5V supply when all LEDs are off.
8.      Reference Voltage Pin 7 and 8
Reference voltage of 125 milli volts is brought out from the IC at pin 7 and 8. The reference voltage at pin7 can be increased up to 12 volts by connecting the reference adjust pin 8 to 0 rail through a resistor .This gives the advantage of setting the sensitivity of IC over wider limits.
9.      Fixing LED current -LED current is programmed by the resistor connected to pin7 and pin8. In LM 3914, total resistance of the internal resistor chain is 10K. So the LED current can be calculated as
LED current =10(1.25V / R + 1.25v / 10K) Where R is the value of programming resistor at pin7, 8 and ground. With 1.2K programming resistor, individual LED current will be10 (1.25/1200+1.25/10,000) = 0.0116 Amps or 11.6 milli Amps.
10. To get more brightness to LED, value of the programming resistor should be below 1K to increase current. If the value of the programming resistor is 560 ohms, the current through the LED is 23.5 milli ampere which gives sufficient brightness. Current should be between 20 to 30 milli ampere.
11. DOT Mode and BAR Mode
If the pin 9 of IC is left free, it shows DOT mode display ( if one LED lights, the previous one turns off ) and if pin 9 is connected to positive supply, it shows BAR mode ( All LEDs remain lit) display.


Circuit Diagrams

electronic-smog-detector_0

Related Articles Read More >

Siren Generator using UM 3561
0-2000V Digital Panel Meter using L7107
Automatic Inverter Battery Charger with Cut Off
Circuit Design: FM Demodulation

HAVE A QUESTION?

Have a technical question about an article or other engineering questions? Check out our engineering forums EDABoard.com and Electro-Tech-Online.com where you can get those questions asked and answered by your peers!


Featured Tutorials

  • Introduction to Wireless Modules
  • ADC with NRF24LE1 (Part 2/14)
  • Interrupts with NRF24LE1 (Part 3/14)
  • Power Failure Indicator in NRF24LE1 (Part 4/14)
  • Using EEPROM of NRF24LE1 (Part 5/14)
  • PWM with NRF24LE1 (Part 6/14)

Stay Up To Date

Newsletter Signup

EE Training Center Classrooms

“ee

“ee

“ee

“ee

“ee

Recent Articles

  • What are Application Specific ICs?
  • Introduction to LUFA
  • What are the different types of integrated circuits?
  • Introduction to Wireless Modules
  • ADC with NRF24LE1 (Part 2/14)

RSS EDABOARD.com Discussions

  • Inductive Current , High Current Track
  • Mains voltage range in India?
  • Thyristor choice?
  • Inspecting split AC control board not running the fan
  • Trying to repair an RF generator

RSS Electro-Tech-Online.com Discussions

  • Tesla coil progress
  • Two switch forward topology WEIRD waveform and efficiency issue
  • EasyEDA Discovery / Tip
  • Ideas for a homemade tv set?
  • How to breadboard with WSON devices.
Engineers Garage
  • Analog IC TIps
  • Connector Tips
  • DesignFast
  • EDABoard Forums
  • EE World Online
  • Electro-Tech-Online Forums
  • Microcontroller Tips
  • Power Electronic Tips
  • Sensor Tips
  • Test and Measurement Tips
  • 5G Technology World
  • About Us
  • Contact Us
  • Advertise

Copyright © 2021 WTWH Media LLC. All Rights Reserved. The material on this site may not be reproduced, distributed, transmitted, cached or otherwise used, except with the prior written permission of WTWH Media
Privacy Policy | Advertising | About Us

Search Engineers Garage

  • Projects and Tutorials
    • Circuit Design
    • Electronic Projects
      • 8051
      • Arduino
      • ARM
      • AVR
      • PIC
      • Raspberry pi
      • STM32
    • Tutorials
    • Components
  • Articles
    • Tech Articles
    • Insight
    • Invention Stories
    • How to
    • What Is
  • News
    • EE Design News
    • DIY Reviews
    • Guest Post
    • Sponsored Content
  • Forums
    • EDABoard.com
    • Electro-Tech-Online
    • EG Forum Archive
  • Digi-Key Store
    • Cables, Wires
    • Connectors, Interconnect
    • Discrete
    • Electromechanical
    • Embedded Computers
    • Enclosures, Hardware, Office
    • Integrated Circuits (ICs)
    • Isolators
    • LED/Optoelectronics
    • Passive
    • Power, Circuit Protection
    • Programmers
    • RF, Wireless
    • Semiconductors
    • Sensors, Transducers
    • Test Products
    • Tools
  • EE Resources
    • DesignFast
    • LEAP Awards
    • Oscilloscope Product Finder
    • Video
    • White Papers
    • Webinars
  • EE Learning Center
  • Women in Engineering