In the previous tutorial, installation and configuration of RSMB Broker for MQTT-SN protocol implementation was discussed. In this tutorial, two devices will be setup to communicate over MQTT-SN protocol using RSMB Broker. One of these devices will be configured as MQTT-SN Client and other as the MQTT-SN Server.
The MQTT-SN needs a gateway when WSN (Wireless Sensor Network) devices want to send data to MQTT server which run on TCP/IP protocol or want to communicate with MQTT clients. The WSN devices do not have TCP/IP stack with them, they simply run over Zigbee, Z-wave, Bluetooth Low Energy or UDP network. MQTT-SN goes over these protocols and the Gateway create a bridge between MQTT-SN protocol and MQTT protocol. The WSN devices send the message to the gateway and the gateway forwards the message to the listening brokers.

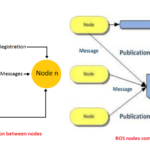
Fig. 1: Image showing Client-Server Communication over MQTT-SN using Raspberry Pi as MQTT-SN Gateway
Components Required –
1) RSMB broker- MQTT-SN along with MQTT broker
2) Mosquitto broker- MQTT broker
3) Raspberry pi 3 as a MQTT-SN gateway
4) One PC (running on Linux) as a MQTT broker
5) Mobile as a MQTT client
6) MQTT-SN tools– MQTT-SN clients.
Client-Server Setup
The following steps will be performed to setup Client-Server system –
1) Configure the Raspberry pi to listen for packets on MQTT-SN port as well as MQTT port.
2) Configure the Mosquitto broker to act as MQTT broker to listen for packets on particular port.
3) Create a bridge between MQTT-SN and MQTT so that any message received on MQTT-SN port can be forwarded to MQTT ports.
4) Set up the MQTT-SN publish client to send packet on MQTT-SN port.
5) Set up the MQTT-SN subscription client to receive the packet on MQTT-SN port.
6) Configure the MQTT protocol in mobile client. We are using MQTT dashboard app to configure mobile as MQTT client.
7) Write down the MQTT broker address on the mobile client and the port on which the broker is listening.
8) Subscribe to the topic which MQTT-SN client has registered on the RSMB broker.
9) Publish the data to the RSMB broker and see if the data is received on MQTT-SN subscription side or not . Then, see if the data is received on mobile MQTT client or not.
10) The subscription client receives the packet from Gateway.
For configuring the Raspberry Pi to act as Gateway, follow the below steps –
1) Download the RSMB broker in home directory or any preferable directory.
2) From terminal, move into src folder /home/user/mosquitto.rsmb/rsmb/src
3) Run make command to make the file executable. The broker_mqtts executable file can be seen there. It will output as follow –

Fig. 2: Screenshot of Command to make the File Executable
4) When the broker_mqtts is run by the command – sudo./broker_mqtts, broker by default listen on 1883 port.
Now, the default configuration need to be changed so that broker can listen for MQTT-SN on user defined port and can create a bridge for MQTT broker. This broker will start listening on port 1887 for MQTT, 1886 for MQTT-SN, 1888 for local bridge of MQTT-SN to MQTT and 1889 for remote bridge of MQTT-SN to MQTT. The configuration file might look like as follow –

Fig. 3: Screenshot of MQTT-SN Configuration File
Now, the broker is ready with the configuration file. Next, the Mosquitto broker need to be configured on the PC. The Mosquitto file need to be configured to listen on port 1889. Edit the Mosquitto configuration file by commenting out everything and write the following line –

Fig. 4: Screenshot of Line that has to be Commented in MQTT-SN Configuration File
Start the Mosquitto broker with configuration file loaded –

Fig. 5: Screenshot of Command to Start the Mosquitto Broker with Loaded Configuration File
The output will look like the following –

Fig. 6: Screenshot of Mosquito Broker
Now, run the broker with loaded configuration file using the following command –

The output on the terminal will look like the following –

Fig. 7: Screenshot of Command to Run the Broker with Loaded Configuration File
Now, it can be seen that RSMB broker has established bridge connection to Mosquitto as well as local Mosquitto running broker. Now, Gateway is active and Mosquitto broker is listening. It’s time to test whether gateway is running properly or not. The MQTT-SN client tool need to be used on the raspberry pi to test the local gateway. To publish the data on local gateway, run the following command on the terminal –

Fig. 8: Screenshot of Loading Configuration on Mosquitto Broker
In the above command,
-h – is for gateway IP address
-p – is port, on which MQTT-SN broker is listening
-t – is topic
-m – is message
-d – is debugging every level
When the command is run, the following output is obtained –

Fig. 9: Screenshot of Command to Publish the Data on Local Gateway
The whole process runs in the background when client connects to broker and register the packet to the server. Now the same topic can be subscribed by running the following command –

Fig. 10: Screenshot of Command to Subscribe the Topic
The output on the terminal will look like the following –

Fig. 11: Screenshot of Subscribing Topics on RSMB Broker
Now, subscribe the same topic “hello” in the mobile client as well which is running on MQTT protocol. Connect mobile client with any MQTT server like Mosquitto broker of PC or Mosquitto broker of Raspberry Pi. Then, the same message will be received on the mobile client side as well, when the message on the mqtt-sn client is published.
In this way, two devices can communicate with each other over MQTT-SN protocol and forward the data to MQTT server as well. Here, there are multiple MQTT clients which subscribe to the same topic. They all will receive the same published message on different port. The RSMB broker transmits the UDP packet to TCP or MQTT. But if there is some other protocol like Zigbee or BLE then some kind of MQTT-SN forwarder will be needed in between gateway and WSN device so that forwarder can convert the different network into UDP network so that further communication can be processed in the same way.
In the next tutorial, learn to setup Secure Client-Server Communication over TLS Security Protocol.
You may also like:


Filed Under: IoT tutorials, Tutorials

Questions related to this article?
👉Ask and discuss on EDAboard.com and Electro-Tech-Online.com forums.
Tell Us What You Think!!
You must be logged in to post a comment.