Engineers Garage

  • Projects and Tutorials
    • Electronic Projects
      • 8051
      • Arduino
      • ARM
      • AVR
      • PIC
      • Raspberry pi
      • STM32
    • Tutorials
    • Circuit Design
    • Project Videos
    • Components
  • Articles
    • Tech Articles
    • Insight
    • Invention Stories
    • How to
    • What Is
  • News
    • Electronic Products News
    • DIY Reviews
    • Guest Post
  • Forums
    • EDABoard.com
    • Electro-Tech-Online
    • EG Forum Archive
  • Digi-Key Store
    • Cables, Wires
    • Connectors, Interconnect
    • Discrete
    • Electromechanical
    • Embedded Computers
    • Enclosures, Hardware, Office
    • Integrated Circuits (ICs)
    • Isolators
    • LED/Optoelectronics
    • Passive
    • Power, Circuit Protection
    • Programmers
    • RF, Wireless
    • Semiconductors
    • Sensors, Transducers
    • Test Products
    • Tools
  • EE Resources
    • DesignFast
    • LEAP Awards
    • Oscilloscope Product Finder
    • White Papers
    • Webinars
  • EE Learning Center
  • Women in Engineering

Clock with LED pendulum with tick tock sound

By Ashutosh Bhatt

Many of us see different kinds of wall clock available in market which produces sound but they are very expensive. The circuit described here produces a tick tock sound and also indicate the time with the help of LED. In this circuit, LED’s are arranged such that you will get time in the form of a pendulum first in one direction than in opposite direction. So you can make your own watch in much less price as compared to market.

[[wysiwyg_imageupload:10523:]]

Fig. 1: Prototype of Clock with LED Pendulum with Tick Tock sound Circuit on Breadboard


This simple circuit is based on two IC’s namely NE555 timer and CD4017 with few more discrete components.

555 timer IC wired as an a-stable oscillator. In this circuit NE555 a-stable generates a clock

for the Circuit, which provide a oscillating wave to the output pin 3 of IC1. You can vary the speed of oscillation with the help of R2. The frequency of oscillation of 555 timer can be calculated by-

f=1.44/ (R1+2*(R2)*C1) and CD4017 is a CMOS counter/ divider IC .

It take clock signal from the clock input and turn on the 10 output in sequence, each time when it receives clock input pulses. It is the most popular IC and extremely useful in various project like Light Chaser, Matrix Die.

In order to understand the working of IC one must know about its individual pin. It has 3 input pin and 10 output pin and one is ground pin and another is used for power supply and one is Carry out pin. Pin diagram of CD4017 is shown below-
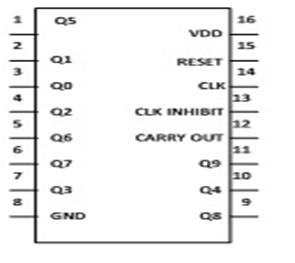
Pin diagram of CD4017

Fig. 2: Pin Diagram of CD4017 

1. Input pin-

a. Reset pin (pin 15) – It is used to reset the counter to zero. Like you want the counter to count up to third output then connect the fourth output to pin 15. Now after every third output it will automatically starts counting from zero.

b. Clock pin (pin14) – Whenever pin 14 goes high it will provide you the output. Like for first clock pulse pin 3 will provide you output similarly for next pulse pin 2 will provide output and so on. After 10 pulse it will again start from Q0 output.

c. Clock Inhibit pin (pin 13) – It is used to switch the counter “on” and “off”. When you want to switch off the counter then pin 13 should be high. If it is high it will ignore the clock pulse no matter how many times you press the switch means the count will not advance. In our circuit we have ground the pin 13.

2. Output pin (pin Q0- Q9) – It is used to receive the output in sequential manner. Like for first pulse pin 3 will provide you the output and so on.

3. Ground pin (pin 8) and Supply pin (pin 16) – It is used to provide ground and power supply to the IC for its working.

4. Carry out pin (pin 12) – It is used to connect one or more CD4017 IC’s. Like if you want to add one more CD4017 IC then connect Pin 12 to Clock input of its successor. The carry pin of first CD4017 is connected to clock input of second and the carry pin of second is connected to the clock input of third and so on. In our circuit we have used only one IC that’s why we have left this pin.

Working of circuit-

Now when power supply is given to 555 timer, output from pin 3 of IC1 is provided to CD4017

Decade counter pin 14, which provides a clock pulse for the working of IC2. Here after receiving the

Clock input, CD4017 starts its counter from zero (as it has inbuilt counter). After, it advances one by

one each time pin 14 goes high. Like first we get output from pin 3 that is Q0 and LED1 will glow and

Then from pin 2, LED2 will glow and so on.

In this circuit first 6 outputs of the IC are directly connected to 6 LED’s because of this, LED’s move in forward direction. And remaining 4 output move the LED’s in backward direction. This cycle is repeated until power supply is provided. You can also connected transistor to produce a large version of display.

In the circuit diagram we have calibrated the clock to display time in seconds. You can calibrate your clock to display time in minutes and hour just by changing the value of resistor R1, R2 and capacitor C1. You can use following values.

Calibrating for Hour use-

R1 = 3.3M

R2 = 4.7M

C1 = 470uF

T   = 1 Hour (It will give you tick tock sound and LED will glow in interval of 1 hour)

Calibrating in minute use-

R1 = 10K

R2 = 4.7M

C1 = 10uF

T   = 1 Minute (It will give you tick tock sound and LED will glow in interval of 1 minute)

Calibrating in seconds use-

R1 = 10K

R2 = 10M

C1 = 0.1uF

T   = 1 Second (It will give you tick tock sound and LED will glow in interval of 1 second)

You can also calculate the time period with help of below formula-

T = .7*(R1+(2*R2)*C1)(in seconds)

Project Components

  • 555 Timer IC
  • Capacitor
  • Diode 1N4148
  • LED
  • Resistor
  • Speaker

Project Video


Filed Under: 555 Timers, Electronic Projects
Tagged With: 555 timer circuit, clock, led, pendulum, tick tock
 

Questions related to this article?
👉Ask and discuss on Electro-Tech-Online.com and EDAboard.com forums.


Tell Us What You Think!! Cancel reply

You must be logged in to post a comment.

HAVE A QUESTION?

Have a technical question about an article or other engineering questions? Check out our engineering forums EDABoard.com and Electro-Tech-Online.com where you can get those questions asked and answered by your peers!


Featured Tutorials

  • Designing Gate Driver Circuit and Switching Mechanism for Modified Sine Wave Inverter – (Part 9/17)
  • Completing Modified Sine Wave Inverter Design with Full Bridge Circuit and Step Up Transformer – (Part 10/17)
  • Designing an Offline UPS – Part (12 /17)
  • How to reduce Switching Time of a Relay – (Part 15/17)
  • Testing MOSFET – (Part 16/17)
  • Driving High Side MOSFET using Bootstrap Circuitry – (Part 17/17)

Stay Up To Date

Newsletter Signup

Sign up and receive our weekly newsletter for latest Tech articles, Electronics Projects, Tutorial series and other insightful tech content.

EE Training Center Classrooms

EE Classrooms

Recent Articles

  • Infineon offers DC-DC controller for full LED headlamps without a microcontroller
  • Vishay launches new high-precision, thin-film wraparound chip resistor
  • STMicroelectronics’ common-mode filters ensure signal integrity in serial interfaces
  • Renesas’ RA Family microcontrollers earn CAVP certification for cryptographic algorithms
  • MicroPython: Serial data communication in ESP8266 and ESP32 using UART

Most Popular

5G 555 timer circuit 8051 ai Arduino atmega16 automotive avr dc motor display Electronic Part Electronic Parts Fujitsu ic infineontechnologies integratedcircuit Intel IoT ir lcd ldr led maximintegratedproducts microchip microchiptechnology Microchip Technology microcontroller microcontrollers mosfet motor powermanagement Raspberry Pi remote renesaselectronics Research robot samsung semiconductor sensor software STMicroelectronics switch Technology vishayintertechnology wireless

RSS EDABOARD.com Discussions

  • Looking for miniature shaded pole motors
  • RF switch selection
  • ddr3 sodimm daughter board for haps-80 system
  • 3D FDTD - how do I compute number of variables and required number of iterations?
  • IRF450 MoSFET

RSS Electro-Tech-Online.com Discussions

  • Opamp ciruit
  • DIY Mini 12v Router UPS malfunction
  • How can a 13 bit number represent 16 bit number?Or why is fragmentation offset multiple of 8?
  • Best home PCB printer and software for prototyping?
  • Passthrough charging-simple but impossible to achieve?
Engineers Garage
  • Analog IC TIps
  • Connector Tips
  • DesignFast
  • EDABoard Forums
  • EE World Online
  • Electro-Tech-Online Forums
  • Microcontroller Tips
  • Power Electronic Tips
  • Sensor Tips
  • Test and Measurement Tips
  • 5G Technology World
  • About Us
  • Contact Us
  • Advertise

Copyright © 2022 WTWH Media LLC. All Rights Reserved. The material on this site may not be reproduced, distributed, transmitted, cached or otherwise used, except with the prior written permission of WTWH Media
Privacy Policy | Advertising | About Us

Search Engineers Garage

  • Projects and Tutorials
    • Electronic Projects
      • 8051
      • Arduino
      • ARM
      • AVR
      • PIC
      • Raspberry pi
      • STM32
    • Tutorials
    • Circuit Design
    • Project Videos
    • Components
  • Articles
    • Tech Articles
    • Insight
    • Invention Stories
    • How to
    • What Is
  • News
    • Electronic Products News
    • DIY Reviews
    • Guest Post
  • Forums
    • EDABoard.com
    • Electro-Tech-Online
    • EG Forum Archive
  • Digi-Key Store
    • Cables, Wires
    • Connectors, Interconnect
    • Discrete
    • Electromechanical
    • Embedded Computers
    • Enclosures, Hardware, Office
    • Integrated Circuits (ICs)
    • Isolators
    • LED/Optoelectronics
    • Passive
    • Power, Circuit Protection
    • Programmers
    • RF, Wireless
    • Semiconductors
    • Sensors, Transducers
    • Test Products
    • Tools
  • EE Resources
    • DesignFast
    • LEAP Awards
    • Oscilloscope Product Finder
    • White Papers
    • Webinars
  • EE Learning Center
  • Women in Engineering