Engineers Garage

  • Electronics Projects and Tutorials
    • Electronic Projects
      • Arduino Projects
      • AVR
      • Raspberry pi
      • ESP8266
      • BeagleBone
      • 8051 Microcontroller
      • ARM
      • PIC Microcontroller
      • STM32
    • Tutorials
      • Audio Electronics
      • Battery Management
      • Brainwave
      • Electric Vehicles
      • EMI/EMC/RFI
      • Hardware Filters
      • IoT tutorials
      • Power Tutorials
      • Python
      • Sensors
      • USB
      • VHDL
    • Circuit Design
    • Project Videos
    • Components
  • Articles
    • Tech Articles
    • Insight
    • Invention Stories
    • How to
    • What Is
  • News
    • Electronic Product News
    • Business News
    • Company/Start-up News
    • DIY Reviews
    • Guest Post
  • Forums
    • EDABoard.com
    • Electro-Tech-Online
    • EG Forum Archive
  • DigiKey Store
    • Cables, Wires
    • Connectors, Interconnect
    • Discrete
    • Electromechanical
    • Embedded Computers
    • Enclosures, Hardware, Office
    • Integrated Circuits (ICs)
    • Isolators
    • LED/Optoelectronics
    • Passive
    • Power, Circuit Protection
    • Programmers
    • RF, Wireless
    • Semiconductors
    • Sensors, Transducers
    • Test Products
    • Tools
  • Learn
    • eBooks/Tech Tips
    • Design Guides
    • Learning Center
    • Tech Toolboxes
    • Webinars & Digital Events
  • Resources
    • Digital Issues
    • EE Training Days
    • LEAP Awards
    • Podcasts
    • Webinars / Digital Events
    • White Papers
    • Engineering Diversity & Inclusion
    • DesignFast
  • Guest Post Guidelines
  • Advertise
  • Subscribe

Designing a 6 Watt Car Audio Amplifier – 5/9

By Diksha April 17, 2025

In the previous tutorial, a Bass Boost Power Amplifier was designed. Now it’s time to start designing power amplifiers suitable for specific applications. In this tutorial, a car audio amplifier will be designed.
The cars have been coming with inbuilt audio systems from years. An audio system of a car is one of the important features that shines as unique selling point (USP) for any car in the market. The audio systems have become a vital accessory for any car. Even many times consumers replace the default audio systems came in their car with new one for better driving experience. 
Any car audio system has the following basic components – 
1) Head Unit
2) Amplifier
3) Speakers
The head unit is the heart of the car audio system. The head unit provides the audio signals (to be reconstructed as sound) from cassettes, CD players, satellite radio, internet radio, USB drive or other source of audio. Nowadays, head units in high end cars also come with video feature. Such head units have display source hooked with the head unit, so a video from a CD, DVD or USB drive can be played on it. Even the head units are nowadays equipped with automated voice assist for the driver. 
The audio signals from the head unit are weakened due to resistive nature of the connecting wires. So, a power amplifier is required at the output stage of the head units to boost signals so that they could reach to the speakers without significant losses. Generally, due to size constraint in the car, the amplifiers are combined with the head unit only. So, there are inbuilt amplifiers in the head unit itself. It is also possible to connect external amplifiers with the head unit to further boost the sound quality. 
With speakers, the audio system of a car is completed. There are three or four speakers in a car placed at different interior positions. The speakers take the audio signals from the amplifier and reproduce the sound. A car requires high power amplifier as the sound needs to be louder in it. Generally, 10 Watt amplifiers are standard and sound pretty loud. For a descent sound quality, 6 Watt amplifier is sufficient. 
In this tutorial, a 6 Watt car audio amplifier is designed using TDA2003 IC. TDA2003 is a 10 Watt Car Radio Power Amplifier. This IC can sustain a peak voltage up to 40 V and has output current capability up to 3.5 A. The IC can be operated by supplying a voltage between 8 V and 18 V. The audio amplifier designed in this tutorial is also a power amplifier. On the basis of application, the audio amplifiers can be categorized into two classes – 
1) Pre-Amplifier
2) Power Amplifier
The pre-amplifiers are used to level up the audio signals from a microphone or audio source to standard voltage levels while the power amplifiers are generally used at the output stage of the audio systems to boost audio signals before they are reproduced by the speakers.
In the introductory article of this series, various design parameters of the audio amplifier circuits were discussed like Gain, Volume, Skew Rate, Linearity, Bandwidth, Clipping effect, Stability, Efficiency, SNR, Output power, THD and loop grounding. This amplifier circuit will be designed considering the following design parameters – 
Gain (Voltage) – 34 dB 
Bandwidth – 40 Hz to 15 KHz
Output Power – 6 W
The amplifier will be designed to supply audio to a 10 Watt speaker having an impedance of 4 ohms. The circuit will have the following additional features – 
– No Clipping Effect
– Volume Control
The designing of the circuit will be followed by testing of the circuit for the verification of the intended design factors. 
Components Required – 
List of Components required for 6 Watt Car Audio Amplifier
Fig. 1: List of components required for 6 Watt Car Audio Amplifier
Block Diagram – 
Block Diagram of Car Audio Amplifier
Fig. 2: Block Diagram of Car Audio Amplifier 

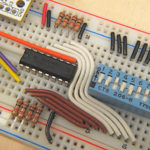
Circuit Connections – 

The amplifier circuit is built by assembling the following components together – 
1) DC Source – A battery of 12V rating is used to power the circuit. This DC source also provides the bias voltage to the amplifier.
2) Audio Source – The audio input is provided from a smart phone. For receiving audio from the smart phone, an audio jack of 3.5 mm is plugged into the phone. The 3.5 mm audio jack has three wires – one for ground and two wires for left and right channel. As the amplifier is designed for single channel, only one of the channel wires will be connected to the amplifier as audio input. The ground wire of the jack will be connected to the common ground of the circuit. 
Typical Image of 3.5 mm Audio Jack
Fig. 3: Typical Image of 3.5 mm Audio Jack

3) TDA2003 – TDA2003 is a monolithic audio power amplifier, so all the components of the amplifier circuit are integrated on the chip itself. This IC can sustain a peak voltage up to 40 V and has output current capability up to 3.5 A. The IC can be operated by supplying a voltage between 8 V and 18 V.  The IC has the following pin configuration – 

Table Listing Pin Configuration of TDA2003 IC
Fig. 4: Table listing pin configuration of TDA2003 IC
The TDA2003 has the following pin diagram – 

Pin Diagram of TDA2003 IC


 Fig. 5: Pin Diagram of TDA2003 IC

The TDA2003 has the following internal circuitry – 

Internal Circuit Diagram of TDA2003 IC
Fig. 6: Internal Circuit Diagram of TDA2003 IC

TDA2003 is basically an operational amplifier with high power output. It can be used a power amplifier for car audio systems. The car audio amplifier designed in this tutorial using TDA2003 has a non-inverting configuration as the audio input is provided at the non-inverting input pin of the IC. This IC can output a power from 6 Watts to 12 Watts. If more power is tried to be drawn from the amplifier (beyond its specifications), the output voltage (amplitude of the audio signal) can start clipping. The clipping effect can severely damage the load which is the speaker in this case. 

Typical Image of TDA2003 Car Audio Amplifier IC
Fig. 7: Typical Image of TDA2003 Car Audio Amplifier IC

According to the datasheet of the TDA2003, the output power of this amplifier depends on the impedance of the load. The IC has the following power outputs at 40 dB for different load impedances at the output – 

Table showing Dependance of Power Output of TDA2003 on Load Impedance
Fig. 8: Table showing dependance of power output of TDA2003 on Load Impedance
So, higher is the load impedance, lower is the power output of the IC. In this amplifier design a 10 Watt 4 ohms speaker is used, so the power output should be ideally 6 Watt. This IC can withstand a permanent short circuit of 16 V. The IC not only has short circuit protection from both AC and DC voltage, it is also immune to polarity inversion having a surge current up to 5 A. It has internal diodes for protection from open ground and load inductance. 
The circuit diagram for this amplifier is typical application circuit as given in the datasheet. The typical application has additional components for different purposes. In the circuit, a smoothing capacitor (Shown as C1 in the circuit diagram) of 10 uF is connected at the non-inverting input pin at which the audio input is provided to block any DC component from input to the circuit. Another capacitor (Shown as C2 in the circuit diagram) of 470 uF is connected at inverting input pin for ripple rejection. There are capacitors (Shown as C3 and C4 in the circuit diagram) of 100 uF and 0.1 uF for filtering the input supply voltage. The high value capacitor C3 is connected to bypass high frequency signals while low value capacitor C4 is connected to bypass low frequency signals. 
An RC circuit (Shown as C5 and R1 in the circuit diagram) is connected at the output pin of the IC to set the upper cut off frequency. A capacitor (Shown as C6 in the circuit diagram) of 1000 uF is connected at the output pin to block any DC component from the amplifier to the speakers. It also sets the lower cutoff frequency. The higher is the value of this capacitor, lower is the cutoff frequency and vice-versa. The cutoff frequency is inversely proportional to the capacitor value. 
Another RC circuit (Shown as C7 and R4 in the circuit diagram) is connected at the output to stabilize the output frequency. The capacitor of 0.1 uF and resistor of 1 ohms or less is recommended for this RC circuit for frequency stabilization. On using a resistor having value greater than 1 ohms in this RC circuit may result into oscillations/distortion at high frequency. So, the recommended value of resistor and capacitor are used in the circuit. All the components are grounded in star topology to avoid any distortions in the audio signal due to loop grounding. 
  
For volume control, a variable resistor (Shown as RV1 in the circuit diagram) at the input of the non-inverting pin is used. This variable resistor can be adjusted to change the amplitude (voltage level) of this input signal which in turns controls the amplitude (loudness) of the output signal. 
4) Speakers – A speaker of 10 Watt power rating  and 4 ohms impedance is used as load at the output of the amplifier. The speaker is connected at pin 4 of the IC which is the output pin of the TDA2003 and the ground wire of the speaker is connected to the common ground. The 10 Watt speaker instead of 6 Watt is used as per the availability. 

Typical Image of 10 Watt 4 Ohms Speaker


Fig. 9: Typical Image of 10 Watt 4 Ohms Speaker

The following precautions must be taken care while assembling the circuit – 

1. Always place the components as close as possible to reduce the noise in the circuit. Follow star topology when grounding, this will keep the noise low.
 
2. Use the capacitor of high voltage rating than the input signal.
3. Always use the filtering capacitor at the input terminal of power supply to avoid the unwanted ripples.
4. Use speaker of equivalent or high power rating as amplifier output power.
5. Always use a series capacitor at the output of amplifier to block any DC component.
6. Always calculate the maximum power rating of the amplifier before connecting it to the speaker. The practical value may differ from the theoretical one. 
7. Avoid clipping of the output signal as it may damage the speakers.  
8. It is recommended to use a heat sink with the IC to provide cooling as the output power is high and this may heat up the IC.
Prototype of 6 Watt Car Audio Amplifier
Fig. 10: Prototype of 6 Watt Car Audio Amplifier 
How the circuit works – 
The typical application circuit of the TDA2003 as per given in its datasheet is used for this amplifier. According to the datasheet, the open loop gain of the IC when there is no feedback from output to the input is 80 dB while the closed loop gain when there is a feedback from output to the input is 40 dB. The voltage gain of the amplifier can be set by the resistive divider network (Shown as R2 and R3 in the circuit diagram) at the output pin of the IC. As per the datasheet, for a 4 ohms load at the output, the IC delivers 6 Watt power.  So, for a load of 4 ohms and output power of 6 Watt, the maximum output voltage without clipping effect can be calculated as follow –  
P = V2(p-p)/2R
Where, 
Output Power, P = 6 W
Load resistance, R = 4 ohms
The peak to peak voltage at output is then as follow –  
P = V2(peak- peak)/2R
6 = V2(peak- peak)/(2*4)
Vp-p = 6.9 V
The maximum gain for a peak to peak voltage of 6.9 V is as follow – 
Gain = Vout/ Vin
Considering, Vin (Input voltage) = 200 mV
Gain = 6.9/200
Gain = 34 (approx.)
For setting gain through resistors R2 and R3, the non-inverting OPAM gain equation for calculating the gain can be used. It is as follow – 
Gain = (R2/R3) + 1
Assuming R2 = 220 ohms
34 = (220/R3) + 1
R3 = 7 ohms (approx.)
So, if R2 is assumed to be 220 ohms, the R3 should be 7 ohms for the desired voltage gain. 
In the circuit, capacitor C5 and resistor R1 are used to set the upper cutoff frequency. The recommended value for this capacitor is 39 nF for which a capacitor of 33 nF is used as per the availability.
The value of the resistor R1 can be calculated as follow – 
R1 = 20*R3
R1 = 20*7
R1 = 140 ohms
The value of the capacitor C5 can be calculated as follow – 
C5 = 1/(2*Pi*B*R1)
Where, B is the frequency response. Every system respond differently to  different frequency. Some system amplifies frequency of certain range and attenuate the other ones. So the way any system output is related to the input signal at a different frequency is defined as Frequency Response of that system. In the datasheet of TDA2003, following frequency response graph between value of the capacitor C5 and frequency response B is given as follow –  

Graph showing Frequency Response Curve of TDA2003

Fig. 11: Graph showing Frequency Response Curve of TDA2003

As per the availability, a capacitor of 33 nF is used for C5 and a resistor of 150 ohms is used for R1.

The power output of this amplifier should be 6 Watt for 4 ohms load. 
Testing the circuit – 
For the testing of the amplifier circuit, the function generator is used as the input source. The function generator is used to generate a sine wave of constant amplitude and frequency. Any audio signal is also basically a sine wave so a function generator can be used instead of using a microphone or actual audio source. So, the function generator can be used as input source for testing the audio amplifier circuit. During testing, at the output also, a speaker is not used as a load as the speaker is resistive as well as inductive. At different frequencies, its inductance changes which in turn changes the impedance (R and L combination) of the speaker. So, the use of a speaker as load at the output of the amplifier for deriving its specifications may give false or non-standard results. In place of speaker, a dummy load which is purely resistive is used. As resistance does not change with frequency so it can be considered a reliable load independent of the frequency of the input audio signal. 
Ideally, the power output of this amplifier should be 6 Watt. The load however had an impedance of 4.7 ohms instead of 4 ohms. So, practically, the following observations were noted –  
Table Listing Output Characterstics of 6 Watt Car Audio Amplifier
Fig. 12: Table listing output characterstics of 6 Watt Car Audio Amplifier
So, the output power of amplifier was approximately 5.75 Watt instead of 6 Watt. This is a tolerable loss in power, so the amplifier circuit is successfully working. This amplifier circuit is operating at a voltage of 12 V and has features like Polarity Inversion, Thermal Shutdown and Short Circuit Protection. 
In the next tutorial, an amplifier circuit for regular headphones will be designed.

You may also like:


  • What are the top development boards for AI and ML?
  • beginners guide
    Basic Electronics 01 – Beginners guide to setting up an…

  • What are LoRa gateways and what types are available?

  • What are hardware filters and their types?

  • What is Light Fidelity (Li-Fi)?

  • What is TinyML?

Project Video


Filed Under: Audio Electronics, Featured Contributions, Tutorials


Next Article

← Previous Article
Next Article →

Questions related to this article?
👉Ask and discuss on Electro-Tech-Online.com and EDAboard.com forums.


Tell Us What You Think!! Cancel reply

You must be logged in to post a comment.

EE TECH TOOLBOX

“ee
Tech Toolbox: Internet of Things
Explore practical strategies for minimizing attack surfaces, managing memory efficiently, and securing firmware. Download now to ensure your IoT implementations remain secure, efficient, and future-ready.

EE Learning Center

EE Learning Center
“engineers
EXPAND YOUR KNOWLEDGE AND STAY CONNECTED
Get the latest info on technologies, tools and strategies for EE professionals.

HAVE A QUESTION?

Have a technical question about an article or other engineering questions? Check out our engineering forums EDABoard.com and Electro-Tech-Online.com where you can get those questions asked and answered by your peers!


RSS EDABOARD.com Discussions

  • differential amplifier with active load
  • Battery sensing circuitry for coin cell application
  • I/O constraint for Hold check
  • Question LCD LED IPS display
  • How can I get the frequency please help!

RSS Electro-Tech-Online.com Discussions

  • how to work on pcbs that are thick
  • 100uF bypass Caps?
  • Fuel Auto Shutoff
  • Actin group needed for effective PCB software tutorials
  • compatible eth ports for laptop

Featured – Designing of Audio Amplifiers part 9 series

  • Basics of Audio Amplifier – 1/9
  • Designing 250 Milli Watt Audio Power Amplifier – 2/9
  • Designing 1 Watt Audio Power Amplifier – 3/9
  • Designing a Bass Boost Amplifier – 4/9
  • Designing a 6 Watt Car Audio Amplifier – 5/9
  • Design a low power amplifier for headphones- 6/9

Recent Articles

  • ITG Electronics releases gate drive transformers with 200 – 450 V DC capability
  • Stackpole introduces HCJ jumpers with 70.7 amp continuous current capability
  • Infineon releases MCU with 128K flash and multi-sense capabilities
  • ST introduces 600V GaN gate drivers with 300 ns start-up time
  • ABLIC releases S-19116 automotive voltage detector with 6.8μs response time

EE ENGINEERING TRAINING DAYS

engineering

Submit a Guest Post

submit a guest post
Engineers Garage
  • Analog IC TIps
  • Connector Tips
  • Battery Power Tips
  • DesignFast
  • EDABoard Forums
  • EE World Online
  • Electro-Tech-Online Forums
  • EV Engineering
  • Microcontroller Tips
  • Power Electronic Tips
  • Sensor Tips
  • Test and Measurement Tips
  • 5G Technology World
  • Subscribe to our newsletter
  • About Us
  • Contact Us
  • Advertise

Copyright © 2025 WTWH Media LLC. All Rights Reserved. The material on this site may not be reproduced, distributed, transmitted, cached or otherwise used, except with the prior written permission of WTWH Media
Privacy Policy

Search Engineers Garage

  • Electronics Projects and Tutorials
    • Electronic Projects
      • Arduino Projects
      • AVR
      • Raspberry pi
      • ESP8266
      • BeagleBone
      • 8051 Microcontroller
      • ARM
      • PIC Microcontroller
      • STM32
    • Tutorials
      • Audio Electronics
      • Battery Management
      • Brainwave
      • Electric Vehicles
      • EMI/EMC/RFI
      • Hardware Filters
      • IoT tutorials
      • Power Tutorials
      • Python
      • Sensors
      • USB
      • VHDL
    • Circuit Design
    • Project Videos
    • Components
  • Articles
    • Tech Articles
    • Insight
    • Invention Stories
    • How to
    • What Is
  • News
    • Electronic Product News
    • Business News
    • Company/Start-up News
    • DIY Reviews
    • Guest Post
  • Forums
    • EDABoard.com
    • Electro-Tech-Online
    • EG Forum Archive
  • DigiKey Store
    • Cables, Wires
    • Connectors, Interconnect
    • Discrete
    • Electromechanical
    • Embedded Computers
    • Enclosures, Hardware, Office
    • Integrated Circuits (ICs)
    • Isolators
    • LED/Optoelectronics
    • Passive
    • Power, Circuit Protection
    • Programmers
    • RF, Wireless
    • Semiconductors
    • Sensors, Transducers
    • Test Products
    • Tools
  • Learn
    • eBooks/Tech Tips
    • Design Guides
    • Learning Center
    • Tech Toolboxes
    • Webinars & Digital Events
  • Resources
    • Digital Issues
    • EE Training Days
    • LEAP Awards
    • Podcasts
    • Webinars / Digital Events
    • White Papers
    • Engineering Diversity & Inclusion
    • DesignFast
  • Guest Post Guidelines
  • Advertise
  • Subscribe