Engineers Garage

  • Projects and Tutorials
    • Electronic Projects
      • 8051
      • Arduino
      • ARM
      • AVR
      • PIC
      • Raspberry pi
      • STM32
    • Tutorials
    • Circuit Design
    • Project Videos
    • Components
  • Articles
    • Tech Articles
    • Insight
    • Invention Stories
    • How to
    • What Is
  • News
    • Electronic Products News
    • DIY Reviews
    • Guest Post
  • Forums
    • EDABoard.com
    • Electro-Tech-Online
    • EG Forum Archive
  • Digi-Key Store
    • Cables, Wires
    • Connectors, Interconnect
    • Discrete
    • Electromechanical
    • Embedded Computers
    • Enclosures, Hardware, Office
    • Integrated Circuits (ICs)
    • Isolators
    • LED/Optoelectronics
    • Passive
    • Power, Circuit Protection
    • Programmers
    • RF, Wireless
    • Semiconductors
    • Sensors, Transducers
    • Test Products
    • Tools
  • EE Resources
    • DesignFast
    • LEAP Awards
    • Oscilloscope Product Finder
    • White Papers
    • Webinars
  • EE Learning Center
  • Women in Engineering

Digital Tachometer using Arduino Microcontroller

By Soham Chetan Kamani

A tachometer is a device that is used to measure the speed of rotation of any device. Using the analog voltage reading property of an arduino, this can be easily implemented using the appropriate parts. Tachometers have a variety of applications, including measuring the speed of dc motors in order to ensure they are running according to specifications.

Prototype of Arduino based Digital Tachometer

Fig. 1: Prototype of Arduino based Digital Tachometer

Image of Arduino Microcontroller Board

Fig. 2: Image of Arduino Microcontroller Board

Image of Tachometer Circuit on Breadboard

Fig. 3: Image of Tachometer Circuit on Breadboard

Components Required:

  1. Arduino board with ATmega32 microcontroller
  2. Any DC motor (preferably battery operated)
  3. Motor wheel
  4. Resistor
  5. Potentiometer
  6. Seven segment display
  7. Jumper wires
  8. IC 7447
  9. LED

Working Principle.

·         In order to make a tachometer, we will have to convert the speed of rotation into a readable form. The only form the arduino can read is in terms of electrical voltage.

·         It is well known that if voltage is given to a motor the motor wheel will turn, the speed of which is determined by the amount of voltage given. However the converse is also true, meaning that if we were to rotate the motor by ourselves, we can obtain a voltage across the two ends of the motor terminals.

·         This voltage can be fed to the arduino and the arduino can compute the speed of rotation depending on how much voltage was fed to it by the rotating motor.

Procedure and Guidelines

Procedure and Guidelines

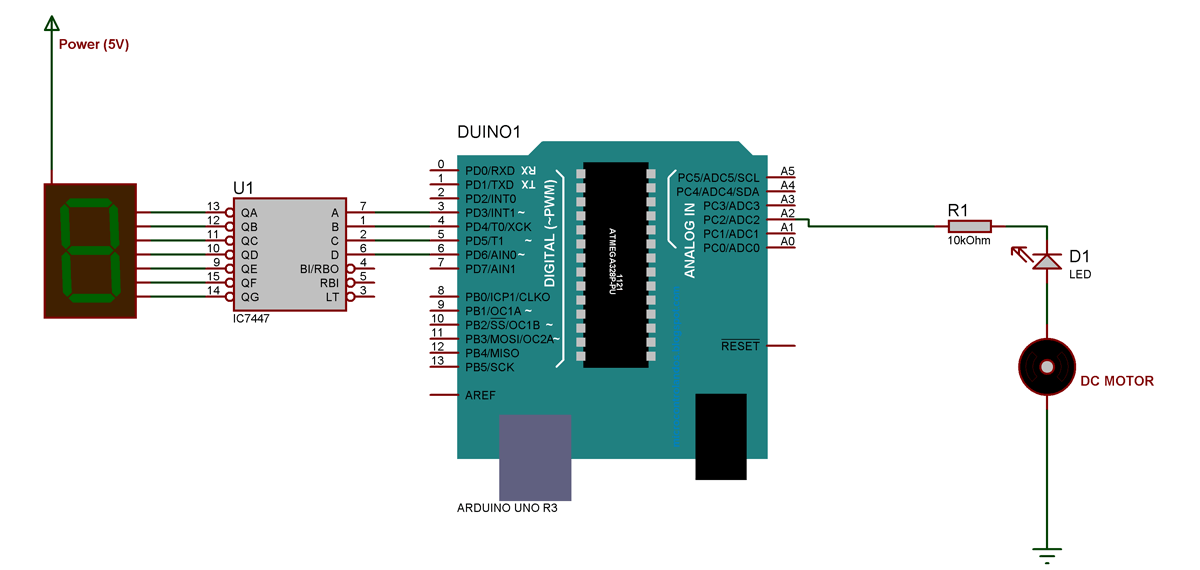
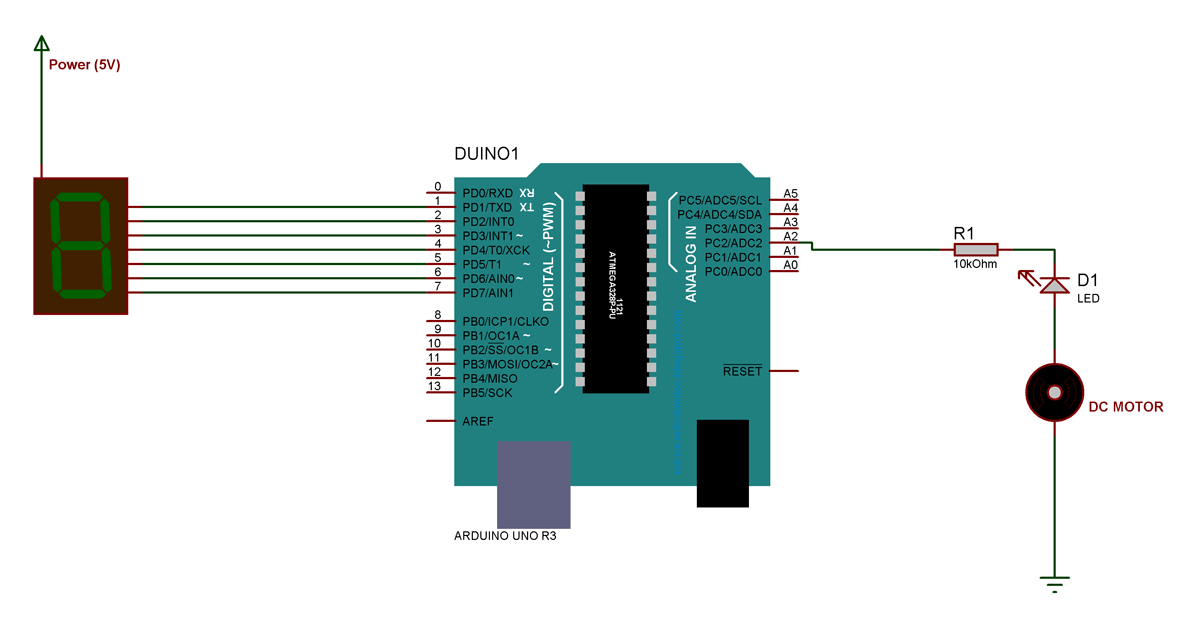
  1. The circuit diagram is as shown in the circuit diagram tabs. Circuit Diagram1 – circuit schematic without using driver ICand Circuit Diagram 2 – circuit schematic using 7 segment display driver IC7447.
  2. The motor is connected to a resistor and a  LED diode. The resistor is used to prevent excess current which would normally damage the arduino. The LED is used to indicate when the motor is working and also to prevent backward operation.
  3. Because we have so many pins of the arduino leftover, we can directly connect them to the 7 segment display. Alternatively we could use a seven segment display driver, which would reduce the number of pins used and also make the implementation easier in terms of the coding process.
  4. Once the motor is turned, a positive voltage will be given to the analog in pin of the arduino.
  5. The arduino will process the analog reading. Since we use a seven segment display, we can have 10 values, ie from 0 to 9. We can program the arduino to divide the analog reading it gets into 9 divisions, which will give the required output from 0 to 9 on the seven segment display .
  6. In case IC7447 is used, one more step is added in that the values from 1 to 9 are converted to their binary equivalents before being passed on to the appropriate pins of the IC.
  7. In case a perf board is being used , you should be careful not to solder he IC itself, instead , an IC holder
  8. As a precaution, always test the voltage of the motor first. This can be done by connecting a multimeter across the two motor terminals and spinning the motor manually with your hands. If the voltage reading is more than 12V then the motor should not be used as there is a chance to harm the arduino board.
  9. In case you want to adjust the sensitivity of the instrument, a potentiometer can be used in place of the resistor. The lower the resistance, the higher the sensitivity.


Project Source Code

###

intval=0;

intbinVal;

void setup()

{

Serial.begin(9600);          //  setup serial

pinMode(3,OUTPUT);

pinMode(4,OUTPUT);

pinMode(5,OUTPUT);

pinMode(6,OUTPUT);

pinMode(A2,INPUT);

}


void loop()

{

val = analogRead(A2);    // read the input pin

Serial.println(val);

    // debug value

binVal=val/1024*9;

switch(binVal){

case 0:

digitalWrite(3,LOW);

digitalWrite(4,LOW);

digitalWrite(5,LOW);

digitalWrite(6,LOW);

break;

case 1:

digitalWrite(3,HIGH);

digitalWrite(4,LOW);

digitalWrite(5,LOW);

digitalWrite(6,LOW);

break;

case 2:

digitalWrite(3,LOW);

digitalWrite(4,HIGH);

digitalWrite(5,LOW);

digitalWrite(6,LOW);

break;

case 3:

digitalWrite(3,HIGH);

digitalWrite(4,HIGH);

digitalWrite(5,LOW);

digitalWrite(6,LOW);

break;

case 4:

digitalWrite(3,LOW);

digitalWrite(4,LOW);

digitalWrite(5,HIGH);

digitalWrite(6,LOW);

break;

case 5:

digitalWrite(3,HIGH);

digitalWrite(4,LOW);

digitalWrite(5,HIGH);

digitalWrite(6,LOW);

break;

case 6:

digitalWrite(3,LOW);

digitalWrite(4,HIGH);

digitalWrite(5,HIGH);

digitalWrite(6,LOW);

break;

case 7:

digitalWrite(3,HIGH);

digitalWrite(4,HIGH);

digitalWrite(5,HIGH);

digitalWrite(6,LOW);

break;

case 8:

digitalWrite(3,LOW);

digitalWrite(4,LOW);

digitalWrite(5,LOW);

digitalWrite(6,HIGH);

break;

case 9:

digitalWrite(3,HIGH);

digitalWrite(4,LOW);

digitalWrite(5,LOW);

digitalWrite(6,HIGH);

break;

default:

break;

  }


} 

###


Circuit Diagrams

Circuit-Diagram-Arduino-Based-Digital-Tachometer
Circuit-Diagram-Arduino-Based-Digital-Tachometer_0


Filed Under: Electronic Projects
Tagged With: Arduino, tachometer
 

Questions related to this article?
👉Ask and discuss on EDAboard.com and Electro-Tech-Online.com forums.


Tell Us What You Think!! Cancel reply

You must be logged in to post a comment.

HAVE A QUESTION?

Have a technical question about an article or other engineering questions? Check out our engineering forums EDABoard.com and Electro-Tech-Online.com where you can get those questions asked and answered by your peers!


Featured Tutorials

  • Designing Gate Driver Circuit and Switching Mechanism for Modified Sine Wave Inverter – (Part 9/17)
  • Completing Modified Sine Wave Inverter Design with Full Bridge Circuit and Step Up Transformer – (Part 10/17)
  • Designing an Offline UPS – Part (12 /17)
  • How to reduce Switching Time of a Relay – (Part 15/17)
  • Testing MOSFET – (Part 16/17)
  • Driving High Side MOSFET using Bootstrap Circuitry – (Part 17/17)

Stay Up To Date

Newsletter Signup

Sign up and receive our weekly newsletter for latest Tech articles, Electronics Projects, Tutorial series and other insightful tech content.

EE Training Center Classrooms

EE Classrooms

Recent Articles

  • Infineon offers DC-DC controller for full LED headlamps without a microcontroller
  • Vishay launches new high-precision, thin-film wraparound chip resistor
  • STMicroelectronics’ common-mode filters ensure signal integrity in serial interfaces
  • Renesas’ RA Family microcontrollers earn CAVP certification for cryptographic algorithms
  • MicroPython: Serial data communication in ESP8266 and ESP32 using UART

Most Popular

5G 555 timer circuit 8051 ai Arduino atmega16 automotive avr dc motor display Electronic Part Electronic Parts Fujitsu ic infineontechnologies integratedcircuit Intel IoT ir lcd ldr led maximintegratedproducts microchip microchiptechnology Microchip Technology microcontroller microcontrollers mosfet motor powermanagement Raspberry Pi remote renesaselectronics Research robot samsung semiconductor sensor software STMicroelectronics switch Technology vishayintertechnology wireless

RSS EDABOARD.com Discussions

  • Simulation of resonator in HFSS
  • IRF450 MoSFET
  • HV Relays - Power Capacity
  • Switching frequency data not available
  • Voltage reference level - how to choose?

RSS Electro-Tech-Online.com Discussions

  • Adding Current Limit Feature to a Buck Converter
  • Background of Members Here
  • Passthrough charging-simple but impossible to achieve?
  • Opamp ciruit
  • DIY Mini 12v Router UPS malfunction
Engineers Garage
  • Analog IC TIps
  • Connector Tips
  • DesignFast
  • EDABoard Forums
  • EE World Online
  • Electro-Tech-Online Forums
  • Microcontroller Tips
  • Power Electronic Tips
  • Sensor Tips
  • Test and Measurement Tips
  • 5G Technology World
  • About Us
  • Contact Us
  • Advertise

Copyright © 2022 WTWH Media LLC. All Rights Reserved. The material on this site may not be reproduced, distributed, transmitted, cached or otherwise used, except with the prior written permission of WTWH Media
Privacy Policy | Advertising | About Us

Search Engineers Garage

  • Projects and Tutorials
    • Electronic Projects
      • 8051
      • Arduino
      • ARM
      • AVR
      • PIC
      • Raspberry pi
      • STM32
    • Tutorials
    • Circuit Design
    • Project Videos
    • Components
  • Articles
    • Tech Articles
    • Insight
    • Invention Stories
    • How to
    • What Is
  • News
    • Electronic Products News
    • DIY Reviews
    • Guest Post
  • Forums
    • EDABoard.com
    • Electro-Tech-Online
    • EG Forum Archive
  • Digi-Key Store
    • Cables, Wires
    • Connectors, Interconnect
    • Discrete
    • Electromechanical
    • Embedded Computers
    • Enclosures, Hardware, Office
    • Integrated Circuits (ICs)
    • Isolators
    • LED/Optoelectronics
    • Passive
    • Power, Circuit Protection
    • Programmers
    • RF, Wireless
    • Semiconductors
    • Sensors, Transducers
    • Test Products
    • Tools
  • EE Resources
    • DesignFast
    • LEAP Awards
    • Oscilloscope Product Finder
    • White Papers
    • Webinars
  • EE Learning Center
  • Women in Engineering