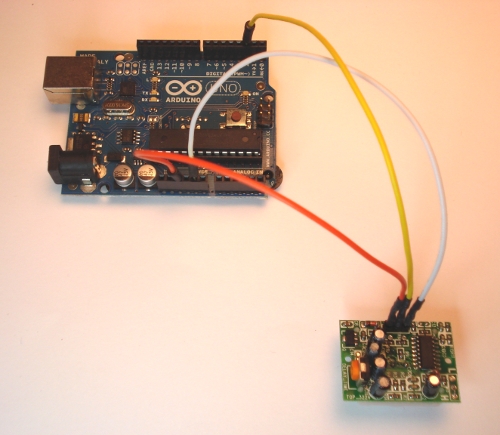
Who doesn’t like to get greetings from people and when you get the same from your house, it gives you an overwhelming experience. Houses with modern sensors, not only makes your life easy and comfortable but also saves the environment and assist humankind. This tutorial by Hacktronis aims to lend a hand in constructing your own Arduino motion sensor/detector so that you can experience something as soon as you enter your room like have the lights turn on, or have your theme song play whenever you enter.
Software used in this lesson can be downloaded from this site, Arduino Motion Detector Software Example and for hardware, check the link, Motion Sensor for Arduino, with wire jumpers. Make sure to gain some experience in Arduino field before trying your hands in this tutorial. For basic lessons, visit “ Arduino: Getting Started ”
To start with connections, the supplied male to female jumpers are used to make these connections – :
| Motion Detector Pin | Arduino Pin |
|---|---|
| “-“ | GND |
| “OUT” | Arduino Pin 2 |
| “+” | +5v |
For the software section, download the example motion sensor for Arduino software here, and unzip the file. As you will download the file, you will have a folder named “motion_sensor_for_arduino”. Now, commence the Arduino software and load the Arduino Motion Sensor example program by clicking File->Sketchbook->Open. Route to the motion_sensor_for_arduino folder and select the “motion_sensor_for_arduino.pde” file.

DIY Arduino Motion Sensor (Image Courtesy: hacktronics.com)
Next, the Arduino Motion Sensor program is transferred to your Arduino board by clicking the “Upload to I/O board” button. After uploading, you will see the LED on the Arduino board light up each time there is motion sensed. And then you end this simple project and understand how easy it is to add motion detection to your Arduino project.
Remember, it takes about 60 seconds after you leading power up the motion sensor before it begins to detect motion. You can regulate the amount of time that the motion detector lights the Arduino LED by fine-tuning the potentiometer screw on the back of the motion sensor module.
Filed Under: Reviews


Questions related to this article?
👉Ask and discuss on Electro-Tech-Online.com and EDAboard.com forums.
Tell Us What You Think!!
You must be logged in to post a comment.