DIY motion detector project with 3-axis accelerometer
Sometimes we need an extra eye for our home to detect something unusual and I am not talking about camera. From a simple home intrusion detector to testing the driving skills or to keep a check on your favorite cookie jar, you need a 3-axis accelerometer, which is the main element of this project to provide a little motion detector.
This project requires Arduino, 3-Axis Accelerometer Module, Male header pins, Grove Base Shield, Universal Cables, Grove Button and Buzzer, Mini Breadboard, Protoshield and female header pins.
The Seed Studio Base Shield is overlaid onto a compatible Arduino and a Universal Cable is attached to a Seeed Studio Grove Button in order to Analog Pin 0 on the Base Shield. The socket is positioned exactly above the Freetronics Eleven Power plug, and followed by the Reset button on the Base Shield.
Another universal Cable is used for attaching a Seeed Studio Grove Buzzer to Analog Pin 1 on the Base Shield. The female header pins is soldered to the Protoboard and is draped onto the Base Shield, creating a third layer. A mini-breadboard is fixed onto the protoboard, which makes protoboard useful for other projects.
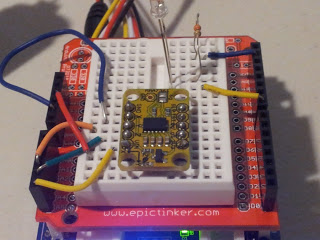
The male headers are soldered to the 3-axis accelerometer, and placed in center of the breadboard. Another five wires are connected to GND on protoboard to GND on accelerometer, 5V on protoboard to VIN on accelerometer, Analog Pin 3 on protoboard to X on accelerometer, Analog Pin 4 on protoboard to Y on accelerometer and Analog Pin 5 on protoboard to Z on accelerometer.
The digital pin 8 is connected to an LED and resistor on the breadboard with the help of a wire connected to GND on the protoboard. The USB cable from the computer is connected to the Freetronics Eleven and simultaneously, the Arduino Sketch is uploaded to the board. The USB cable, after disconnected, powers the Freetronics Eleven.
When the button is pressed, 3 warning sounds can be heard before it activates. In case, it senses a vibration or motion, which surpasses the tolerance level, it will alarm until the Grove button is pressed. Check out the following link for complete details.
http://arduinobasics.blogspot.in/2012/08/arduino-basics-3-axis-accelerometer.html
Filed Under: Reviews

Questions related to this article?
👉Ask and discuss on EDAboard.com and Electro-Tech-Online.com forums.
Tell Us What You Think!!
You must be logged in to post a comment.