I brought wired remote controlled car for my little princess. Using wired remote it can move forward and reverse. It was very simple toy car with a DC motor inside and in remote, there were two AAA size battery cells with two buttons – one to move the motor forward and another to move reverse. It was working very fine and the car runs very nice. But once, my baby broke the remote. I tried to repair it but the button’s contacts were broken so it was not possible to repair it.
So I just decided to make new remote for the motor.
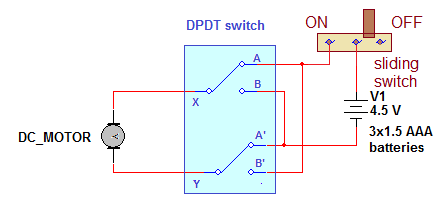
The remote can be built using one DPDT switch, one sliding switch and 3 AAA size batteries.
DPDT switch is as shown in the figure given below with its internal connections. It has 6 terminals and it is used to move the car forward and reverse. Means this switch will simply work as joystick – when the switch is moved forward, the car will go forward and vice versa.

Fig. 1: Image and Internal Circuit Diagram of DPDT Switch
The sliding switch is as shown in the figure given below. It has 3 terminals and used to turn ON or OFF the supply to a toy car.

Fig. 2: Image and Internal Circuit Diagram of Sliding Switch
Now let us start wiring up the circuit.
First, connect 3 batteries in series to get total 4.5 V supply. For further connections please refer the Circuit wiring diagram.
CIRCUIT CONNECTIONS
1. Connect +Ve terminal of battery supply to middle terminal of sliding switch
2. Connect any one side terminal of sliding terminal to terminal A of DPDT switch as shown.
3. The middle two terminals of DPDT switch X and Y are connected to car motor with long wire (around 2-3 meter)
4. Both side terminals A-B and A’-B’ are crosses connected – means A is connected with B’ and B is connected to B’. that will give reversible supply to DC motor of car
CIRCUIT OPERATION
• When sliding switch is moved to ON position, the motor gets supply through A – X – Y – A’. So it will rotate and that moves toy car forward
• If DPDT switch position is changed, the motor gets supply through B’ – Y – X – B. so it will start rotating reverse and that makes toy car to move reverse
• Thus sliding switch runs or stops the toy car and DPDT switch moves car forward and reverse
When I handed over the car and remote to my daughter, again I found one problem. The speed of the car was very high that my little daughter cannot handle it.
So next I think to add speed control and vary the speed of the motor so that she can comfortably control the car.
For this, I added multi-point sliding switch to give 3 different supply of 1.5 V, 3 V and 4.5 V. I can do this very easily because there is 3 AAA size battery cells so I can tap the supply from each cell and vary the speed of the car.
Now the simple sliding switch is replaced by multi-point sliding switch. It has 8 terminals and 4 connections. When the switch is in 1st connection, the battery is not connected to the car. So the car stops. When it is moved to the 2nd position, toy car motor gets only single battery cell supply of 1.5 V. so it will move very slowly. the s switch is moved further to 3rd position, toy car motor gets the supply of two batteries (3 V). So its speed slightly increased. And finally, when the switch is moved to the last position, toy car motor gets supply from all 3 batteries of 4.5 V and runs at full speed.
So this is how I can have speed control of car also. And now, my daughter can easily handle her toy car at ease with full of joy.
Here are some of the snaps of the toy car with the remote.

Fig. 3: Prototype of Simple Remote Toy Car with Speed Control Feature
Fig. 4: Prototype of Simple Remote Toy Car with Speed Control Feature
Circuit Diagrams
Project Video
Filed Under: Electronic Projects
Filed Under: Electronic Projects

Questions related to this article?
👉Ask and discuss on Electro-Tech-Online.com and EDAboard.com forums.
Tell Us What You Think!!
You must be logged in to post a comment.