In this tutorial i am going to teach you how to interface ds18b20 temperature sensor with arduino and monitor the temperature of a particular place. Temperature readings from ds18b20 sensor will be displayed on arduino lcd keypad shield. Temperature will be displayed on arduino lcd display in two scales, Celsius and Fahrenheit. On first row of arduino lcd shield temperature will be displayed in Celsius scale and on the second row of arduino lcd keypad shield temperature will be displayed in Fahrenheit scale.

Arduino Lcd keypad sheild
Character lcd’s comes in many sizes 16×1, 16×2, 20×1 and 20×4 etc. Were first number represents the number of coulombs and second number represents the number of rows on a character lcd. For example 16×2 character lcd means lcd has 16 coulombs and two rows. To learn more about how characters lcd’s working principle, initialization and modes of operation? pin out and individual pin function? internal registers etc of 16×2 lcd. I recommend to take the below tutorial.
Interfacing character lcd’s with microcontrollers is not an easy task. It requires a proper setup, circuit and code to successfully interface the character lcd with microcontroller. Setting up a 16×2 character lcd circuit is a messy task. Lot of wires and components make a mess. In order to reduce mess and time to build the lcd circuit arduino designed a pre assembled 16×2 lcd circuit on a board and named it arduino lcd shield. Not only a 16×2 lcd hardware shield is made by arduino, their software team also developed shield compatible library <LiquidCrystal.h>.
One can mount the arduino lcd keypad shield on any arduino board and export its library in arduino sketch to use the predefined functions in library. Almost every function that character lcd offers their soft code is present in LiquidCrystal.h library. We just need to know about each function present in the library. One can see the library documentation on arduino website for each function(https://www.arduino.cc/en/Reference/LiquidCrystal).
Arduino lcd shield is interfaced with arduino boards in 4 bit mode(Difference between 4 bit and 8 bit mode). Arduino lcd display shield has a variable resistor mounted on it. One can rotate it to adjust the contrast of lcd display. It also has some push buttons on it which performs different functions like moving the cursor forward, backward, up and down. To learn more about power requirements and internal circuit of arduino lcd shield visit https://www.freetronics.com
Ds18b20 Temperature Sensor
DS18B20 is a popular temperature sensor among arduino diy projects community. DS18B20 works on 1 wire protocol. From 1 wire it means only one digital pin is used to communicate with it. Each ds18b20 temperature sensor has a unique address(64 bit long) stored in its ROM. We can connect multiple ds18b20 temperature sensors on a single wire and call a single sensor to respond individually. Ds18b20 outputs temperature form 9 to 12 bit resolution. It can measure temperature from -55 degree centigrade to 125 degree centigrade. The huge temperature range it covers is not possible with other sensors. It only requires 3 to 5 volts to power the DS18B20 temperature sensor. We can even power the ds18b20 with microcontrollers input supply power.
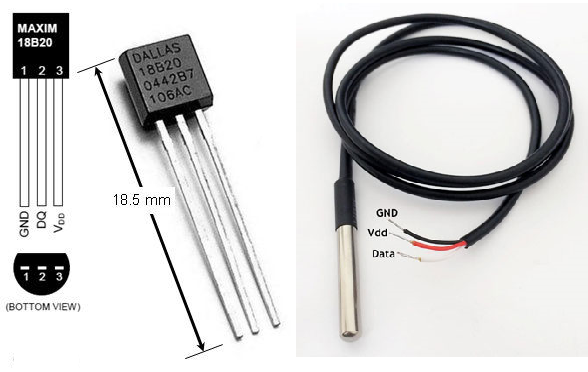
Ds18b20 pinout
|
DS18B20 has three pins. Two are power pins. Vcc which is connected to +ve of power supply and GND which is connected to -ve of power supply. The third and the middle pin is data pin(DQ). Data pin connected to an external controller for data fetching from sensor and for addressing the sensor. When used in circuits data pin must be pulled high for proper configuration of the sensor. Pulled up resistor value can be between 1 k ohm to 10 k ohm. DS18B20 is available in market in two packages. First package has its metal legs exposed much like a transistor and in the second package legs are connected to wires and sensor is enclosed in a metal casing to protect it from over heating.
|
Project circuit diagram
Mount the arduino lcd shield on arduino uno. Connect the vcc out of arduino or 5v of arduino to vcc of ds18b20. Connect the ground of arduino with gnd of ds18b20. Insert a pull up resistor between DQ and vcc pins of ds18b20. Resistor value can be between 1 k ohm to 10 k ohm. I inserted 4.7 k ohm resistor. Connect the DQ pin with D2 pin of arduino. Your circuit is complete now
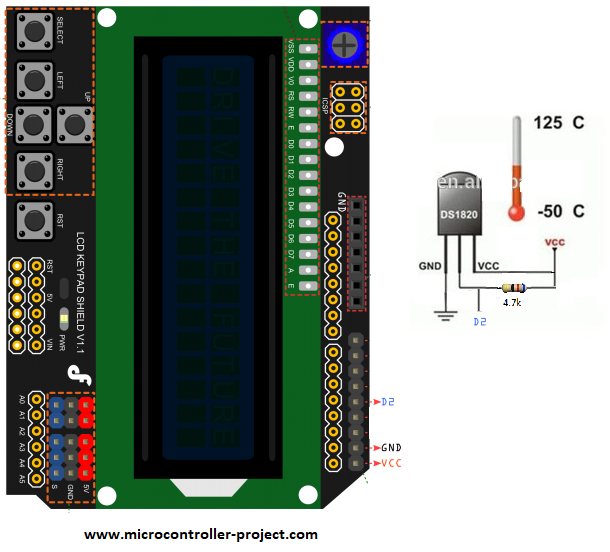
DS18B20 arduino and arduino lcd keypad shield interface for temperature monitoring
Project code
Coming to the project code portion. Code is written in arduino ide. First the OneWire.h, DallasTemperature.h and LiquidCrystal.h libraries are made part of the project. One wire library is used to handle devices that works on one wire protocol and in our project ds18b20 temperature sensor is working on one wire protocol. Dallas Temperature library is used to work with Dallas temperature sensors. DS18B20 sensor is Dallas product so we can use the Dallas Temperature library for ds18b20. Liquid crystal library is for lcd shield functions as discussed above. Then some instances to call the ds18b20 sensors are defined in code. Afterwards arduino lcd pins are defined. The statement below is used to define the arduino pins consumed by the arduino lcd shield.
LiquidCrystal lcd(8, 9, 4, 5, 6, 7); // Arduino lcd sheild pins defined
So arduino uno pins 8, 9, 4, 5, 6 and 7 are occupied by the lcd shield. Another pin A0 or analog 0 of arduino uno is occupied by the lcd shield buttons. So total 7 arduino pins are occupied by the arduino lcd keypad shield at a time. We connected our sensor with D2 pin of arduino which has no relation with arduino lcd shield.
In the setup function 16×2 lcd and ds18b20 sensors are commanded to begin their operations. In the loop function ds18b20 sensors on one wire is requested for temperature readings. sensors.requestTemperatures() is requesting all the senors on one wire to make ready the temperature readings. sensors.getTempCByIndex(0) is fetching the temperature reading of first ds18b20 temperature sensor on one wire. Temperature fetched by this command is in Celsius form. sensors.getTempFByIndex(0) is fetching the temperature from ds18b20 temperature sensor in Celsius form but it then converts it in to Fahrenheit from and as output this function gives us temperature on Fahrenheit scale. Since we have only one sensor on our one wire so we requested reading from only one sensor. If their are multiple sensors on 1 wire we can request temperature by increasing the index value sensors.getTempFByIndex(N) N=1,2,3…
After temperature fetching cursor is set on 16×2 lcd screen. First on first line temperature in centigrade is displayed then the cursor is moved to second line of 16×2 lcd and temperature in Fahrenheit is displayed on second line of 16×2 lcd. Last statement of the code is delay function. The delay function is halting the temperature reading for 5 seconds. I other words we can say that after every 5 seconds the temperature reading are updated on lcd.
After temperature fetching cursor is set on 16×2 lcd screen. First on first line temperature in centigrade is displayed then the cursor is moved to second line of 16×2 lcd and temperature in Fahrenheit is displayed on second line of 16×2 lcd. Last statement of the code is delay function. The delay function is halting the temperature reading for 5 seconds. I other words we can say that after every 5 seconds the temperature reading are updated on lcd.
Future Work
I connected only one ds18b20 sensor on one wire. For future enhancement to project one can insert multiple sensors one one wire and read data from multiple sensors. Check if the readings among all the sensors is same or their is some difference. One can monitor room, garden, garage and kitchen temperature with the above diy project.
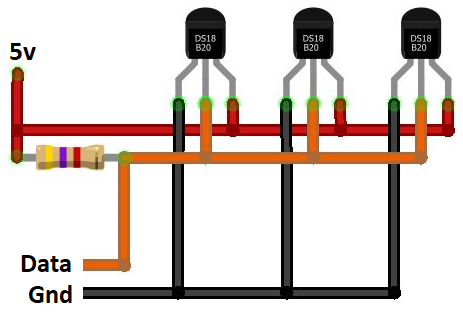
Multiple Ds18b20 temperature sensor configuration
Download the project code. Folder contains the arduino ide project .ino code. Please provide us your feed back on the project. If you have any queries please write them below in the comments section.
Filed Under: Arduino, Microcontroller Projects

Questions related to this article?
👉Ask and discuss on EDAboard.com and Electro-Tech-Online.com forums.
Tell Us What You Think!!
You must be logged in to post a comment.