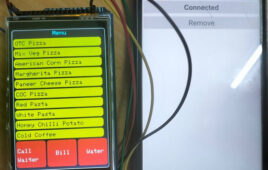
Digitalization has significantly shifted us toward a paperless society, impacting both personal and professional lives. Take restaurants, for example, where many establishments now offer digital menus. Providing a digital option offers several advantages to restaurant owners, their customers, and the environment. It reduces paper waste, allowing for an interactive experience and real-time updates for the…
How to build a paint application using Arduino
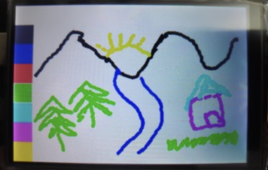
In this project, we’ll build a paint application on Arduino UNO/Arduino Mega that runs on a 3.5-inch TFT touchscreen display based on the ILI9486 driver. The ILI9486 touchscreen has a display resolution of 320×480 pixels. Using a stylus, you can draw, paint, and write on it (even in your own handwriting ). Required components Arduino…
How to build an Arduino-based biometric voting machine
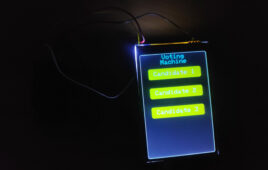
Typical electronic voting machines require voters to push a button to cast their ballots. However, there have been security concerns with these devices and whether they’re at risk for tampering. One solution is to use biometric-based voting machines, which use fingerprint matching or a retina scan to verify an authorized voter. In this project, we’ll…
Home-made digital clock keeps time after 45 years
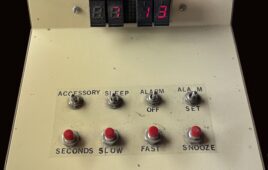
Look inside this one-chip clock built from surplus parts. With the case open, replacing parts waiting to fail seemed like a good idea. In my second year at WPI, I found myself in “B term” where I had a scheduling problem. Being as WPI operates on a four-term academic year, I couldn’t find a one-term…
How to design an Arduino library for an 8-bit IO port
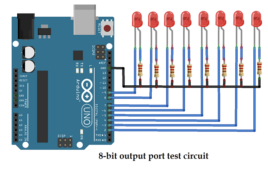
In this project, we’ll create an 8-bit IO port Arduino library that reads and writes all eight bits in a single command by combining Arduino’s pins. This means sending and receiving the 8-bit data from a single pin will be possible. Arduino provides digital output using the digitalWrite() function and receives digital input via the…
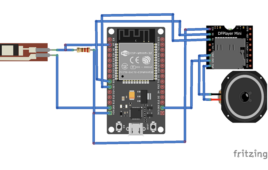
How to build a plant health monitor using ESP8266 and the MIT App Inventor
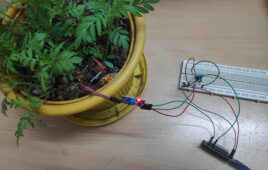
Most house plants require temperature, humidity, and moisture monitoring for optimal care. Temperatures exceeding the optimal range can cause stress, wilting, stunted growth, and even death, while cold temperatures can slow plant development, leading to weak growth and susceptibility to frost damage. Excessive humidity encourages fungal diseases and prevents proper transpiration, while drier air typically…
How to use the TCS230/TCS3200 color-recognition sensor with Arduino
Color detection is the process of identifying and distinguishing colors within an image, video, scene, or object. Many embedded and robotic applications require this feature, as it’s useful for sorting, selection, test strip reading, path determination, and more. Two standard sensors used for color detection include TCS230 or TCS3200. TCS3200 recognizes various colors based on…
How to build a fire alarm with SMS and WhatsApp alerts
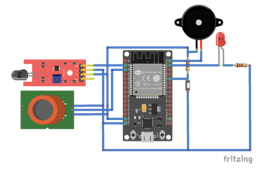
Fire alarms are critical in homes and buildings, mitigating fire risks and ensuring safety. These alarms aim to safeguard lives and property, providing a warning and initiating emergency procedures. In this project, we’ll build a fire alarm system using ESP32, a flame sensor, and an MQ2 gas sensor. This device will trigger a buzzer and…
How to build a sign-to-speech converter
Sign language is a system of communication using visual gestures. However, not everyone understands sign language. So, in this project, we’ll build a device that converts hand gestures into speech. What’s required: flex sensors, a DF Mini Player, and a microcontroller that has an analog input and supports serial communication via a universal asynchronous receiver/transmitter…
CAN communication between PIC and Arduino
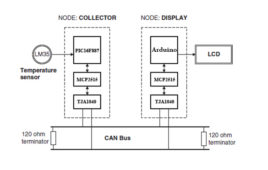
This project helps in understanding the insights of CAN protocol interfacing two different Microcontroller for example, PIC and Arduino. Controller Area Network or CAN protocol is a methodology of communication between various electronic devices like engine management systems, gear control, active suspension, ABS, lighting control, air conditioning, airbags, central locking etc. embedded in an automobile. For further learnings refer this article.
Temperature sensing using PIC microcontroller CAN interface

This project helps in understanding the insights of CAN protocol interfacing with PIC Microcontroller. Controller Area Network or CAN protocol is a methodology of communication between electronic devices like engine management systems, gear control, active suspension, ABS, airbags, lighting control, air conditioning, central locking etc. embedded in an automobile. For further learnings refer this article.
CAR REVERSE GUIDE USING CAN PROTOCOL

This Project is to design and implement an Ultrasonic Vehicular Parking Aid Display, which notifies the driver about obstacles coming in the way of parking. In light of the emerging traffic situation where parking space is at a premium such a device can be very useful and also facilitate parallel parking easily. The implementation of the idea with the ultrasonic sensor interfaced with Arduino and the technical details of this project follows later.
SPEEDOMETER USING ARDUINO AND CAN PROTOCOL

This Article is to make readers to explore about how Speedometer works in modern cars. Here you can get an idea on the CAN Bus which is used in the Communication of Sensors, Actuators and controllers in a car.Controller Area Network or CAN protocol is a methodology of communication between various electronic devices like engine management systems, gear control, active suspension, ABS, airbags, lighting control, air conditioning, central locking etc.
ESP32 voice-operated home automation with ThingSpeak MQTT, IFTTT and Google Assistant
This article explains how to build a voice-based Home Automation to control Home Appliances. Google Assistant is used to input voice commands or text commands. The main intention of this project is to introduce various IoT tools and integrate them to build a real-time project. As home automation is a friendly project, it is chosen…
How to design a multi-use level indicator using Arduino

In this mini do-it-yourself (DIY) electronic project, we’ll design a multi-use level indicator that can measure multiple physical parameters like temperature, water, voltage, humidity, distance, and more. It consists of a bar-graph LED display that presents the measurements. Four main types of sensors are used to measure the different physical parameters, including the following LM35…
How to build an app-controlled alarm mat
Waking up isn’t always easy, especially when the snooze button is typically only a short reach away. Overcoming the desire to stay in the comfort of our beds often requires an understanding of intrinsic motivation. But we have a solution that requires one simple device — a smart mat. In this project, we’ll design a…
How to make an Internet clock using ESP8266
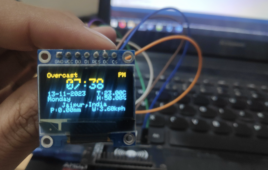
The Internet of things (IoT) offers several interesting applications, including an Internet clock. This timekeeping device uses an Internet connection to synchronize the time with a time server. This ensures highly accurate timekeeping, aligning with online servers’ coordinated universal time (UTC). Most Internet clocks use NTP, a protocol designed to synchronize clocks over a network.…
How to design an IoT-based smart alarm
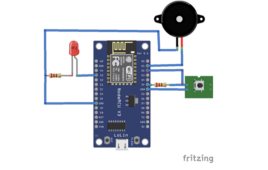
We might not always appreciate them, but that morning wake-up alarm is important for everyday life. It ensures we wake up in time for work, school, meetings, appointments, or other essential tasks. Alarms can also help us keep a regular sleep/wake schedule. In this project, we’ll use the Internet of Things (IoT) to set a…
How to send email alerts from Arduino/ESP8266/ESP32 through IFTTT
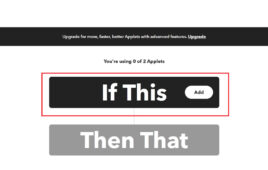
IFTTT plays a significant role in the Internet of Things (IoT) ecosystem. As IoT involves the interconnection of various devices and platforms, IFTTT provides a simple and user-friendly platform for devices to integrate together and automate embedded applications. IFTTT provides a cross-platform integration of among a multitude of platforms, brands, and standards, bridging the “things”…
How do you list Raspberry Pi’s users?
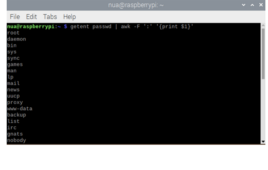
Raspberry Pi (RPi) is a popular microcomputer used for embedded systems design, hosting high-level applications that run over an operating system. Many of these applications have multiple active users with different permissions and access to system resources. As a result, there may be situations when it’s important to know what users are sharing the device.…