Engineers Garage

  • Projects and Tutorials
    • Circuit Design
    • Electronic Projects
      • 8051
      • Arduino
      • ARM
      • AVR
      • PIC
      • Raspberry pi
      • STM32
    • Tutorials
    • Components
  • Articles
    • Tech Articles
    • Insight
    • Invention Stories
    • How to
    • What Is
  • News
    • EE Design News
    • DIY Reviews
    • Guest Post
    • Sponsored Content
  • Forums
    • EDABoard.com
    • Electro-Tech-Online
    • EG Forum Archive
  • Digi-Key Store
    • Cables, Wires
    • Connectors, Interconnect
    • Discrete
    • Electromechanical
    • Embedded Computers
    • Enclosures, Hardware, Office
    • Integrated Circuits (ICs)
    • Isolators
    • LED/Optoelectronics
    • Passive
    • Power, Circuit Protection
    • Programmers
    • RF, Wireless
    • Semiconductors
    • Sensors, Transducers
    • Test Products
    • Tools
  • EE Resources
    • DesignFast
    • LEAP Awards
    • Oscilloscope Product Finder
    • Video
    • White Papers
    • Webinars
  • EE Learning Center
  • Women in Engineering

Raspberry Pi camera QR-code scanning

February 16, 2021 By Usman ali Butt

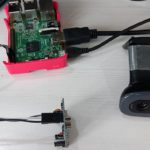
This tutorial will teach you how to scan QR codes using the Raspberry Pi module and the official Raspberry Pi camera. To attach the camera to the Raspberry pi, we use a dedicated header is available onboard. You can also use a USB camera with Raspberry Pi. The disadvantage is USB interface is slow. Also, the Raspberry Pi USB port version is 2.0, which is slow compared to 3.0. A few extra settings and the configuration are also required to tell Raspberry that a USB camera is attached with its USB port. The official camera is easy to go with, and all support files are already installed.

Before beginning, I will assume you have already connected the camera with Pi.

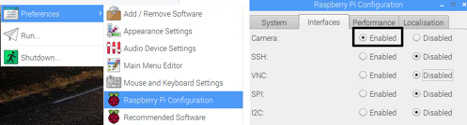
First, we must enable the camera in the Raspberry config file. The easy way is to do it graphically. Go to main menu>Preferences>Raspberry Pi Configuration next window, then go to interfaces against camera select the enable button.

Now it’s time to update and install the camera packages necessary to make the camera live. Picamera is a lightweight package. It offers many functions, and above all, it’s easy to play with. I installed this package. Open the command prompt from Raspberry pi and type the following commands.

$ sudo apt-get update
$ sudo apt-get install python-picamera python3-picamera

Note: Both versions of Python 2 and 3 packages will be installed at once with the above command. It depends on you what version of python you are working with. I am working with python 3.

Another package required is zbarlight. This package decodes the QR code present in the image. To installed zbarlight, type the following commands in the command prompt.

$ apt-get install libzbar0 libzbar-dev
$ pip3 install zbarlight

Image processing package named PIL is preinstalled in the Raspberry pi. In case it is not present, you can install it with

pip install –no-index -f https://dist.plone.org/thirdparty/ -U PIL

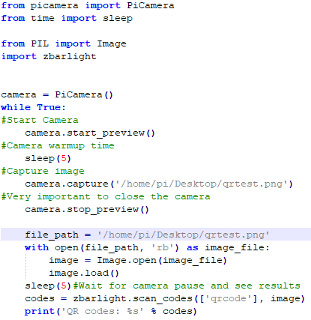
In the code, first imported the packages at the top.

  • PiCamera package to work with Raspberry Pi camera
  • Time>sleep for delay
  • PIL for image processing
  • Zbarlight to decode and find the QR code present in the processed image.

Next, an instance of PiCamera is created named camera. Camera.start_preview() opens the camera feed, and you can see the camera view on an LCD screen to which Raspberry pi is connected. Sleep(5) control remains in sleep for 5 seconds. You can see the camera feed in these 5 seconds. Camera.capture() captures the image and store it at the location specified in the function arguments. Camera.stop_preview() ends the camera feed means no camera display on the screen.

Now starts the image decode and QR code extraction part. A variable with the name file_path assigned path to the image. With open statement opens the image as an image file. ‘rb’ means the file under consideration is not a text file. Image variable is holding the file, which is opened by PIL(Image.open(image_file)) image processing library. Image.load() loads the image. Image vectors are now present in the image variable. Vectors are then passed to zbarlight to extract the QR code from vectors. Extracted QR code is stored in the codes variable and at the end print statement prints the extracted text on the console.

Testing

I generated a QR code using an online website on my mobile. QR input text is on the left-hand side, and the encoded QR image is on the right-hand side.

I executed the code on Raspberry pi and placed the mobile in front of the camera (You can see the video on the following link https://www.facebook.com/electronicsgru/videos/548460509194441).

Decoded message is

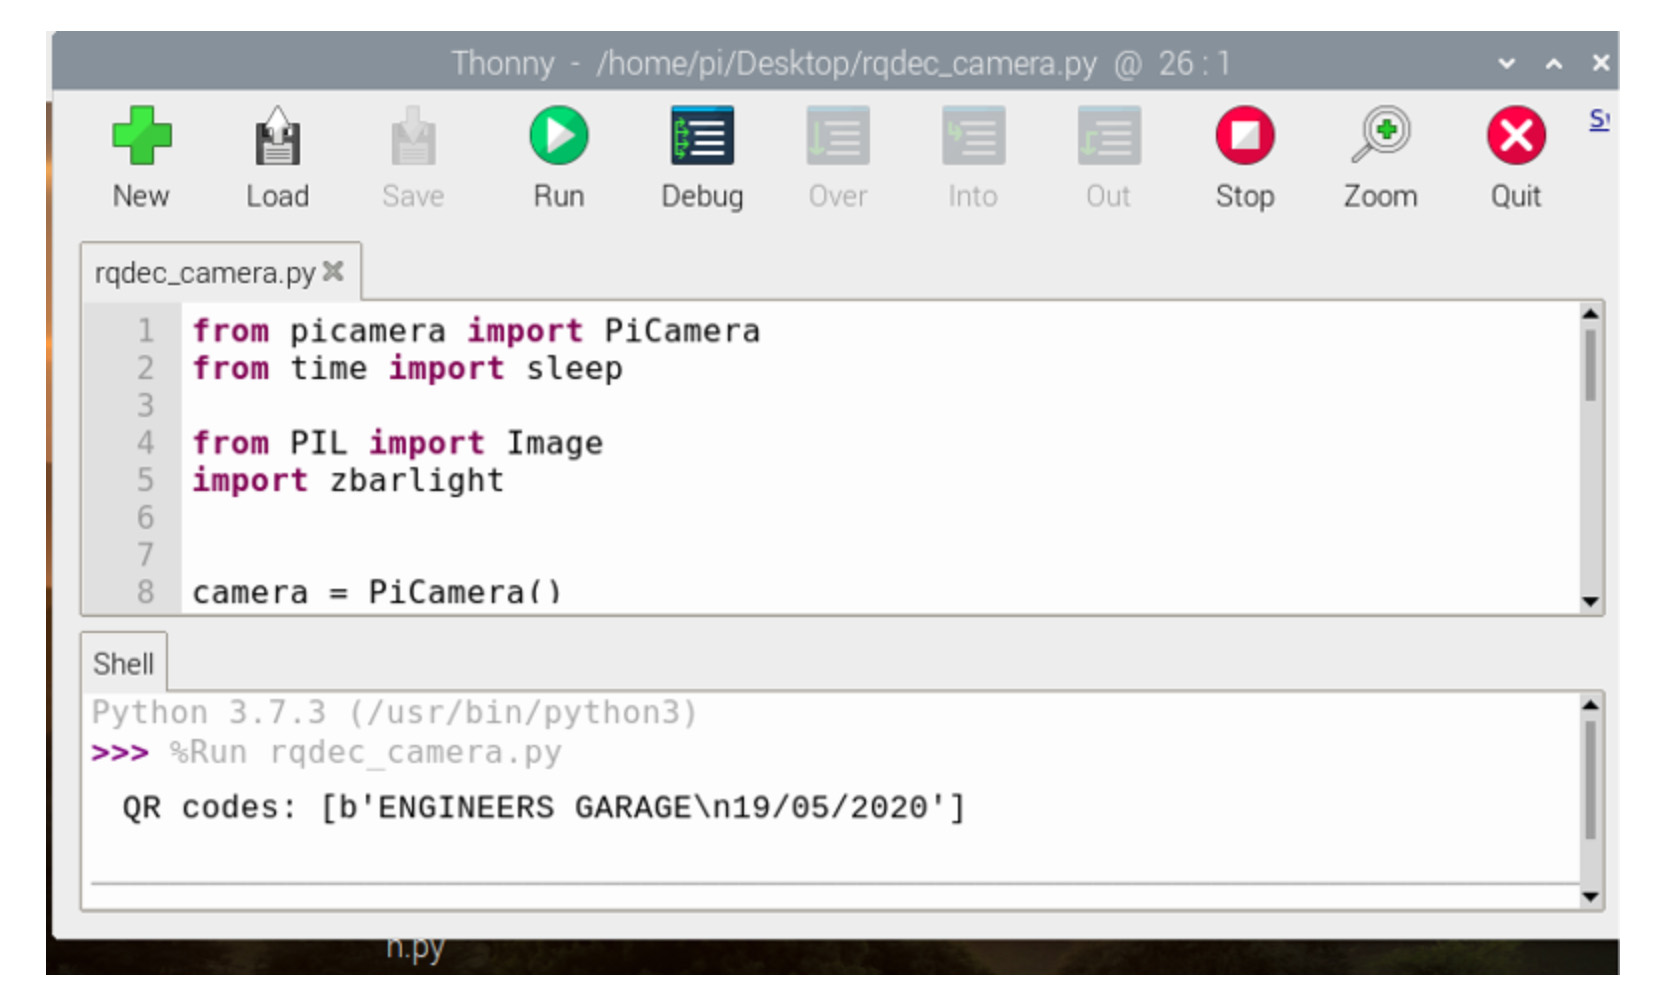
I used Thonny default python ide in Raspberry Pi. You can run the python file from the command prompt. I suggest using any python ide. Ide will let you know any errors and type in case if some error arises.

Let’s Diy this project: Where to purchase parts?

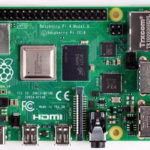
Raspberry Pi (Mouser Electronics)
Raspberry pPi camera (Mouser Electronics)


You may also like:


  • Raspberry Pi 2 & 3 Vs Beaglebone Black

  • Getting started with Raspberry Pi
  • Raspberry Pi 4
    RPi Python Programming 01: Introduction to Raspberry Pi 4
  • Python Basics
    RPi Python Programming 06: Python basics

  • Raspberry Pi based Smart Home Security System

Related Articles Read More >

Arduino-based automatic car windows for protection from dust and pollution
Raspberry Pi Server based Hotel/Restaurant Order Management System on IoT – IOT Part 46
Servo Control using Brain Wave (Part 12/13)
How to design an Arduino-based container shipment tracking system

Featured Tutorials

  • Remote Controlling Multiple Loads Using RF Module (Part 2/23)
  • Increasing Range of RF Module by Increasing Transmission Power (Part 3/23)
  • Increasing range of RF module by using antenna (Part 4/23)
  • Increasing the Range of RF Module by Using Antenna and Increasing Transmission Power (Part 5/23)
  • Controlling Multiple RF Receivers by Universal RF Transmitter (Part 6/23)
  • Multiple RF Receivers Controlled by a Universal RF transmitter based on Address Pin Configuration (Part 7/23)

Stay Up To Date

Newsletter Signup

EE Training Center Classrooms

“ee

“ee

“ee

“ee

“ee

Recent Articles

  • IAR Systems announces IEC and ISO certifications of its RISC-V development tools
  • Mathematical equations executed by an MCU
  • Infineon’s new Wi-Fi 6 brings reliable connectivity to smart homes
  • Toshiba releases compact LDO regulators for stabilizing DC power lines
  • Clap sensor using STM32 MCU
...

RSS EDABOARD.com Discussions

  • How can I explan this simple PWM creator Circuit
  • Can I use a Virtual clock instead of using a create_clock?
  • MCLR as digital input is resetting the device
  • Symmetrical Fully Differential Amplifier Layout
  • What is the DC voltage rating of this Y2 capacitor?

RSS Electro-Tech-Online.com Discussions

  • NTC flakey
  • Diode that only allows continuity at 13.5v?
  • Can two N-Channel MOSFETs be connected in series to perform a "AND" function?
  • Cycle Indicator Lights
  • #MEASURING OUTPUT VOLTAGE# Ideal laboratory power supply - YOURS requirements
Engineers Garage
  • Analog IC TIps
  • Connector Tips
  • DesignFast
  • EDABoard Forums
  • EE World Online
  • Electro-Tech-Online Forums
  • Microcontroller Tips
  • Power Electronic Tips
  • Sensor Tips
  • Test and Measurement Tips
  • 5G Technology World
  • About Us
  • Contact Us
  • Advertise

Copyright © 2021 WTWH Media LLC. All Rights Reserved. The material on this site may not be reproduced, distributed, transmitted, cached or otherwise used, except with the prior written permission of WTWH Media
Privacy Policy | Advertising | About Us

Search Engineers Garage

  • Projects and Tutorials
    • Circuit Design
    • Electronic Projects
      • 8051
      • Arduino
      • ARM
      • AVR
      • PIC
      • Raspberry pi
      • STM32
    • Tutorials
    • Components
  • Articles
    • Tech Articles
    • Insight
    • Invention Stories
    • How to
    • What Is
  • News
    • EE Design News
    • DIY Reviews
    • Guest Post
    • Sponsored Content
  • Forums
    • EDABoard.com
    • Electro-Tech-Online
    • EG Forum Archive
  • Digi-Key Store
    • Cables, Wires
    • Connectors, Interconnect
    • Discrete
    • Electromechanical
    • Embedded Computers
    • Enclosures, Hardware, Office
    • Integrated Circuits (ICs)
    • Isolators
    • LED/Optoelectronics
    • Passive
    • Power, Circuit Protection
    • Programmers
    • RF, Wireless
    • Semiconductors
    • Sensors, Transducers
    • Test Products
    • Tools
  • EE Resources
    • DesignFast
    • LEAP Awards
    • Oscilloscope Product Finder
    • Video
    • White Papers
    • Webinars
  • EE Learning Center
  • Women in Engineering