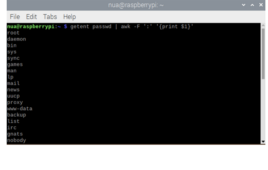
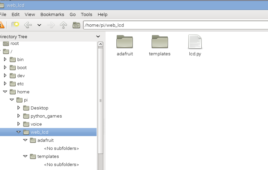
Raspberry Pi (RPi) is a popular microcomputer used for embedded systems design, hosting high-level applications that run over an operating system. Many of these applications have multiple active users with different permissions and access to system resources. As a result, there may be situations when it’s important to know what users are sharing the device.…
How to build a Raspberry Pi VPN server
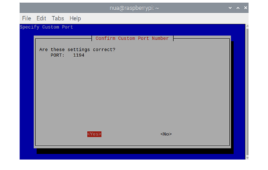
Cyber security is a growing concern. As homes and offices are more connected than ever, the risk of cyber attacks, identity theft, and hacking has increased significantly. A network has several smart devices connected to one another and the internet. In the case of a cyber-attack, each connected device is at risk. One effective way…
How to install OpenCV 4.5 & QT5 on Raspberry Pi & NVIDIA Jetson Nano for computer vision

OpenCV is one of the best computer vision tools available out there. It is the most popular machine vision library among developers and makers. Due to being open-source, the library has enjoyed vast community support and evolved as one of the most mature software packages. OpenCV itself stands for “Open-source Computer Vision.” The latest version…
Using SMTP in the IoT
Controlling IoT devices requires specific apps and settings. But you can also control them using emails since emailing is possible using SMTP (Simple Mail Transfer Protocol), which is on the TCP/IP stack. Therefore, the devices that support TCP/IP stack can use emails as command and control. So, for an application purpose, we will be making…
Raspberry Pi-based digital door peekhole
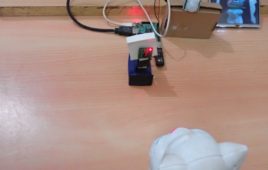
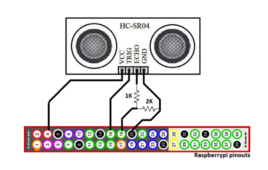
A peephole, spyhole, or peekhole is a small opening through the door that allows viewing from inside to outside. Such door holes allow seeing outside the door without opening it. Usually, these door holes have a fisheye lens to have a wider look of the outside. In this project, we have developed a digital version…
Raspberry Pi to Light a Led using Voice Control- (Part 2/12)
Now voice control is not only limited to high end devices such as smart phones or iPhones. The Raspberry Pi, which is an open source hardware and completely customizable offers you the same. Plus, it’s cheap! You can customize it to play music, open gmail or maybe tell you some jokes.Here is a simple yet interesting example on how to customize your Raspberry Pi to light a led using voice control. In this tutorial we will learn how to install Voice Command, and making the configuration to turn a Led on and off.
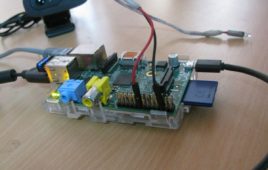
How to use Raspberry Pi to monitor and log environmental parameters
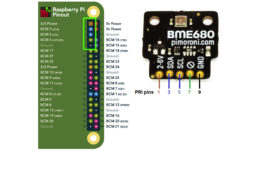
In this tutorial, we’ll learn how to interface the four-in-one BME680 pressure, gas, humidity, and temperature sensor with Raspberry Pi (RPi). This will include understanding how to log and retrieve data from a database. The BME680 can “communicate” with external controllers on either the serial peripheral interface (SPI) and I2C protocols. For this project, we’ll…
Raspberry Pi-based smart home security system
Home Security Systems are a need of the modern day houses. It is possible to design a simple home security solution by using Raspberry Pi and utilizing the power of Internet of Things. The home security system designed in this project is a simple and easily installable device built using Raspberry Pi 3, Web Cam and PIR Motion Sensor. The Raspberry Pi 3 Model B comes equipped with on-board Bluetooth (BLE) and Wi-Fi (BCM43438 Wireless LAN), so, it can be easily connected with a Wi-Fi Router to access a cloud service.
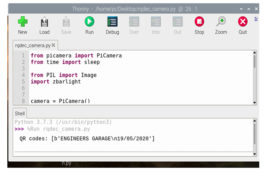
Raspberry Pi camera QR code encoding and decoding
This tutorial is about creating a QR code (quick response code) using Raspberry Pi B and Python 3.7. QR code is an optical machine-readable code. Optical means it can be decoded using any camera device. A direct competitor of QR code is Bar code. QR’s advantage over Bar Code is it’s faster to read and…
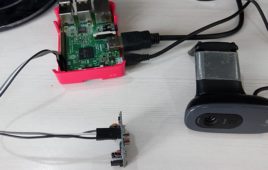
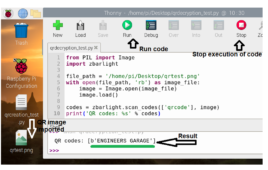
Raspberry Pi camera QR-code scanning
This tutorial will teach you how to scan QR codes using the Raspberry Pi module and the official Raspberry Pi camera. To attach the camera to the Raspberry pi, we use a dedicated header is available onboard. You can also use a USB camera with Raspberry Pi. The disadvantage is USB interface is slow. Also,…
Getting started with Raspberry Pi
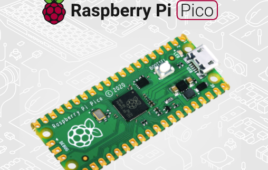
Raspberry Pi Pico is a low-cost, high-performance microcontroller board built on silicon with flexible digital interfaces. Whether you choose to use the C/C++ SDK or the official MicroPython port, everything you need to get started is available here. Key features: RP2040 microcontroller chip designed by Raspberry Pi in the UK Dual-core Arm Cortex M0+ processor,…
How to Access Raspberry Pi Directly through the Ethernet Port of PC – (Part 03/38)
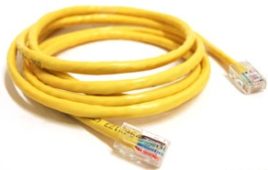
The Raspberry pi is a single board minicomputer which has only the essential hardware included so as to meet the goal of low cost. The board is Raspberry pi board runs on ARM11 processor but is available at extremely cheap price. The board is designed with an intention of providing computer education to the remote schools where the PCs are not very commonly used. The idea behind the design is to use the TV screen as the display unit for the Raspberry pi board and hence converting the normal TV into a computer. The board is hence provided with a RCA connector which can be used to connect it directly to a TV screen which is based on PAL and NTSC standard. The board also has a HDMI connector output which can be used to connect the board to a HD TV.
ESP8266 and Arduino-based IoT behicle tracking dystem
The vehicle tracking systems are designed for tracking the movement of a vehicle from a location at any time. Such system is equipped with a GPS receiver which maintains the GPS location of the device. The GPS location of the device traced by the GPS sensor is sent to a cloud server or cloud service with the help of a controller. This project is a simple implementation of such system on one of the most popular prototyping boards – Arduino UNO.
How to Make First Python Program with Beaglebone Black
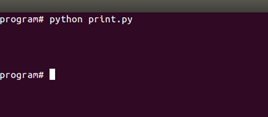
Beaglebone black supports various high level languages such as a C, C++ and scripting languages like java, python. Programming of application is mostly written in C language for controller or processor. Python is an interpreted language and great library source available for BBB. At low level, programming in python is efficient and responds quicker than C language.This tutorial talks about making first python program with Beaglebone Black. So in case you are not aware of basic python programming then I suggest you to go through the same before proceeding.
Web Controlled LCD Display- (Part 9/12)
We will make a straightforward web application with a frame that permit a client to send a message to the Raspberry Pi utilizing Flask in a web browser. This will permit us to control the Raspberry Pi from a PC, tablet or smart phone. At the point when the form is submitted, it will send the message to the LCD by means of the Raspberry Pi’s GPIO ports. All the code, including the web application, is in Python and HTML.
Web controlled Home Automation- (Part 11/12)
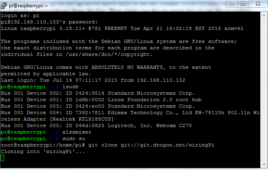
The Wiring Pi project is used here to switch the GPIO pins high and low. Run the following commands for downloading Wiring Pi and install.
How to Use Raspberry Pi as a Game Server- (Part 35/38)
In this particular project Ubuntu is installed on Raspberry pi board and is loaded on the Raspberry pi board and is connected to a router using a cross-over LAN cable. Hence the only additional hardware required with the Raspberry pi for this project is a LAN cable only.Once connected to the router with Ubuntu OS on it, it can be accessed remotely from other systems connected in same LAN network. The board can be accessed from a Linux PC using the secure shell which is enabled in the Ubuntu of Raspberry pi board.This article focus on how to configure the Raspberry pi board as a web server and the technique to make it serve a graphical game for those who type the IP or address of the Raspberry pi board from the address tab of their web browser. The Raspberry pi web server is available in the same LAN network or it can be made available to anyone who has the internet connectivity using the technique of port forwarding.
How to Add Sound to Raspberry Pi Game Pad- (Part 37/38)
The gamepad is a simple circuit built on a breadboard with few buttons, LEDs and a resistor array. There are eight general purpose IO pins on the 13*2 pin connectors of the Raspberrypi board and among them four pins has been selected as input and then remaining four pins as output. The input pins are connected to push button and are pulled down using 1K resistors. The output pins are connected to the LEDs through another set of 1K resistors. For this project the Raspberry pi board is loaded with Ubuntu and is remotely accessed using VNC. To access the pins that coming out of the Broadcom controller the C library “bcm2835” has been downloaded and installed. This article focuses on how to add sound to a game that is coded to be played with a Raspberry pi gamepad.
Simple Raspberry Pi Game Pad for Ball Catching Game – (Part 36/38)
Raspberry Pi is provided with a RCA connector which can be used to connect it directly to a TV screen which is based on PAL and NTSC standard. The board also has a HDMI connector output which can be used to connect the board to a HD TV. One can also use remote login to access the Raspberry pi and view the GUI (Text User Interface) on the PC screen. The Raspberry pi board is also very easy to interface with external devices or circuits through its pin outs. This makes the Raspberry pi a suitable platform for playing and developing interesting games.This article discusses how to develop a simple graphical game using the HTML5 and JavaScript language and to interface it with an external custom made game pad hardware connected to the pins of Raspberry pi board.
Playing Snake Game using Raspberry Pi Game Pad- (Part 38/38)
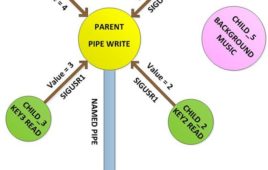
This article discusses about how to develop simple game pad hardware and interface it with the Raspberrypi board and also about the technique of interfacing a game code written in HTML5 with the game pad. Here a Snake game written in HTML5 and JavaScript is modified in such a way that it can be played with the new game pad having four push buttons. In this project the techniques of signals, pipe, fork etc. are used get the game running. The Snake game running on a browser window forms the GUI or front end of the entire system. In a Linux operating system each hardware device is represented as a file. In this project there is game pad which is the hardware and there is a process which reads from the game pad and there is also a Pipe file or FIFO in-between the game and the game pad reading process.