The project presented here opens or closes the gates – switches depending upon input signal frequency. It first count input signal frequency and then based on in which range it falls, it closes one particular switch – gate and allows to pass the signal through that switch. That means it sorts the incoming signal based on frequency. So the project is given name frequency selective gates.
The project is build using micro controller AT89C52 and analog switch ADG5142. It also uses LCD to display frequency and display messages, LEDs to indicate which gate is open*(switch is closed).
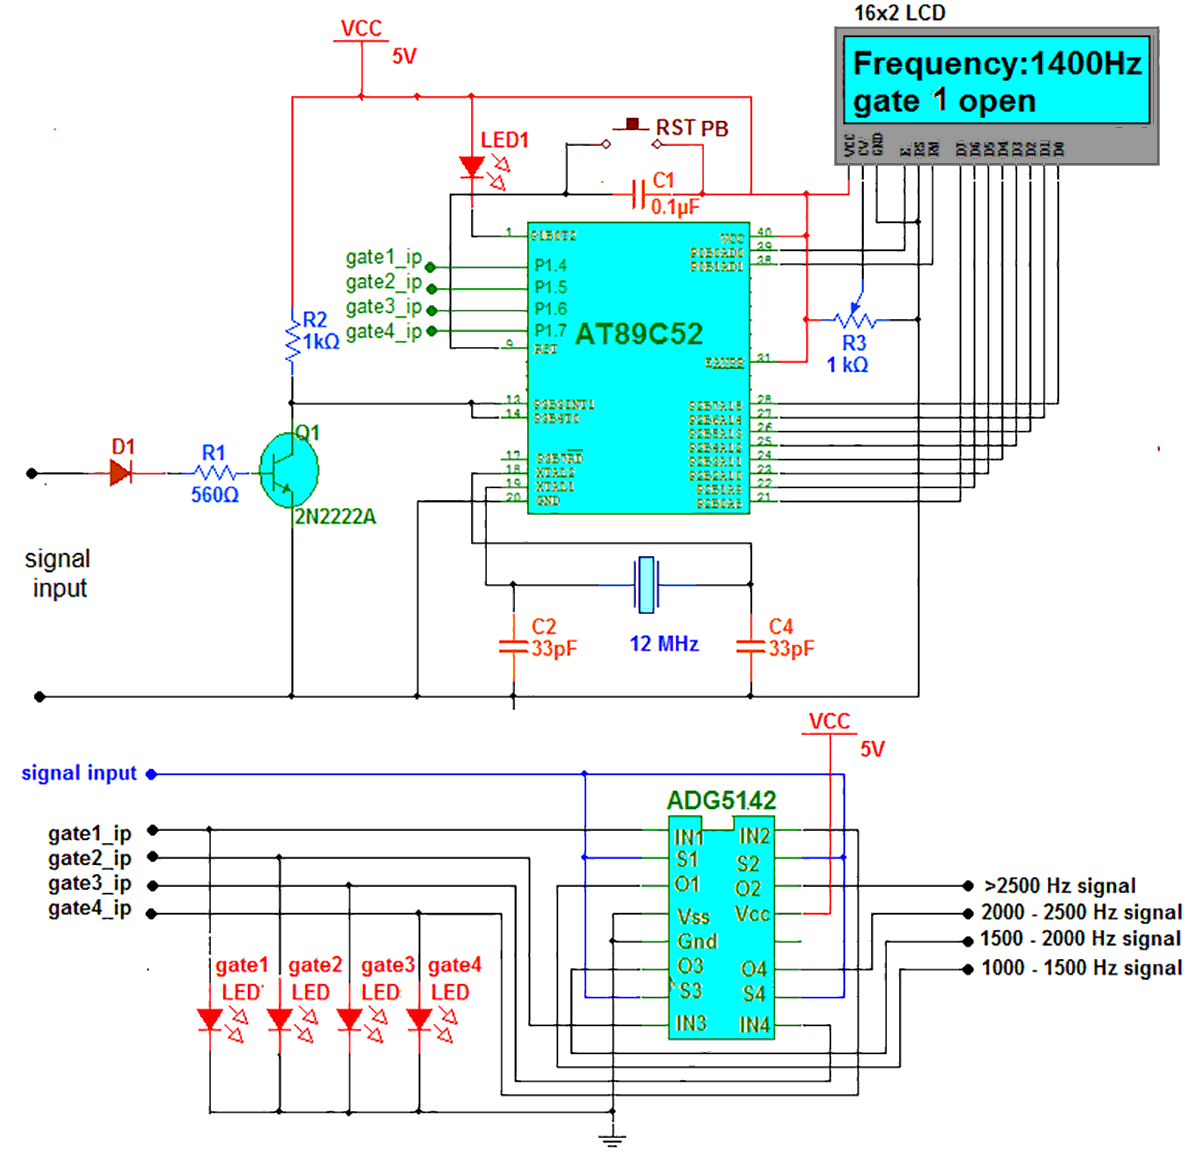
ADG5142 is analog switch from Analog Devices. It’s a Quad SPST switches. There are four SPST switches that are controlled through their 4 logic control inputs. When logic control input is high (logic 1) the switch is closed and vice versa. E.g. if IN1 is high, S1 is connected to O1 and if IN1 is low – no connection between S1 and O1. For more detail description, go through its datasheet.
The given project selects four different gates depending upon following frequency ranges.
(Check the circuit diagram tab for complete circuit for Frequency Selective Gates (switches) )
|
Sr no |
Frequency range |
Selected gate |
Switch closed |
|
1 |
1000 – 1500 Hz |
Gate 1 |
Switch 1 |
|
2 |
1500 – 2000 Hz |
Gate 2 |
Switch 2 |
|
3 |
2000 – 2500 Hz |
Gate 3 |
Switch 3 |
|
4 |
Above 2500 Hz |
Gate 4 |
Switch 4 |
The different frequency ranges chosen here is for demonstration. One can select different frequency ranges as per requirements to operate gate or to close the switch.
*Note: – don’t get confuse with gate and switch. The words are different but the meaning and operation are same. Opening a gate means switch is closed. It allows signal to pass. Similar to that gate is close means switch is open – the signal is not allowed to pass.
Circuit description:
· The frequency input is given to base input of NPN transistor Q1 through diode D1 and current limiting resistor R1
· The transistor is connected in switch configuration and its collector output is connected with timer 0 input and INT1 (external interrupt 1) input of micro controller AT89C52
· An LED is connected to pin P1.0 as shown
· A capacitor C1 is connected in between Vcc supply and reset input pin (9) to provide “power on reset”
· A push button is connected in parallel with C1 between Vcc supply and reset pin that is used for manual reset
· A 12 MHz crystal along with two 33 pF capacitors is connected to crystal input pins XTAL1 and XTAL2
· Port P2 drives data pins D0-D7 of LCD. Two LCD control pins RS and En are connected with P0.0 and P0.1 respectively. RW pin is connected to ground
· One 1 K potentiometer is connected to VEE pin of LCD as shown to vary LCD brightness
· PORT 1 pins P1.4 – P1.7 are connected to enable input pins IN1 – IN4 of analog switch chip ADG5142. Each pin also drives one RED LED as shown
· The input signal frequency is given as input to all four switch inputs S1 – S4. The four outputs O1 – O4 of switches are taken out that gives output signal of different frequency ranges
Circuit operation:
· The diode D1 rectifies incoming AC signal – means clamps negative cycles. Thus it prevents negative input to micro controller
· The transistor further converts all kind of input signals (sinusoidal, triangle etc) into pulses
· As the transistor output is applied to both interrupt input as well as timer/counter input of micro controller, the first negative edge to micro controller will generate an interrupt and it will start counting pulses till 1 second
· The RED LED1 will be ON to indicate pulse counting process
· After exact 1 second micro controller will stop counting and displays count on LCD as frequency because frequency = number of pulses in 1 second
· Based on this frequency count it will close one of the switches as per the frequency falls in which range.
· Logic 1 input is given to respective switch enable input INX to close the switch. The respective RED LED becomes ON to indicate that switch is closed
· At a time only one of the switches is closed as per the input signal frequency fall in which range. E.g. if input signal frequency is 1400 Hz it must pass through first switch output O1 only. So first switch is closed that is indicated by gate1 LED
· This process repeats again after 1 second when new frequency is counted
· Thus the incoming signal frequency is continuously counted, displayed on LCD and switches are opened or closed based on the frequency falls in which range
· The incoming signal is allowed to pass through any one of four switches (gates) thus the signal is sorted out on the bases of its frequency range
The complete circuit operation is due to the program loaded into the internal FLASH memory of micro controller. All the functionalities are implemented using software logic and program.
Software program:
The program performs following tasks
· It counts pulses for 1 second period
· It indicated counting process on LED
· Displays frequency on LCD screen
· Opens or closes switches as per the frequency
The program is written in C language. It is compiled using KEIL (IDE) cross compiler tool. It is compiled for generic 8051 micro controller platforms so it can be used for all different micro controllers of MCS51 family like 89C51 / 89C52 / 89S52 etc. After compiling the program the HEX file is generated. That HEX file is loaded into the internal FLASH (EEPROM) of micro controller using any suitable EEPROM programmer.

Fig. 1: Prototype of 8051 Microcontroller based Frequency Selective Switches
Project Source Code
###
//Program to#include<reg51.h>#include<string.h>
#define ON 0;
#define OFF 1;
sbit rs = P0^0; // rs pin of LCD
sbit en = P0^1; // en pin of LCD
sbit led= P1^0; // LED pin
sbit gate1_led = P1^4; // switch enable input pin
sbit gate2_led = P1^5;
sbit gate3_led = P1^6;
sbit gate4_led = P1^7;
unsigned int flag=0;
void delay() // 1 sec delay
{
int k;
TL1 = 0xAF; // load value 15535=3CAF
TH1 = 0x3C;
TR1 = 1;
for(k=0;k<20;k++)
{
while(TF1==0);
TF1 = 0;
TL1 = 0xBF;
TH1 = 0x3C;
}
TR1 = 0;
}
void lcd_busy() // wait till LCD busy
{
int x;
for(x=0;x<1500;x++);
}
void writecmd(unsigned char a) // send command byte to LCD
{
lcd_busy();
rs = 0;
P2 = a;
en = 1;
en = 0;
}
void writedata(unsigned char b) // send data byte to LCD
{
lcd_busy();
rs = 1;
P2 = b;
en = 1;
en = 0;
}
void writestr(unsigned char *s) // write string / message to LCD
{
unsigned char l,i;
l = strlen(s);
for(i=0;i<l;i++)
{
writedata(*s);
s++;
}
}
void int1(void) interrupt 2 // external interrupt 1 function
{
EA=0; // first disable interrupts
led=0;
TH0=0x00; // clear T0
TL0=0x01;
TR0=1; // start timer 0
delay(); // give 1 sec delay
TR0=0; // stop timer
flag=1; // if not then set the flag
led=1;
}
void select_gate() // select switch or gate as per frequency
{
unsigned int tmp1,tmp2,tmp3,tmp4,t,t1,i,j,tmp;
unsigned char asci[4];
tmp1 = (TL0 & 0x0F);
tmp2 = TL0 >> 4;
tmp3 = (TH0 & 0x0F);
tmp4 = TH0>>4; // convert HEX into decimal
tmp2 = tmp2*16;
tmp3 = tmp3*256;
tmp4 = tmp4*4096;
t = tmp1+tmp2+tmp3+tmp4;
tmp = t;
i=3;
if (t>=1000) // then convert decimal into ASCII
{
while(t>=10)
{
t1=t%10;
asci[i]=t1+0x30;
t=t/10;
i--;
}
asci[0]=t+0x30;
}
else
{
while(t>=10)
{
t1=t%10;
asci[i]=t1+0x30;
t=t/10;
i--;
}
asci[1]=t+0x30;
asci[0]=0x20;
}
writecmd(0x89);
writedata(':');
for(j=0;j<4;j++)
writedata(asci[j]); // display digits of frequency one by one
writestr("Hz");
if((tmp>1000) && (tmp<=1500)) // if frequency is within 1000 to 1500
{
writecmd(0xC0);
writestr("Gate 1 open "); // close 1st gate -switch
gate1_led = ON;
gate2_led = OFF;
gate3_led = OFF;
gate4_led = OFF;
}
else if((tmp>1500) && (tmp<=2000)) // else if frequency 1500 to 2000
{
writecmd(0xC0);
writestr("Gate 2 open "); // close 2nd gate - switch
gate1_led = OFF;
gate2_led = ON;
gate3_led = OFF;
gate4_led = OFF;
}
else if((tmp>2000) && (tmp<=2500)) // same for other two ranges
{
writecmd(0xC0);
writestr("Gate 3 open ");
gate1_led = OFF;
gate2_led = OFF;
gate3_led = ON;
gate4_led = OFF;
}
else if(tmp>2500)
{
writecmd(0xC0);
writestr("Gate 4 open ");
gate1_led = OFF;
gate2_led = OFF;
gate3_led = OFF;
gate4_led = ON;
}
}
void main()
{
TMOD=0x15; // timer 0 in 16 bit counter and timer 1 in 16 bit timer
P2 = 0x00; // P2 & P1 as output port
P1 = 0x00;
rs=0; // clear all LCD control pins
en=0;
led=0;
led=1;
writecmd(0x3C); // initialize LCD
writecmd(0x0E);
writecmd(0x01);
writestr("Frequency"); // display initial message
writecmd(0xC0);
writestr("selective Gates");
TH0=0x00; // clear T0
TL0=0x01;
IT1=1;
IE=0x84; // enable external interrupt 1
while(1)
{
while(flag==0); // remain within loop till flag is clear
select_gate(); // when flag is set select gate to be closed
flag=0; // reset the flag to 0 again
EA=1; // again enable interrupts
}
}
###
Circuit Diagrams
Project Video
Filed Under: Electronic Projects
Filed Under: Electronic Projects

Questions related to this article?
👉Ask and discuss on EDAboard.com and Electro-Tech-Online.com forums.
Tell Us What You Think!!
You must be logged in to post a comment.