Before starting with a microcontroller, certain factors like its cost, availability etc. should be considered. One of the most important criteria to choose a controller is the availability of its development tools like assembler, compiler, debugger, simulator etc. Various companies have developed different types of compilers and simulators which are easily available for use.
Development cycle:
For developing or testing an embedded system application, a particular development cycle is followed which consists of several stages. An Integrated Development Environment (IDE) allows for implementation of all such steps of a development cycle.
Typically, a development cycle has following steps:
a. The code is written/edited in an Editor program.
b. The Compiler/Assembler/Linker programs generate relevant support files like .hex, .obj etc.
c. The code is loaded into Simulator/Debugger program.
d. The code is analyzed by Simulation or Debugging.
If an error occurs, the code is re-edited and the whole cycle is repeated.

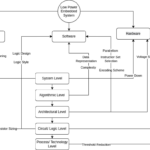
Fig. 1: Image showing Software Development Cycle
Different IDE tools:
There are various IDE tools provided by different companies for PIC18 series of microcontrollers. Microchip developed MPLAB IDE tools for each series of PIC microcontroller. This IDE suite provides following programs :
· Editor : MPLAB Editor
· Assembler : MPASM
· Compiler : MPLAB C Compiler for PIC18 MCUs
· Linker : MPLINK
· Simulator : MPLAB SIM
· Debugger : MPLAB ICD 2/3
· Programmer : Pickit 2/3
Besides these, Hi-Tech C compiler, Byte Craft’s MPC and CCS’s PCWH are third party compilers which can work on MPLAB IDE.
mikroElektronika has also developed an IDE for PIC microcontroller which is named Mikro C. This IDE provides C compiler, software simulator and mikroICD debugger. Along with this package, mikroElektronika provides different tools like Graphical LCD bitmap editor, LCD custom character editor, USART terminal etc. MikroC IDE also provides in-built custom libraries for not only PIC’s internal peripherals like ADC, USART, SPI, I2C etc. but also for external peripherals like LCD, 7-segment etc.
Please note that a dedicated USB HID Terminal and a HID Class Library is also provided with this package for USB Communication with PIC Microcontrollers that support USB protocols like PIC18F4550 etc.
How to work with MicroC
How to work with MikroC:
Following are the steps to start a project with Mikro C IDE.
Step 1 :
To start a new project, open mikroC.exe and go to Project -> New Project. The following window will appear.

Fig. 2: Screenshot of New Project window in MikroC
The project name, its location and clock frequency is provided in the New Project window. The device configuration settings are also selected at the beginning of the project. PIC18F4550 includes several features like internal oscillator, watchdog timer etc to maximize the reliability and minimize the cost through elimination of external components. These features are configured through the Configuration bits.
Step2 :
After configuring the initial settings the code can be written in the Code Editor.
The code is written in Code Window and built by pressing Ctrl+F9 or from Project -> Build. The error(s), if any, will be displayed in the Message Window at the bottom.

Fig. 3: Screenshot showing parts of main window of MikroC IDE
Continued
Step3 : Debugging
Debugging of the code can be started with F9 or from Run -> Start Debugging. The Watch Window can be opened by View -> Debug Window -> View Watch. A watch can be added through Add option in the Watch Window. The step by step debugging can be done by pressing F7 and corresponding result will be displayed.

Fig. 4: Screenshot of Debug Options in MikroC IDE
Step4 : When the code is built, a .hex file is generated in the directory location selected at the start of the project. The generated .hex file can be burnt on the PIC microcontroller using the burn JDM type or PICkit or any other similar burners/programmers.
You may also like:


Filed Under: Tutorials

Questions related to this article?
👉Ask and discuss on Electro-Tech-Online.com and EDAboard.com forums.
Tell Us What You Think!!
You must be logged in to post a comment.