Engineers Garage

  • Projects and Tutorials
    • Electronic Projects
      • 8051
      • Arduino
      • ARM
      • AVR
      • PIC
      • Raspberry pi
      • STM32
    • Tutorials
    • Circuit Design
    • Project Videos
    • Components
  • Articles
    • Tech Articles
    • Insight
    • Invention Stories
    • How to
    • What Is
  • News
    • Electronic Products News
    • DIY Reviews
    • Guest Post
  • Forums
    • EDABoard.com
    • Electro-Tech-Online
    • EG Forum Archive
  • Digi-Key Store
    • Cables, Wires
    • Connectors, Interconnect
    • Discrete
    • Electromechanical
    • Embedded Computers
    • Enclosures, Hardware, Office
    • Integrated Circuits (ICs)
    • Isolators
    • LED/Optoelectronics
    • Passive
    • Power, Circuit Protection
    • Programmers
    • RF, Wireless
    • Semiconductors
    • Sensors, Transducers
    • Test Products
    • Tools
  • EE Resources
    • DesignFast
    • LEAP Awards
    • Oscilloscope Product Finder
    • White Papers
    • Webinars
  • EE Learning Center
    • Design Guides
      • WiFi & the IOT Design Guide
      • Microcontrollers Design Guide
      • State of the Art Inductors Design Guide
  • Women in Engineering

Home appliance control using Android phone

By Deepesh Verma

With enhancement in technology, automation has become a need whether it is home, office or some other place. At home we come across many appliances be it  fan, AC, TV,  lights, etc. What if you could operate all of them with the Android Phone you’re holding in your hand.

Prototype of Android Mobile controlled Home Automation System

Fig. 1: Prototype of Android Mobile controlled Home Automation System

This project aims to incorporate android phone control over electrical appliances. We use Bluetooth communication between Android phone and a Receiver (control unit) that is connected to the appliances.
Bluetooth is a wireless technology standard for exchanging data over short distances (using short-wavelength UHF radio waves in the ISM band from 2.4 to 2.485 GHz) from fixed and mobile devices and building personal area networks (PANs). Invented by telecom vendor Ericsson in 1994, it was originally conceived as a wireless alternative to RS-232 data cables. It can connect several devices, overcoming problems of synchronization.

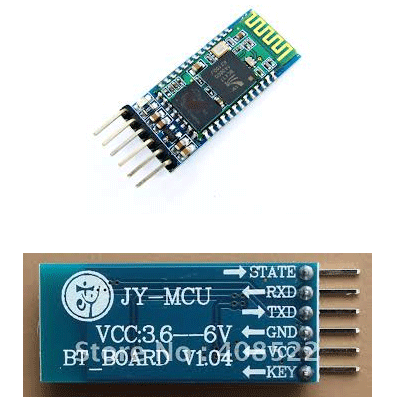
HC-05 module is an easy to use Bluetooth SPP (Serial Port Protocol) module, designed for transparent wireless serial connection setup.  It contains 6 pins that are labelled on the back but most modules only have 4 of those populated with pogo pins.  KEY & STATE  are not required, as KEY is used for flashing the device and STATE simply indicates  whether the device is awake or not.  So that leaves only GND, VCC, TXD, RXD.
Typical image of HC-05 Bluetooth Module

Fig. 2: Typical image of HC-05 Bluetooth Module

For connecting the module with Arduino, we need to use the Serial (Tx and Rx) pins provided on the board.

Connections & Working

Making Connections with HC-05:
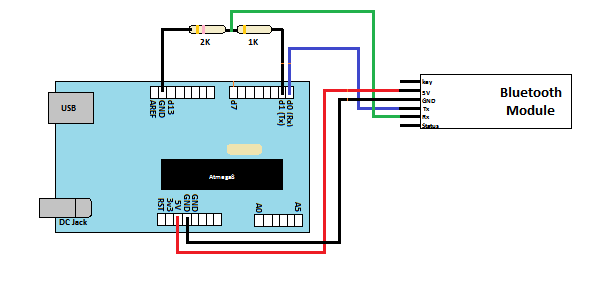
Some modules have VCC labelled for working voltages up to ~6 volts.  These modules DO NOT like anything except 3.3 volts on the VCC line. We should use a level converter to 3.3V on the RXD line.  Use two resistors, as a simple voltage divider to make the TTL level conversion.  Wire  one 2.2k ohm resistor to ground and another 1k ohm resistor to the TXD line on the MCU. Connect the RXD pin in between the two resistors for an output of approx 3.4 volts.
Connect RXD pin of module to TXD of Arduino (Digital Pin 1), through the voltage divider configuration shown below:

Image showing circuit connections of Arduino Uno and HC-05 Bluetooth Module
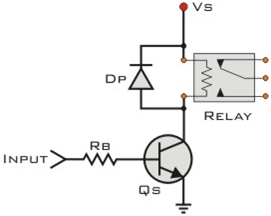
Fig. 3: Image showing circuit connections of Arduino Uno and HC-05 Bluetooth Module

Now connect TXD of module to RXD of Arduino (Digital Pin 0).
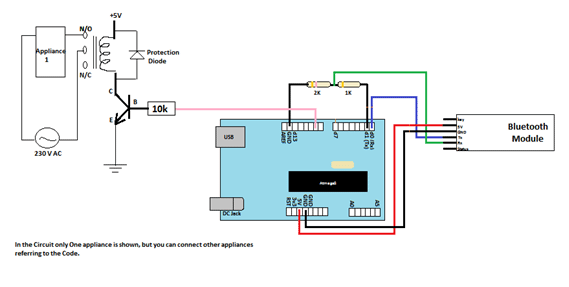
To operate the appliances, we can’t connect them directly to Arduino. We need something called RELAY which is driven with the help of Transistor based driver circuit.

Circuit Diagram of Transistor based Relay Driver

Fig. 4: Circuit Diagram of Transistor based Relay Driver

The ‘Input’ is from Arduino I/O pin. RB is the current limiting resistor at the base of the transistor. Its value is typically 10K Ohm. ‘VS’ is the supply voltage needed to trigger the Relay coil (It depends on the Relay rating). A diode is connected in Reverse in parallel to the relay. This is done to avoid the back e.m.f. generated by coil that can damage the transistor or the Arduino.

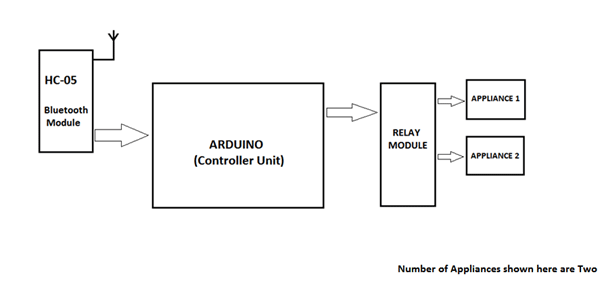
A simplified Block diagram of the complete system is shown below:
Block Diagram of Android Mobile controlled Home Automation System

Fig. 5: Block Diagram of Android Mobile controlled Home Automation System

After making above connections, you’ll see blinking led on the module. This just ensures your device is powered properly. After that pick your Android Phone, and get the App- “Arduino Bluetooth Terminal” from the Google Play Store. This app is available for free, and is easy to use.
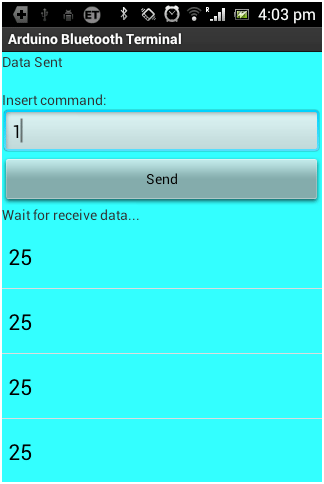
Screenshot of Android App used to control Home Appliances

Fig. 6: Screenshot of Android App used to control Home Appliances

After installation, turn ON Bluetooth of phone. Now search for devices until you find HC-05 and then start pairing with it. Enter Password 1234, when asked.
If properly paired, the LED blinking on Bluetooth module will  stop.  If not check the connections again. Get back to the app you just downloaded. It’ll automatically find the device, match the key it displays, and start conversation. Make sure, the phone’s Bluetooth remains ON.

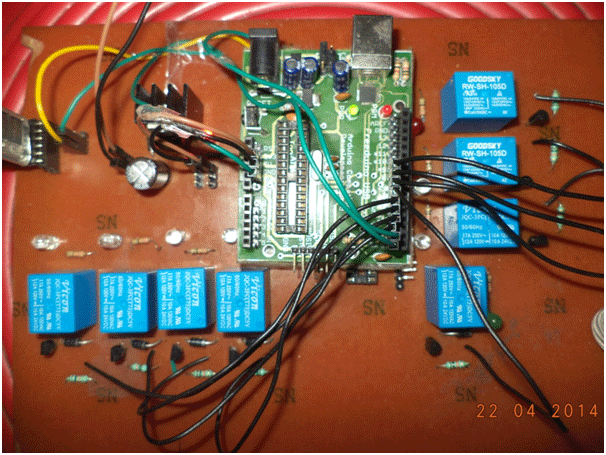
Prototype of Android Mobile controlled Home Automation System

Fig. 7: Image showing complete prototype of Arduino based Android phone controlled Home Automation System


System Operation:

When we send ‘1’ to the Arduino, the Appliance 1 connected to Arduino Turns ON and when ‘2’ is sent, Appliance 2 turns ON. The serial data is read by Arduino, through Serial.read () function and is stored in the integer type variable state declared in the program. After this in the loop(), we just compare state value with 1, 2, 3 and so on till 8 to check the ON condition of 8 Appliances. Then we compare state value with a, b, c and so on till h to check the OFF condition of appliances and perform respective operation.

In addition to this we can also monitor the physical state such as  temperature,  pressure, etc., through the android phone. Say, we need to monitor the temperature of the room. We connect the LM35 Temperature sensor to the Arduino. Now read the sensor value and send it to the phone via serial link established over Bluetooth between  the phone and Arduino.


Project Source Code

###


int led1 = 2;
int led2 = 3;
int led3 = 4;
int led4 = 5;
int led5 = 6;
int led6 = 7;
int led7 = 8;
int led8 = 9;
int state;
int flag=0;       
void setup()
{
    pinMode(led1, OUTPUT);
    pinMode(led2, OUTPUT);
    pinMode(led3, OUTPUT);
    pinMode(led4, OUTPUT);
    pinMode(led5, OUTPUT);
    pinMode(led6, OUTPUT);
    pinMode(led7, OUTPUT);
    pinMode(led8, OUTPUT);
Serial.begin(9600);
}
void loop() {
    if(Serial.available() > 0)
    {    
      state = Serial.read();  
      flag=0;
    }  
    if (state == '1')
    {
       digitalWrite(led1, HIGH);
       if(flag == 0){
        Serial.println("Appliance 1 is ON");
          flag=1;
        }
    }
  
   else if (state == '2')
    {
        digitalWrite(led2, HIGH);
        if(flag == 0){
        Serial.println("Appliance 2 is ON");
        flag=1;
        }
    }
    else if (state == '3')
    {
        digitalWrite(led3, HIGH);
        if(flag == 0){
        Serial.println("Appliance 3 is ON");
        flag=1;
        }
    }
    else if (state == '4')
    {
        digitalWrite(led4, HIGH);
        if(flag == 0){
        Serial.println("Appliance 4 is ON");
        flag=1;
        }
    }
    else if (state == '5')
    {
       digitalWrite(led5, HIGH);
        if(flag == 0){
          Serial.println("Appliance 5 is ON");
          flag=1;
        }
    }
  
   else if (state == '6')
    {

        digitalWrite(led6, HIGH);
        if(flag == 0){
          Serial.println("Appliance 6 is ON");
          flag=1;
        }
    }
    else if (state == '7')
    {
        digitalWrite(led7, HIGH);
        if(flag == 0){
         Serial.println("Appliance 7 is ON");
          flag=1;
        }
    }
    else if (state == '8')
    {
        digitalWrite(led8, HIGH);
        if(flag == 0){
        Serial.println("Appliance 8 is ON");
         flag=1;
        }
    }
    else if (state == 'a')
    {
        digitalWrite(led1, LOW);
        if(flag == 0){
         Serial.println("Appliance 1 is OFF");
         flag=1;
        }
    }
    else if (state == 'b')
    {
        digitalWrite(led2, LOW);
        if(flag == 0){
          Serial.println("Appliance 2 is OFF");
          flag=1;
        }
    }
   else if (state == 'c')
    {
        digitalWrite(led3, LOW);
        if(flag == 0){
          Serial.println("Appliance 3 is OFF");
          flag=1;
        }
    }
  else if (state == 'd')
    {
       digitalWrite(led4, LOW);
        if(flag == 0){
          Serial.println("Appliance 4 is OFF");
          flag=1;
        }
    }
   else if (state == 'e')
    {
         digitalWrite(led5, LOW);
        if(flag == 0){
          Serial.println("Appliance 5 is OFF");
          flag=1;
        }
    }
    else if (state == 'f')
    {
         digitalWrite(led6, LOW);
        if(flag == 0){
          Serial.println("Appliance 6 is OFF");
          flag=1;

        }
    }
    else if (state == 'g')
    {
         digitalWrite(led7, LOW);
        if(flag == 0){
          Serial.println("Appliance 7 is OFF");
          flag=1;
        }
    }
    else if (state == 'h')
   {
         digitalWrite(led8, LOW);
        if(flag == 0){
          Serial.println("Appliance 8 is OFF");
          flag=1;
        }
    }
}

###


Circuit Diagrams

Circuit-Diagram-Arduino-Based-Android-Controlled-Home-Automation-System

Project Video


Filed Under: Electronic Projects

Tagged With: ac, android, Arduino, bluetooth
 

Questions related to this article?
👉Ask and discuss on EDAboard.com and Electro-Tech-Online.com forums.


Tell Us What You Think!! Cancel reply

You must be logged in to post a comment.

HAVE A QUESTION?

Have a technical question about an article or other engineering questions? Check out our engineering forums EDABoard.com and Electro-Tech-Online.com where you can get those questions asked and answered by your peers!


Featured Tutorials

  • PS2 Keyboard To Store Text In SD Card Using Arduino Circuit Setup On Breadboard
    How To Use PS2 Keyboard To Store Text In SD Card Using Arduino- (Part 42/49)
  • Wireless Path Tracking System Using Mouse, XBee And Arduino Circuit Setup On Breadboard
    How To Make A Wireless Path Tracking System Using Mouse, XBee And Arduino- (Part 43/49)
  • How to Make a Wireless Keyboard Using Xbee with Arduino- (Part 44/49)
  • Making Phone Call From GSM Module Using Arduino Circuit Setup On Breadboard
    How to Make Phonecall From GSM Module Using Arduino- (Part 45/49)
  • How to Make a Call using Keyboard, GSM Module and Arduino
    How To Make A Call Using Keyboard, GSM Module And Arduino- (Part 46/49)
  • Receiving SMS Using GSM Module With Arduino Prototype
    How to Receive SMS Using GSM Module with Arduino- (Part 47/49)

Stay Up To Date

Newsletter Signup

Sign up and receive our weekly newsletter for latest Tech articles, Electronics Projects, Tutorial series and other insightful tech content.

EE Training Center Classrooms

EE Classrooms

Recent Articles

  • Renesas delivers intelligent sensor solutions for IoT applications
  • Microchip Technology releases AVR-IoT Cellular Mini Development Board
  • Qualcomm acquires Cellwize to accelerate 5G adoption and spur infrastructure innovation
  • MediaTek’s chipset offers high-performance option for 5G smartphones
  • Nexperia’s new level translators support legacy and future mobile SIM cards

Most Popular

5G 555 timer circuit 8051 ai Arduino atmega16 automotive avr bluetooth dc motor display Electronic Part Electronic Parts Fujitsu ic infineontechnologies integratedcircuit Intel IoT ir lcd led maximintegratedproducts microchip microchiptechnology Microchip Technology microcontroller microcontrollers mosfet motor powermanagement Raspberry Pi remote renesaselectronics renesaselectronicscorporation Research samsung semiconductor sensor software STMicroelectronics switch Technology vishayintertechnology wireless

RSS EDABOARD.com Discussions

  • How do you find the angle made by two isosceles triangles in a kite?
  • Limits of duty cycle for ICM7555 IC?
  • Increasing the Termination Resistor value for Ethernet
  • Thermal pad construction on pcb
  • virtuoso layout suit could select bottom cell pin shape

RSS Electro-Tech-Online.com Discussions

  • Component identification.
  • Flickering (candle) LED to trigger 555
  • writing totals in Eprom
  • intro to PI
  • Heatsink mounting kit for TO247?
Engineers Garage
  • Analog IC TIps
  • Connector Tips
  • DesignFast
  • EDABoard Forums
  • EE World Online
  • Electro-Tech-Online Forums
  • Microcontroller Tips
  • Power Electronic Tips
  • Sensor Tips
  • Test and Measurement Tips
  • 5G Technology World
  • About Us
  • Contact Us
  • Advertise

Copyright © 2022 WTWH Media LLC. All Rights Reserved. The material on this site may not be reproduced, distributed, transmitted, cached or otherwise used, except with the prior written permission of WTWH Media
Privacy Policy | Advertising | About Us

Search Engineers Garage

  • Projects and Tutorials
    • Electronic Projects
      • 8051
      • Arduino
      • ARM
      • AVR
      • PIC
      • Raspberry pi
      • STM32
    • Tutorials
    • Circuit Design
    • Project Videos
    • Components
  • Articles
    • Tech Articles
    • Insight
    • Invention Stories
    • How to
    • What Is
  • News
    • Electronic Products News
    • DIY Reviews
    • Guest Post
  • Forums
    • EDABoard.com
    • Electro-Tech-Online
    • EG Forum Archive
  • Digi-Key Store
    • Cables, Wires
    • Connectors, Interconnect
    • Discrete
    • Electromechanical
    • Embedded Computers
    • Enclosures, Hardware, Office
    • Integrated Circuits (ICs)
    • Isolators
    • LED/Optoelectronics
    • Passive
    • Power, Circuit Protection
    • Programmers
    • RF, Wireless
    • Semiconductors
    • Sensors, Transducers
    • Test Products
    • Tools
  • EE Resources
    • DesignFast
    • LEAP Awards
    • Oscilloscope Product Finder
    • White Papers
    • Webinars
  • EE Learning Center
    • Design Guides
      • WiFi & the IOT Design Guide
      • Microcontrollers Design Guide
      • State of the Art Inductors Design Guide
  • Women in Engineering