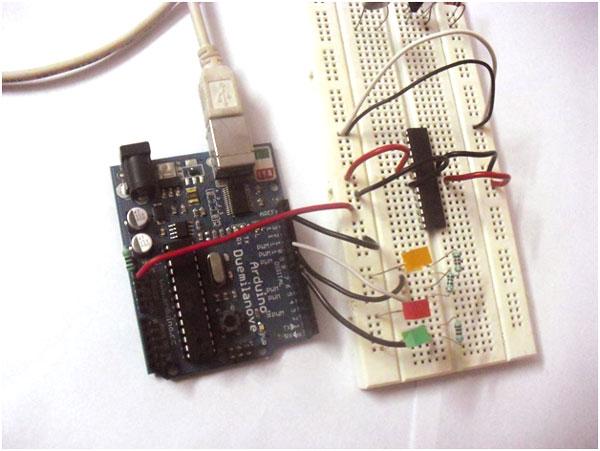
Yes, you read that right!! The very same electronic prototype platform you thought to be a must buy, needn’t be purchased at all. Shown in this DIY is how one can assemble and program an Arduino on a breadboard, by using simple electronic components arranged suitably on a breadboard.We all have seen some marvelous DIY where Arduino acts as their heart. What only a few know is the interesting fact that Arduino also has a heart, the AtMega 328 IC, which carries out the instructions for any program to be executed. It is around this IC that the whole board is designed and that’s what Praneet does when he clones one.
Accompanying the 328 IC would be a few wires, LEDs, resistors and a frequency generator. Where does the “original” Arduino comes into the picture here? Well, it is actually the original Arduino which along with the same PC on which you are reading this (we hope) which makes the breadboard circuitry turn into the clone. The Arduino, when connected to the PC and the breadboard circuit, burns the bootloader into it. And then, Voila!! You have just created a brand new Arduino platform.

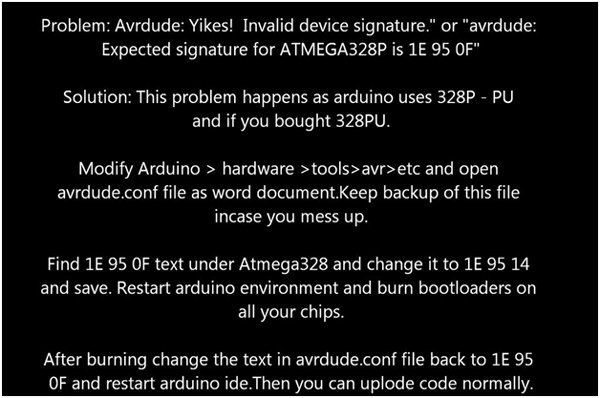
Like most DIYs, this one also has a few common problems which one might face in the process. No issues, anyhow. A straight to solution based troubleshoot guide is also been provided to solve ‘em all. Rest just agrees with what they say “Practice makes a man perfect”.
How far can you take the perfectionism with this DIY? We see no USB or power adapter input socket here, can you add it?
Filed Under: Reviews

Questions related to this article?
👉Ask and discuss on Electro-Tech-Online.com and EDAboard.com forums.
Tell Us What You Think!!
You must be logged in to post a comment.