Engineers Garage

  • Projects and Tutorials
    • Electronic Projects
      • 8051
      • Arduino
      • ARM
      • AVR
      • PIC
      • Raspberry pi
      • STM32
    • Tutorials
    • Circuit Design
    • Project Videos
    • Components
  • Articles
    • Tech Articles
    • Insight
    • Invention Stories
    • How to
    • What Is
  • News
    • Electronic Products News
    • DIY Reviews
    • Guest Post
  • Forums
    • EDABoard.com
    • Electro-Tech-Online
    • EG Forum Archive
  • Digi-Key Store
    • Cables, Wires
    • Connectors, Interconnect
    • Discrete
    • Electromechanical
    • Embedded Computers
    • Enclosures, Hardware, Office
    • Integrated Circuits (ICs)
    • Isolators
    • LED/Optoelectronics
    • Passive
    • Power, Circuit Protection
    • Programmers
    • RF, Wireless
    • Semiconductors
    • Sensors, Transducers
    • Test Products
    • Tools
  • EE Resources
    • DesignFast
    • LEAP Awards
    • Oscilloscope Product Finder
    • White Papers
    • Webinars
  • EE Learning Center
  • Women in Engineering

How to Install Qt in Raspberry Pi- (Part 29/38)

By Ajish Alfred

The Raspberry pi is a device which uses the Broadcom controller chip which is a SoC (System on Chip). This SoC has the powerful ARM11 processor which runs on 700 MHz at its core. This powerful processor and the controller having the peripherals like timers, interrupt controller, GPIO, PCM / I2S, DMA controller, I2C, SPI slave, PWM, UART, USB, graphical processing unit (GPU) which includes VideoCore, MPEG-2 and MPEG-4 and a 512 MB SDRAM makes it a mini-computer. The Raspberrypi board is powerful enough to run large operating systems like Linux, Mac and Windows.Linux operating systems especially Ubuntu is preferred for all kind of programming and development.

The board is provided with a RCA connector which can be used to connect it directly to a TV screen which is based on PAL and NTSC standard. The board also has a HDMI connector output which can be used to connect the board to a HD TV. A board capable of generating graphics on standard display screen needs a perfect application using which the programmers can exploit that capability. The ‘QT’ is a widely used platform for creating GUIs in Linux environment.

Qt is an application which helps in developing the UI framework using the Qt IDE. Qt uses standard C++ but it also supports support many compilers, including the GCC C++ compiler and the Visual Studio suite. This article explains how to install the QT in Raspberry pi.


In this project the Raspberrypi board is loaded with Ubuntu and is remotely accessed using VNC. The Raspberrypi board is also connected to the internet. Installing the QT in Raspberry pi is actually very easy using the commands, but it will take 30 minutes to 4 hours to finish the installation depending upon the speed of the internet connection. Downloading and installing the fourth version, QT4 is discussed in the following:

Open the command terminal and type the following command:

apt-get install qt4-dev-tools

If not logged as the root user, add the sudo before the command like:

sudo apt-get install qt4-dev-tools

Once the Ubuntu finds the files to be downloaded it will ask permission to proceed. Around 350 Mb is required to download all these files and hence make sure that the SDcard has enough free space available.

Type ‘y’ and press Enter to proceed.

That will install all the required development tools for the QT IDE and the next step is to install the QT IDE itself.

Use the following commands:

apt-get install qtcreator

or

sudo apt-get install qtcreator

Again another 350 Mb is required to download all the files and type ‘y’ and press Enter to proceed with the downloading and installation.

Wait till it finishes, and once the installation is complete the user can find them listed under the installed programs for ‘Programming’ as shown in the following image:

QT listed in installed programs for ‘Programming’

Fig. 2: QT Listed In Installed Programs For ‘Programming’


The list includes “Qt 4 Assistant”, “Qt 4 Designer”, “Qt 4 Linguist” and “Qt Creator”. The “Qt 4 Assistant” is basically provides help in the form of documentations related to the topics in QT. “Qt 4 Designer” is where the user can create a design and save it as a ‘.ui’ file which can then be used in QT projects. The “Qt 4 Linguist” provides a language view of the design created. The “Qt Creator” is where all these things can be done in the same IDE which helps in creating a GUI using QT.

Click on the “Qt Creator” and the following window opens up which includes options for creating a project, editing the code, design the UI and even option for debugging. Options are available in the same window for compile, build and run also.

Qt Creator Window in Raspberry pi

Fig. 3: Qt Creator Window In Raspberry Pi

First time users are suggested to go through the “Examples” and “Tutorials” to get a quick overview about using the QT.

There are a few settings to be done before getting started with the application development using QT. The path of the compiler tool chains need to be set in the IDE. Go to “Tools” >> “Options”.

Changing path of compiler tool from options

Fig. 4: Changing Path Of Compiler Tool From Options

Select the option “Build & Run” go to its “General” settings and check the things as shown in the following image:

Build & Run

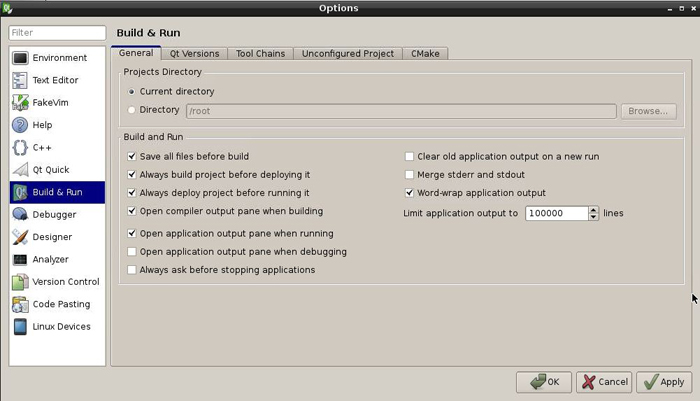
Fig. 5: Selecting General Setting For “Build & Run” To Use QT In Raspberry Pi Board

Go to the “Qt Versions” and make sure that the path is the same as shown in the following image:

Qt Versions

Fig. 6: Checking The Path In QT Version Tab

To set the tool chain path, open the “Tool Chain” tab and click on the “Add” button.

Tool Chain

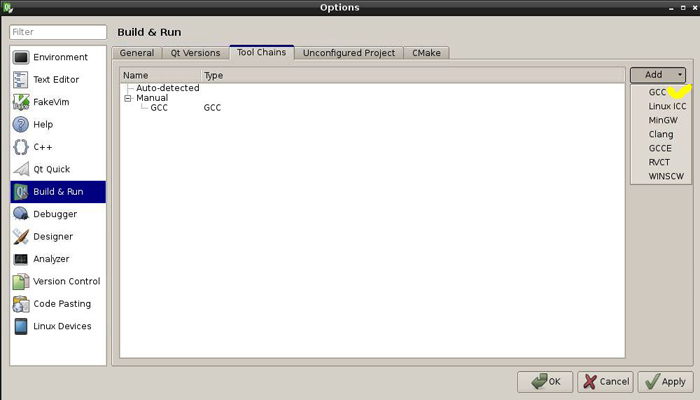
Fig. 7: Set Tool Chain Path In QT Window

Select the “GCC” from the drop down list as shown in the image. Now click on the “GCC” and browse to the “/usr/bin” and select the arm-linux-gnueabi-g++-4.6

GCC

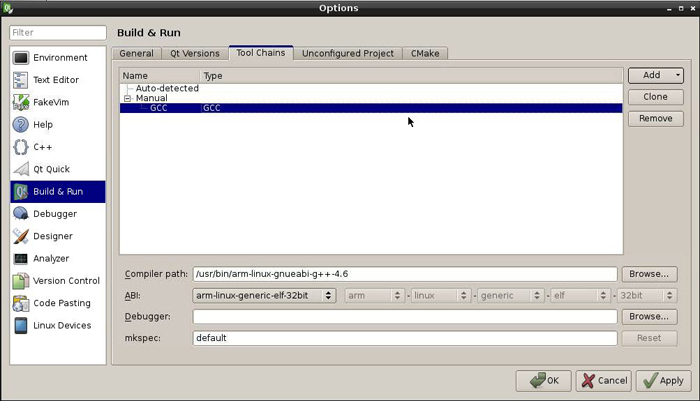
Fig. 8: Select GCC” And arm-linux-gnueabi-g++-4.6 To Create Applications In Raspberry Pi Board 

Click “Apply” and then “Ok” and the QT is ready in to create applications in the Raspberrypi board.


Filed Under: Raspberry pi
Tagged With: qt, Raspberry Pi
 

Questions related to this article?
👉Ask and discuss on Electro-Tech-Online.com and EDAboard.com forums.


Tell Us What You Think!! Cancel reply

You must be logged in to post a comment.

HAVE A QUESTION?

Have a technical question about an article or other engineering questions? Check out our engineering forums EDABoard.com and Electro-Tech-Online.com where you can get those questions asked and answered by your peers!


Featured Tutorials

  • Designing Gate Driver Circuit and Switching Mechanism for Modified Sine Wave Inverter – (Part 9/17)
  • Completing Modified Sine Wave Inverter Design with Full Bridge Circuit and Step Up Transformer – (Part 10/17)
  • Designing an Offline UPS – Part (12 /17)
  • How to reduce Switching Time of a Relay – (Part 15/17)
  • Testing MOSFET – (Part 16/17)
  • Driving High Side MOSFET using Bootstrap Circuitry – (Part 17/17)

Stay Up To Date

Newsletter Signup

Sign up and receive our weekly newsletter for latest Tech articles, Electronics Projects, Tutorial series and other insightful tech content.

EE Training Center Classrooms

EE Classrooms

Recent Articles

  • Renesas to demonstrate first working silicon based on the Arm Cortex-M85 processor
  • STMicroelectronics releases first automotive IMU with embedded machine learning
  • Infineon offers DC-DC controller for full LED headlamps without a microcontroller
  • Vishay launches new high-precision, thin-film wraparound chip resistor
  • STMicroelectronics’ common-mode filters ensure signal integrity in serial interfaces

Most Popular

5G 555 timer circuit 8051 ai Arduino atmega16 automotive avr dc motor display Electronic Part Electronic Parts Fujitsu ic infineontechnologies integratedcircuit Intel IoT ir lcd ldr led maximintegratedproducts microchip microchiptechnology Microchip Technology microcontroller microcontrollers mosfet motor powermanagement Raspberry Pi remote renesaselectronics renesaselectronicscorporation Research samsung semiconductor sensor software STMicroelectronics switch Technology vishayintertechnology wireless

RSS EDABOARD.com Discussions

  • IC wirebonding question
  • PS4 chip replacement not going to plan
  • Level shifter for differential oscillator
  • Voltage reference level - how to choose?
  • Boost converter, 3W...shielded or unshielded inductor?

RSS Electro-Tech-Online.com Discussions

  • Background of Members Here
  • software PWM
  • Audio equalizer
  • SPI Questions
  • Dog Scarer
Engineers Garage
  • Analog IC TIps
  • Connector Tips
  • DesignFast
  • EDABoard Forums
  • EE World Online
  • Electro-Tech-Online Forums
  • Microcontroller Tips
  • Power Electronic Tips
  • Sensor Tips
  • Test and Measurement Tips
  • 5G Technology World
  • About Us
  • Contact Us
  • Advertise

Copyright © 2022 WTWH Media LLC. All Rights Reserved. The material on this site may not be reproduced, distributed, transmitted, cached or otherwise used, except with the prior written permission of WTWH Media
Privacy Policy | Advertising | About Us

Search Engineers Garage

  • Projects and Tutorials
    • Electronic Projects
      • 8051
      • Arduino
      • ARM
      • AVR
      • PIC
      • Raspberry pi
      • STM32
    • Tutorials
    • Circuit Design
    • Project Videos
    • Components
  • Articles
    • Tech Articles
    • Insight
    • Invention Stories
    • How to
    • What Is
  • News
    • Electronic Products News
    • DIY Reviews
    • Guest Post
  • Forums
    • EDABoard.com
    • Electro-Tech-Online
    • EG Forum Archive
  • Digi-Key Store
    • Cables, Wires
    • Connectors, Interconnect
    • Discrete
    • Electromechanical
    • Embedded Computers
    • Enclosures, Hardware, Office
    • Integrated Circuits (ICs)
    • Isolators
    • LED/Optoelectronics
    • Passive
    • Power, Circuit Protection
    • Programmers
    • RF, Wireless
    • Semiconductors
    • Sensors, Transducers
    • Test Products
    • Tools
  • EE Resources
    • DesignFast
    • LEAP Awards
    • Oscilloscope Product Finder
    • White Papers
    • Webinars
  • EE Learning Center
  • Women in Engineering