LCD is used to present textual information to the users. It is great fun to work with LCD. Also LCD makes your application more interactive. LCD comes in various configurations and the most popular one is 16x2 matrix display. This article shows the interfacing of ATmega16 with LCD by displaying a simple character on the LCD. For more information about LCD, refer the article LCD interfacing.
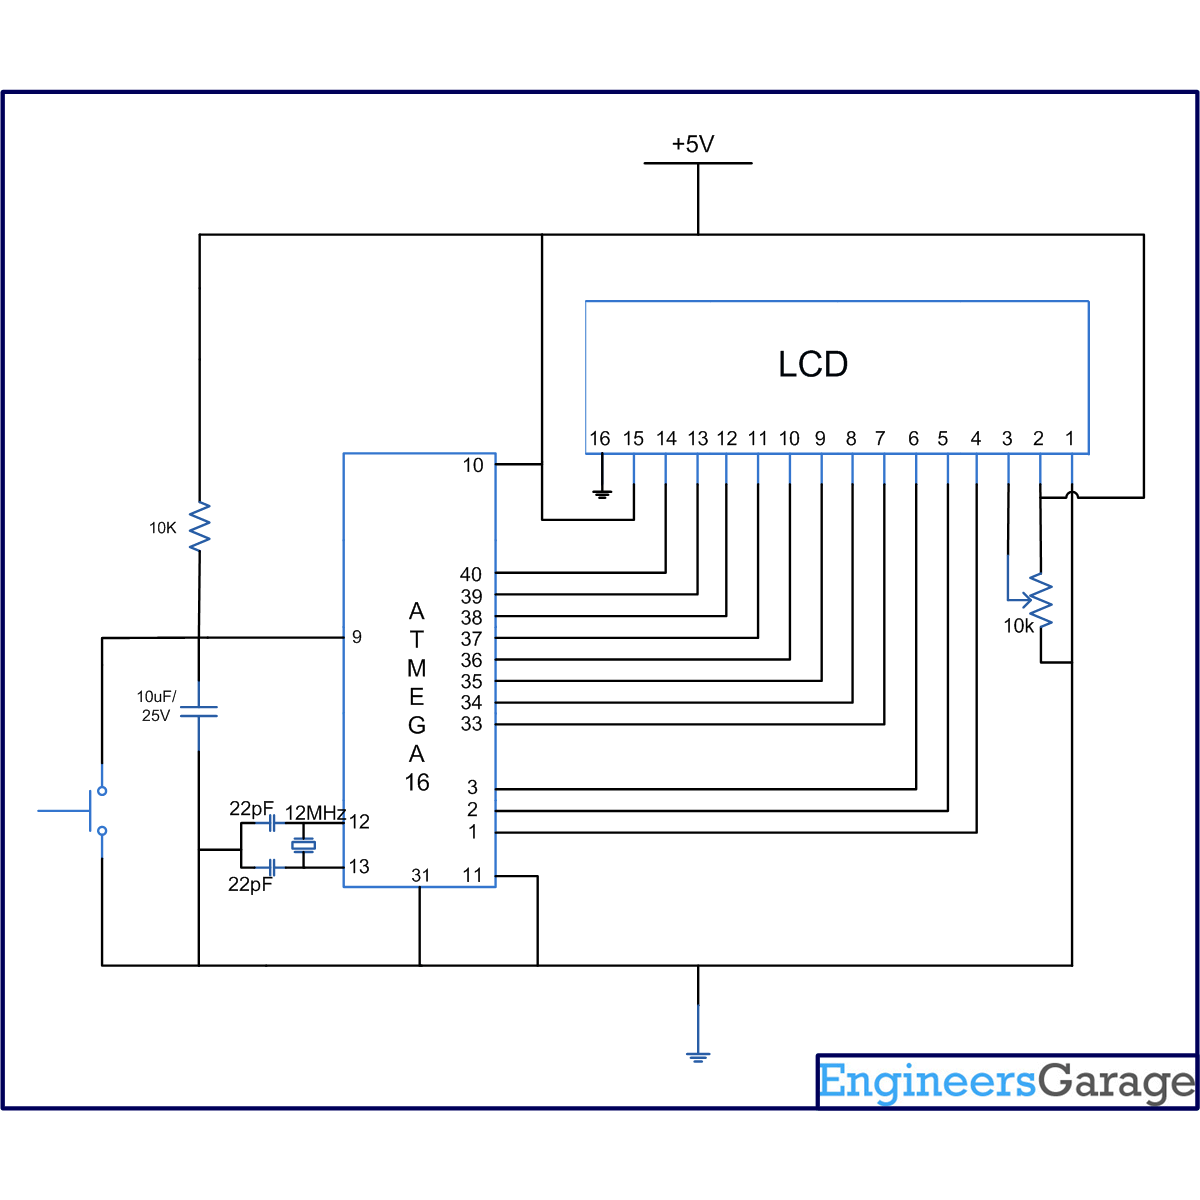
In this project LCD is working in 8-bit mode i.e., the data transferred to the LCD must be in 8-bit data form. The PortA of ATmega16 is connected to data pins of LCD and is defined as LCD_DATA. PortB is defined as control pins (Rs, R/W and En).
Conceptually, interfacing LCD with AVR microcontroller is similar to that of interfacing it with any other microcontroller.
The following steps explain in detail how LCD can be interfaced with ATMEGA 16:
Step1: To initialize LCD
The following instructions are used to initialize LCD.
· 0x38 to initialize LCD in 8-bit mode
· 0x01 to clear LCD
· 0x0E to make cursor ON
· 0x80 to go to first line and 0th position in LCD
Delay of around 50 micro second is necessary b/w two commands for execution of instructions.
void init_LCD(void)
{
LCD_cmd(0x38); // initialization of 16X2 LCD in 8bit mode
_delay_ms(1);
LCD_cmd(0x01); // clear LCD
_delay_ms(1);
LCD_cmd(0x0E); // cursor ON
_delay_ms(1);
LCD_cmd(0x80); // —8 go to first line and –0 is for 0th position
delay_ms(1);
return;
}
Step2: Define command function
To send any command to LCD
· Transfer the command to LCD_DATA port
· Set RS and RW bit to go LOW and enable as HIGH
· Give a small delay
· Set enable to LOW
void LCD_cmd(unsigned char cmd)
{
LCD_DATA=cmd;
ctrl =(0<<rs)|(0<<rw)|(1<<en); // RS and RW as LOW and EN as HIGH
_delay_ms(1);
ctrl =(0<<rs)|(0<<rw)|(0<<en); // RS, RW , LOW and EN as LOW
_delay_ms(50);
return;
}
Step3: Define write function
To display any data on LCD
· Transfer the data (Ascii value of the character to be sent) to LCD_DATA port.
· Make RW as LOW and set RS and enable as HIGH.
· Give a small delay.
· Make enable pin LOW
void LCD_write(unsigned char data)
{
LCD_DATA= data;
ctrl = (1<<rs)|(0<<rw)|(1<<en); // RW as LOW and RS, EN as HIGH
_delay_ms(1);
ctrl = (1<<rs)|(0<<rw)|(0<<en); // EN and RW as LOW and RS HIGH
_delay_ms(50); // delay to get things executed
return ;
}
Project Source Code
###
// Program to display a single alphabet ‘A’ on LCD/*LCD data transfer through 8 bit modeWriting a single letter A on LCDLCD DATA port----PORT Actrl port------PORT Brs-------PB0rw-------PB1en-------PB2*/#include<avr/io.h>#include<util/delay.h>#define LCD_DATA PORTA // LCD data port#define ctrl PORTB#define en PB2 // enable signal#define rw PB1 // read/write signal#define rs PB0 // register select signalvoid LCD_cmd(unsigned char cmd);void init_LCD(void);void LCD_write(unsigned char data);int main(){DDRA=0xff; // making LCD_DATA port as output portDDRB=0x07; // making signal as out putinit_LCD(); // initialization of LCD_delay_ms(50); // delay of 50 milli secondsLCD_write('A'); // call a function to write A on LCDreturn 0;}void init_LCD(void){LCD_cmd(0x38); // initialization of 16X2 LCD in 8bit mode_delay_ms(1);LCD_cmd(0x01); // clear LCD_delay_ms(1);LCD_cmd(0x0E); // cursor ON_delay_ms(1);LCD_cmd(0x80); // ---8 go to first line and --0 is for 0th positiondelay_ms(1);return;}void LCD_cmd(unsigned char cmd){LCD_DATA=cmd;ctrl =(0<<rs)|(0<<rw)|(1<<en); // RS and RW as LOW and EN as HIGH_delay_ms(1);ctrl =(0<<rs)|(0<<rw)|(0<<en); // RS, RW , LOW and EN as LOW_delay_ms(50);return;}void LCD_write(unsigned char data){LCD_DATA= data;ctrl = (1<<rs)|(0<<rw)|(1<<en); // RW as LOW and RS, EN as HIGH_delay_ms(1);ctrl = (1<<rs)|(0<<rw)|(0<<en); // EN and RW as LOW and RS HIGH_delay_ms(50); // delay to get things executedreturn ;}###
Circuit Diagrams
Project Components
Project Video
Filed Under: AVR.
Filed Under: AVR.

Questions related to this article?
👉Ask and discuss on Electro-Tech-Online.com and EDAboard.com forums.
Tell Us What You Think!!
You must be logged in to post a comment.