Engineers Garage

  • Electronics Projects and Tutorials
    • Electronic Projects
      • Arduino Projects
      • AVR
      • Raspberry pi
      • ESP8266
      • BeagleBone
      • 8051 Microcontroller
      • ARM
      • PIC Microcontroller
      • STM32
    • Tutorials
      • Audio Electronics
      • Battery Management
      • Brainwave
      • Electric Vehicles
      • EMI/EMC/RFI
      • Hardware Filters
      • IoT tutorials
      • Power Tutorials
      • Python
      • Sensors
      • USB
      • VHDL
    • Circuit Design
    • Project Videos
    • Components
  • Articles
    • Tech Articles
    • Insight
    • Invention Stories
    • How to
    • What Is
  • News
    • Electronic Product News
    • Business News
    • Company/Start-up News
    • DIY Reviews
    • Guest Post
  • Forums
    • EDABoard.com
    • Electro-Tech-Online
    • EG Forum Archive
  • DigiKey Store
    • Cables, Wires
    • Connectors, Interconnect
    • Discrete
    • Electromechanical
    • Embedded Computers
    • Enclosures, Hardware, Office
    • Integrated Circuits (ICs)
    • Isolators
    • LED/Optoelectronics
    • Passive
    • Power, Circuit Protection
    • Programmers
    • RF, Wireless
    • Semiconductors
    • Sensors, Transducers
    • Test Products
    • Tools
  • Learn
    • eBooks/Tech Tips
    • Design Guides
    • Learning Center
    • Tech Toolboxes
    • Webinars & Digital Events
  • Resources
    • Digital Issues
    • EE Training Days
    • LEAP Awards
    • Podcasts
    • Webinars / Digital Events
    • White Papers
    • Engineering Diversity & Inclusion
    • DesignFast
  • Guest Post Guidelines
  • Advertise
  • Subscribe

How to interface three input channels of ADC0808 using 8051 microcontrollers (AT89C51)- (Part 24/45)

By Himanshu Choudhary August 6, 2010

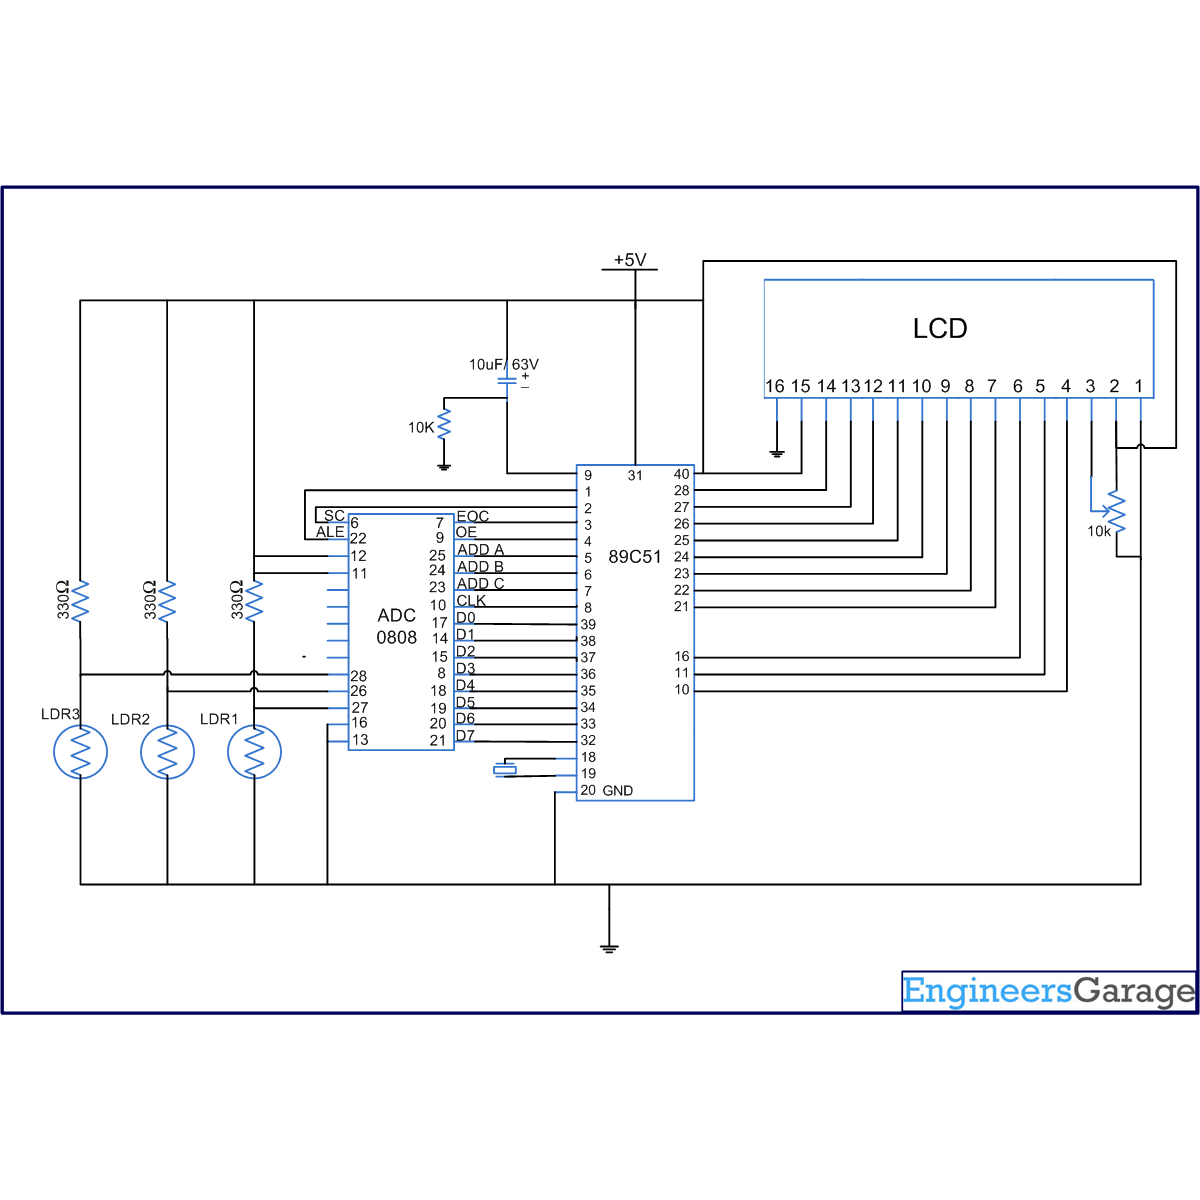
Many applications need to measure and/or monitor the physical quantities like temperature, pressure, light intensity etc. The sensors used to measure the physical quantities give the output in analog form, which are converted to digital through an ADC for further processing. This circuit demonstrates the principle and operation of interfacing ADC0808 with three LDR. The output of the sensor is displayed on the LCD. The external clock needed by the ADC0808 is provided by the controller using interrupt. The output is displayed on the LCD. The circuit is divided into four parts: LDR, ADC, 8051 microcontroller and LCD. Its applications could be measuring and monitoring the light intensity level.


ADC0808 is an 8-bit resolution ADC with eight input channels. At any point of time only one input can be read. The output of LDR


s are used as inputs. An LDR will detect the intensity of light and generate voltage depending upon light intensity.


 A clock of frequency 500 KHz is generated using Timer0 in the interrupt mode. To enable the interrupt, the value of the register IE is set to 0x82 (Refer ADC 0808 with interrupt clock).
 
The output pins of ADC are connected to the port P0 of the microcontroller AT89C51.  Pin10 of the ADC is connected to pin8 (P1.7) of the controller for clock input. ALE, pin22 of the ADC is connected to pin1 (P1.0) of controller. OE, pin9 of the ADC is connected to pin4 (P1.3) of microcontroller. SC, pin6 of the ADC is connected to pin2 (P1.1) of the controller. EOC, pin7 is connected to pin3 (P1.2) of microcontroller. Selector pins A (25), B (24) and C (24) of ADC are connected to the pins 4, 5 and 6 of the controller respectively.
 
Port P2 (pins 21-28) of controller is used to send the data to the LCD (pins 7-14). RS (pin4) of LCD is connected to P3.0 (pin 10) of the microcontroller.AT89C51. R/W (pin5) of LCD is connected to P3.1 (pin11) of the controller. Enable pin, EN, pin6 of LCD will connect to P3.6 of controller (Refer LCD interfacing).


The controller monitors the output of the three sensors, from the ADC, serially one after the other and keeps displaying them on LCD. If the output of any of the LDR varies, the corresponding change is reflected on the LCD. The output of the LDR varies with the intensity of light. The output value of ADC varies in the range 0 to 255. The output is displayed as a number. (Refer displaying a number on 16×2 LCD)


Project Source Code

###

// Program to interface 3 LDRs with ADC 0808 using three input channels of ADC 0808. The output pins are connected to LCD to show intensity value between (0-255). Controller interrupt is used to generate the clock for driving the ADC 0808.
#include<reg51.h>
sbit ale=P1^0;  //address latch enable
sbit oe=P1^3;  //output enable
sbit sc=P1^1;  //start conversion
sbit eoc=P1^2;  //end of conversion
sbit clk=P1^7;  // clock
sbit ADD_A=P1^4;  //Address pins for selecting input channels.
sbit ADD_B=P1^5;
sbit ADD_C=P1^6;
sfr lcd_data_pin=0xA0;  //Port P2
sbit rs=P3^0;
sbit rw=P3^1;
sbit en=P3^6;
sfr input_port=0x80;  //Port P0
unsigned int key,value,number,ascii1,ascii2,ascii3,flag,temp1,key1/*,data1,data2,data3,data11,data12,data13,data21,data22,data23*/;

void timer0() interrupt 1  // Function to generate clock of frequency 500KHZ using Timer 0 interrupt.
{
clk=~clk;
}

void delay(unsigned int count)  // Function to provide time delay in msec.
{
int i,j;
for(i=0;i<count;i++)
  for(j=0;j<1275;j++);
}

void lcd_command(unsigned char comm)  //Function to send command to LCD.
{
lcd_data_pin=comm;
en=1;
rs=0;
rw=0;
delay(1);
en=0;
}
           
void lcd_data(unsigned char disp)  //Function to send data to LCD.
{
lcd_data_pin=disp;
en=1;
rs=1;
rw=0;
delay(1);
en=0;
}

lcd_dataa(unsigned char *disp)  //Function to send string data to LCD.
{
int x;
for(x=0;disp[x]!=0;x++)
{
  lcd_data(disp[x]);
}
}

void lcd_ini()  //Function to inisialize the LCD
{
lcd_command(0x38);  // for using 8-bit 2 row LCD
delay(5);
lcd_command(0x0F);  // for display on cursor blinking
delay(5);
lcd_command(0x80);
delay(5);  //Force cursor to blink at line 1 positon 0
}

void BCD()  // Binary to decimal conversion to send the data to LCD
{
  key1++;
  key=0;
  flag=0;
    number=input_port;
    value=number%10;
number=number/10;
ascii1=value+48;
if(number!=0)
{
  value=number%10;
  number=number/10;
  ascii2=value+48;
    flag=1;
}
else
{
  ascii2=48;
  flag=1;
}
if(number!=0)
{
  value=number%10;
    number=number/10;
    ascii3=value+48;
    key=2;
}
else
{
  ascii3=48;
  key=2;
}
if(key1==1)    
{
  lcd_command(0xC0);
}
if(key1==2)
{
  lcd_command(0xC5);
}
if(key1==3)
{
  lcd_command(0xCA);
}
if(key==2)
lcd_data(ascii3);
if(flag==1)
lcd_data(ascii2);
lcd_data(ascii1);
if(key1==3)
{
  key1=0;
  ascii3=0;
  ascii2=0;
  ascii1=0;
  delay(10);
} 
}
void adc()  //Function to drive ADC
{
while(1)
  {
   if(temp1==0)
   {
    ADD_C=0;  // Selecting input channel 1 using address lines
    ADD_B=0;
    ADD_A=0;
   }
   if(temp1==1)
   {
    ADD_C=0;  // Selecting input channel 2 using address lines
    ADD_B=0;
    ADD_A=1;
   }
   if(temp1==2)
   {
    ADD_C=0;  // Selecting input channel 3 using address lines
    ADD_B=1;
    ADD_A=0;
   }
   delay(2);
   ale=1;
   delay(2);
   sc=1;
   delay(1);
   ale=0;
   delay(1);
   sc=0;
   while(eoc==1);
   while(eoc==0);
   oe=1;
   BCD();
   delay(2);
   oe=0;
   temp1++;
   if(temp1==3)
   temp1=0;
  }
}

void main()
{
  eoc=1;
    ale=0;
   oe=0;
   sc=0;
  TMOD=0x02;  //Timer0 setting for generating clock of 500KHz using interrupt enable mode.
  TH0=0xFD;
  IE=0x82;
  TR0=1;
  temp1=0;
key1=0;
lcd_ini();
lcd_dataa("SN1:");
lcd_dataa(" SN2:");
lcd_dataa(" SN3:");
   adc();
}

###


Circuit Diagrams

Circuit-Diagram-Interfacing-Three-Input-Channels-ADC0808-Using-8051-Microcontrollers-AT89C51

Project Components

  • AT89C51 Microcontroller
  • IC ADC0808
  • LCD
  • LDR
  • Preset

Project Video


Filed Under: 8051 Microcontroller
Tagged With: 8051, adc, microcontroller, three channel
 

Next Article

← Previous Article
Next Article →

Questions related to this article?
👉Ask and discuss on EDAboard.com and Electro-Tech-Online.com forums.


Tell Us What You Think!! Cancel reply

You must be logged in to post a comment.

EE TECH TOOLBOX

“ee
Tech Toolbox: Internet of Things
Explore practical strategies for minimizing attack surfaces, managing memory efficiently, and securing firmware. Download now to ensure your IoT implementations remain secure, efficient, and future-ready.

EE Learning Center

EE Learning Center
“engineers
EXPAND YOUR KNOWLEDGE AND STAY CONNECTED
Get the latest info on technologies, tools and strategies for EE professionals.

HAVE A QUESTION?

Have a technical question about an article or other engineering questions? Check out our engineering forums EDABoard.com and Electro-Tech-Online.com where you can get those questions asked and answered by your peers!


RSS EDABOARD.com Discussions

  • MCU identification?
  • GanFet power switch starts burning after 20 sec
  • problem identifying pin purpose on PMA5-83-2WC+ amplifier
  • AC amplifier, transistor with bias network
  • modelsim not run the clock long enough

RSS Electro-Tech-Online.com Discussions

  • LED circuit for 1/6 scale diorama
  • Can I use this charger in every country?
  • Electronic board faulty?!?
  • using a RTC in SF basic
  • An Update On Tarrifs

Featured – Designing of Audio Amplifiers part 9 series

  • Basics of Audio Amplifier – 1/9
  • Designing 250 Milli Watt Audio Power Amplifier – 2/9
  • Designing 1 Watt Audio Power Amplifier – 3/9
  • Designing a Bass Boost Amplifier – 4/9
  • Designing a 6 Watt Car Audio Amplifier – 5/9
  • Design a low power amplifier for headphones- 6/9

Recent Articles

  • Fischer connector system adds ratchet locking system designed for 300g shock resistance
  • Littelfuse introduces tactile switch with enhanced bracket peg design for mounting strength
  • Infineon releases GaN switch with monolithic bidirectional design
  • Sienna Semiconductor data converters feature sample rates from 20 to 250 Msps
  • Delta’s 5,500 W power supplies achieve 97.5% energy efficiency for AI servers

EE ENGINEERING TRAINING DAYS

engineering

Submit a Guest Post

submit a guest post
Engineers Garage
  • Analog IC TIps
  • Connector Tips
  • Battery Power Tips
  • DesignFast
  • EDABoard Forums
  • EE World Online
  • Electro-Tech-Online Forums
  • EV Engineering
  • Microcontroller Tips
  • Power Electronic Tips
  • Sensor Tips
  • Test and Measurement Tips
  • 5G Technology World
  • Subscribe to our newsletter
  • About Us
  • Contact Us
  • Advertise

Copyright © 2025 WTWH Media LLC. All Rights Reserved. The material on this site may not be reproduced, distributed, transmitted, cached or otherwise used, except with the prior written permission of WTWH Media
Privacy Policy

Search Engineers Garage

  • Electronics Projects and Tutorials
    • Electronic Projects
      • Arduino Projects
      • AVR
      • Raspberry pi
      • ESP8266
      • BeagleBone
      • 8051 Microcontroller
      • ARM
      • PIC Microcontroller
      • STM32
    • Tutorials
      • Audio Electronics
      • Battery Management
      • Brainwave
      • Electric Vehicles
      • EMI/EMC/RFI
      • Hardware Filters
      • IoT tutorials
      • Power Tutorials
      • Python
      • Sensors
      • USB
      • VHDL
    • Circuit Design
    • Project Videos
    • Components
  • Articles
    • Tech Articles
    • Insight
    • Invention Stories
    • How to
    • What Is
  • News
    • Electronic Product News
    • Business News
    • Company/Start-up News
    • DIY Reviews
    • Guest Post
  • Forums
    • EDABoard.com
    • Electro-Tech-Online
    • EG Forum Archive
  • DigiKey Store
    • Cables, Wires
    • Connectors, Interconnect
    • Discrete
    • Electromechanical
    • Embedded Computers
    • Enclosures, Hardware, Office
    • Integrated Circuits (ICs)
    • Isolators
    • LED/Optoelectronics
    • Passive
    • Power, Circuit Protection
    • Programmers
    • RF, Wireless
    • Semiconductors
    • Sensors, Transducers
    • Test Products
    • Tools
  • Learn
    • eBooks/Tech Tips
    • Design Guides
    • Learning Center
    • Tech Toolboxes
    • Webinars & Digital Events
  • Resources
    • Digital Issues
    • EE Training Days
    • LEAP Awards
    • Podcasts
    • Webinars / Digital Events
    • White Papers
    • Engineering Diversity & Inclusion
    • DesignFast
  • Guest Post Guidelines
  • Advertise
  • Subscribe