Engineers Garage

  • Projects and Tutorials
    • Electronic Projects
      • 8051
      • Arduino
      • ARM
      • AVR
      • PIC
      • Raspberry pi
      • STM32
    • Tutorials
    • Circuit Design
    • Project Videos
    • Components
  • Articles
    • Tech Articles
    • Insight
    • Invention Stories
    • How to
    • What Is
  • News
    • Electronic Products News
    • DIY Reviews
    • Guest Post
  • Forums
    • EDABoard.com
    • Electro-Tech-Online
    • EG Forum Archive
  • Digi-Key Store
    • Cables, Wires
    • Connectors, Interconnect
    • Discrete
    • Electromechanical
    • Embedded Computers
    • Enclosures, Hardware, Office
    • Integrated Circuits (ICs)
    • Isolators
    • LED/Optoelectronics
    • Passive
    • Power, Circuit Protection
    • Programmers
    • RF, Wireless
    • Semiconductors
    • Sensors, Transducers
    • Test Products
    • Tools
  • EE Resources
    • DesignFast
    • LEAP Awards
    • Oscilloscope Product Finder
    • White Papers
    • Webinars
  • EE Learning Center
  • Women in Engineering

How to Program in Boot Loader Section- (Part 31/46)

By Ashutosh Bhatt

In the AVR microcontroller the flash memory is divided into two parts, namely Application Section and Boot Loader Section.  A code can be programmed into either the Application Section or the Boot loader Section (BLS). The code programmed into the Application section runs normally and is used for common applications, whereas the code running in the BLS is provided with some special features. The code running in the BLS section can execute Self Programing Mode (SPM) instructions which are blocked for the code running in the Application section. Using SPM instructions the code from the BLS can rewrite the code in the application section or the code in the BLS itself. The BLS section is normally used for storing the Boot-loader code for the microcontroller. The Boot-Loader code can be used for initializing the peripherals in the microcontroller, initialize the devices connected to the microcontroller, select the application to load and execute from a storage medium, load the selected application to the application section, jump to the application section and execute the application.

This project tries to program a simple LED blinking code into the BLS and another similar kind of simple code in the Application section and observes the code executing in the BLS and then makes a jump to the Application section code. Programing a simple code into the BLS, make the microcontroller to execute the program in the BLS after a reset and jumping from the BLS to the application code are the initial steps to create a Boot-Loader code for the microcontroller. In this project ATMEGA16 microcontroller is used and AVR studio is used as the IDE. The programmer used in this project is Usbasp and the burner software used is AVR-Burnomat. 


The AVR flash memory is divided into two sections namely the application section and the Boot-Loader section (BLS). In case of the ATMEGA16 it has 16 KB of flash memory of which the 15KB is application section and the rest 1KB is BLS. The memory architecture of the ATMEGA16 is shown in the following figure;
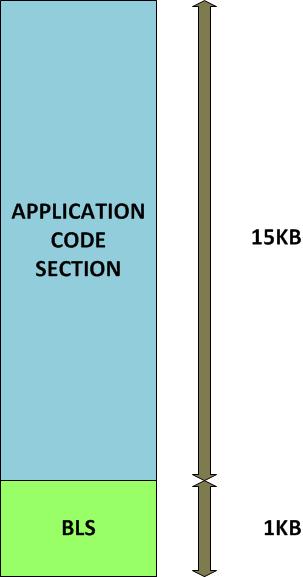
 

Architechure of AVR Flash Memory

Fig. 2: Architechure of AVR Flash Memory
 
The code for the BLS or application section is written as normally does and there is no much difference. The only thing to be careful about is the size of the code binary. It should not be more than 1KB, otherwise it won’t be able to code programmed into the BLS. The following section discusses how to program a code into the BLS of ATMEGA16 microcontroller with the help of AVR studio as IDE, USBasp as the programmer and AVR-Burnomat as the burner software.
Open the AVR studio, copy and paste a simple led blinking code which is given below;
 
//#######################################################################//
#define F_CPU 8000000
 
#include <avr/io.h>
#include <util/delay.h>
 
int main ( void )
{
            DDRD |= 0x80;
 
            while(1)
            {
                        PORTD &= 0x7F;                 //led on
                        _delay_ms ( 500 );
                        PORTD |= 0x80;                 //led off
                        _delay_ms ( 500 );
            }
 
}
//#######################################################################//
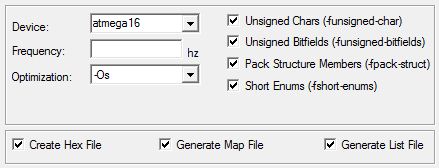
Before compiling the few settings need to be done. Select the target as ATMEGA 16 as shown in the figure.
AVR Studio Window
Fig. 3: AVR Studio Window
 
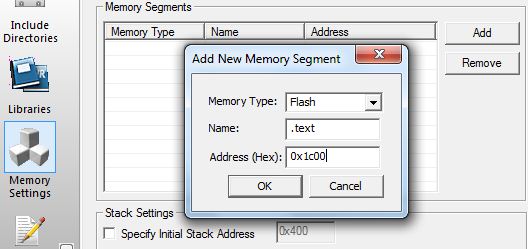
The code should be compiled in such a way that it will get flashed at the BLS only. For that one need to do the memory settings as shown below. Select the memory as “flash” name the memory as “.text “give the memory address as “0x1C00”.
Memory Settings to flash code in BLS of AVR
Fig. 4: Memory Settings to flash code in BLS of AVR
 
Now build the code. Once the compilation has been completed a hex file will be generated. The USBASP programmer is currently not supported by the AVR studio 4. Hence software called AVR-BURNO-MAT can be used for flashing the hex file.
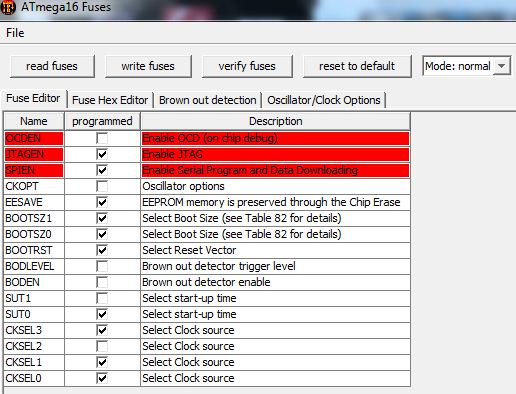
One must write the fuse bits before flashing the code so as to enable the features such as to enable the internal oscillator and to select the reset vector as 0x1C00.
 
 
FUSE BITS CONFIGURATION
 
 
FUSE
 
 
VALUE
OCDEN
1
OCD1
0
JTAGEN
0
SPIEN
1
CKPOT
1
EESAVE
0
BOOTSZ1
0
BOOTSZ0
0
BOOTRST
0
BODLEVEL
1
BODEN
1
SUT1
0
SUT0
0
CKSEL3
0
CKSEL2
1
CKSEL1
0
CKSEL0
0
Fig. 5: Fuse Bit Configuration
 
The AVR-BURNO-MAT is the best application available for writing the fuse bits into the AVR microcontroller. The fuse bit selection in the AVR-BURNO-MAT is shown in the following figure.
Fuse Bit Configuration
Fig. 6: Fuse bit selection in AVR-BURNO-MAT
This is the fuse bit setting which are about to written into ATMEGA16. Now click the “write button” and the fuse bits will get written into it.
Now one can flash the code to the boot loader section using the AVR-BURNO-MAT itself. Select the required hex file which has been generated by the AVR-STUDIO. Select the file format as Intel Hex. Now click the write button and the code will get written into the microcontroller.
 
Fuse bit selection in AVR-BURNO-MAT
 
Fig. 7: Code Flashed in boot loader using the AVR-BURNO-MAT
 
Once the flashing has been completed the LED starts Blinking, which means the code has been programmed successfully into the BLS and the microcontroller starts executing from the BLS section on reset. Now one can try to write a code for the BLS section which when done executing the code can make a jump to the application section using the jump instruction. The following section discuss about how to do that. For the BLS a simple LED blinking code which can blink the led 5 times with a delay of 500ms can be written. At the end of the code one can write a statement asm ( “jmp 0x0000” )
How to Program in Boot Loader Section
for making a jump to the address 0x0000 which is the starting address of the application section. The code is as shown below.
//#####################################################################//
#define F_CPU 8000000
#include <avr/io.h>
#include <util/delay.h>
int main ( void )
{
            DDRD |= 0x80;
            PORTD &= 0x7F;
            _delay_ms ( 500 );
            PORTD |= 0x80;
            _delay_ms ( 500 );
            PORTD &= 0x7F;
            _delay_ms ( 500 );
            PORTD |= 0x80;
            _delay_ms ( 500 );
            PORTD &= 0x7F;
            _delay_ms ( 500 );
            PORTD |= 0x80;
            _delay_ms ( 500 );
            PORTD &= 0x7F;
            _delay_ms ( 500 );
            PORTD |= 0x80;
            _delay_ms ( 500 );
            PORTD &= 0x7F;
            _delay_ms ( 500 );
            PORTD |= 0x80;
            _delay_ms ( 500 );
            asm ( “jmp 0x0000” );
}
//#####################################################################//
For the application section one can write another code which blinks the led with a delay of 2 seconds so that whenever the code jumps from the BLS to the application section it can be easily identified by the difference in the delay with which the LED blinks. The code is as shown below.
//#####################################################################//
#define F_CPU 8000000
#include <avr/io.h>
#include <util/delay.h>
int main ( void )
{
            DDRD |= 0x80;
            while(1)
            {
                        PORTD &= 0x7F;
                        _delay_ms ( 2000 );
                        PORTD |= 0x80;
                        _delay_ms ( 2000 );
            }
}
//#####################################################################//
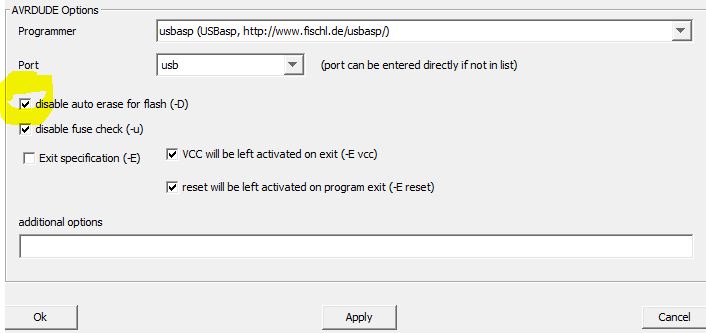
Flash the led blinking with small delay to the BLS before flashing the led blinking with large delay to the application section. One should disabled the flash memory erasing option at the AVR-BURNO-MAT before flashing the code to the application section.
Code Flashed in boot loader using the AVR-BURNO-MAT
Fig. 8: Disabled flash memory Erasing option in AVR-BURNO-MAT
Now it can be observed that when the microcontroller resets the led blinks with small delay for 5 times which happens while the code is executing in the BLS. After the led starts blinking with large delay which happens only after a jump occurred to the application section.This was only the first step towards writing a Boot-Loader code for the AVR microcontroller. After practicing this project one can try out more complex things like initializing the peripherals from the BLS, using SPM flash to flash, SPM EEPROM to flash, and then the basic Boot-Loader code


Project Source Code

###


#define F_CPU 8000000
#include <avr/io.h>
#include <util/delay.h>
 
int main ( void )
{
DDRD |= 0x80;
 
PORTD &= 0x7F;
_delay_ms ( 500 );
PORTD |= 0x80;
_delay_ms ( 500 );
 
PORTD &= 0x7F;
_delay_ms ( 500 );
PORTD |= 0x80;
_delay_ms ( 500 );
 
PORTD &= 0x7F;
_delay_ms ( 500 );
PORTD |= 0x80;
_delay_ms ( 500 );
 
PORTD &= 0x7F;
_delay_ms ( 500 );
PORTD |= 0x80;
_delay_ms ( 500 );
 
PORTD &= 0x7F;
_delay_ms ( 500 );
PORTD |= 0x80;
_delay_ms ( 500 );
 
asm ( "jmp 0x0000" );
}

###


Project Source Code

###

//########## Test-Application##########// #define F_CPU 8000000
#include <avr/io.h>
#include <util/delay.h>
int main ( void )
{
	DDRD |= 0x80;
	while(1)
	{
		PORTD &= 0x7F;
		_delay_ms ( 2000 );
		PORTD |= 0x80;
		_delay_ms ( 2000 );	 }
}

###


Project Components

  • ATmega16
  • LCD
  • LED
  • Resistor

Project Video


Filed Under: AVR Microcontroller
Tagged With: avr microcontroller, bootloader, circuit, program a bootloader, project
 

Questions related to this article?
👉Ask and discuss on EDAboard.com and Electro-Tech-Online.com forums.


Tell Us What You Think!! Cancel reply

You must be logged in to post a comment.

HAVE A QUESTION?

Have a technical question about an article or other engineering questions? Check out our engineering forums EDABoard.com and Electro-Tech-Online.com where you can get those questions asked and answered by your peers!


Featured Tutorials

  • Designing Gate Driver Circuit and Switching Mechanism for Modified Sine Wave Inverter – (Part 9/17)
  • Completing Modified Sine Wave Inverter Design with Full Bridge Circuit and Step Up Transformer – (Part 10/17)
  • Designing an Offline UPS – Part (12 /17)
  • How to reduce Switching Time of a Relay – (Part 15/17)
  • Testing MOSFET – (Part 16/17)
  • Driving High Side MOSFET using Bootstrap Circuitry – (Part 17/17)

Stay Up To Date

Newsletter Signup

Sign up and receive our weekly newsletter for latest Tech articles, Electronics Projects, Tutorial series and other insightful tech content.

EE Training Center Classrooms

EE Classrooms

Recent Articles

  • MicroPython – I2C protocol in ESP8266 and ESP3
  • New automotive radar sensor enables reliable in-cabin monitoring system
  • TI breaks ground on 300-mm semiconductor wafer-fabrication plants in Texas
  • New wireless AR Smart Viewer reference design
  • Infineon launches scalable and wireless charging platform with configurable controllers

Most Popular

5G 555 timer circuit 8051 ai Arduino atmega16 automotive avr dc motor display Electronic Part Electronic Parts Fujitsu ic infineontechnologies integratedcircuit Intel IoT ir lcd ldr led maximintegratedproducts microchip microchiptechnology Microchip Technology microcontroller microcontrollers mosfet motor powermanagement Raspberry Pi remote renesaselectronics renesaselectronicscorporation Research samsung semiconductor sensor software STMicroelectronics switch Technology vishayintertechnology wireless

RSS EDABOARD.com Discussions

  • What's the deal with all these "MPPT" IC's with no current sense?
  • Photovoltaic MOSFET Drivers - Voltage Rating
  • Impedance requirement for SDRAM signals
  • A circuit that can adjust a resistance and probing a voltage node
  • A analogue circuit that spit out the resistance desired

RSS Electro-Tech-Online.com Discussions

  • IRS2453 the H circuit
  • Ampro 16mm Stylist projector woes.
  • How to quickly estimate lead acid battery capacity ?
  • Finally switched to Linux.
  • Multistage BJT amplifier
Engineers Garage
  • Analog IC TIps
  • Connector Tips
  • DesignFast
  • EDABoard Forums
  • EE World Online
  • Electro-Tech-Online Forums
  • Microcontroller Tips
  • Power Electronic Tips
  • Sensor Tips
  • Test and Measurement Tips
  • 5G Technology World
  • About Us
  • Contact Us
  • Advertise

Copyright © 2022 WTWH Media LLC. All Rights Reserved. The material on this site may not be reproduced, distributed, transmitted, cached or otherwise used, except with the prior written permission of WTWH Media
Privacy Policy | Advertising | About Us

Search Engineers Garage

  • Projects and Tutorials
    • Electronic Projects
      • 8051
      • Arduino
      • ARM
      • AVR
      • PIC
      • Raspberry pi
      • STM32
    • Tutorials
    • Circuit Design
    • Project Videos
    • Components
  • Articles
    • Tech Articles
    • Insight
    • Invention Stories
    • How to
    • What Is
  • News
    • Electronic Products News
    • DIY Reviews
    • Guest Post
  • Forums
    • EDABoard.com
    • Electro-Tech-Online
    • EG Forum Archive
  • Digi-Key Store
    • Cables, Wires
    • Connectors, Interconnect
    • Discrete
    • Electromechanical
    • Embedded Computers
    • Enclosures, Hardware, Office
    • Integrated Circuits (ICs)
    • Isolators
    • LED/Optoelectronics
    • Passive
    • Power, Circuit Protection
    • Programmers
    • RF, Wireless
    • Semiconductors
    • Sensors, Transducers
    • Test Products
    • Tools
  • EE Resources
    • DesignFast
    • LEAP Awards
    • Oscilloscope Product Finder
    • White Papers
    • Webinars
  • EE Learning Center
  • Women in Engineering