Engineers Garage

  • Electronic Projects & Tutorials
    • Electronic Projects
      • Arduino Projects
      • AVR
      • Raspberry pi
      • ESP8266
      • BeagleBone
      • 8051 Microcontroller
      • ARM
      • PIC Microcontroller
      • STM32
    • Tutorials
      • Audio Electronics
      • Battery Management
      • Brainwave
      • Electric Vehicles
      • EMI/EMC/RFI
      • Hardware Filters
      • IoT tutorials
      • Power Tutorials
      • Python
      • Sensors
      • USB
      • VHDL
    • Circuit Design
    • Project Videos
    • Components
  • Articles
    • Tech Articles
    • Insight
    • Invention Stories
    • How to
    • What Is
  • News
    • Electronic Product News
    • Business News
    • Company/Start-up News
    • DIY Reviews
    • Guest Post
  • Forums
    • EDABoard.com
    • Electro-Tech-Online
    • EG Forum Archive
  • DigiKey Store
    • Cables, Wires
    • Connectors, Interconnect
    • Discrete
    • Electromechanical
    • Embedded Computers
    • Enclosures, Hardware, Office
    • Integrated Circuits (ICs)
    • Isolators
    • LED/Optoelectronics
    • Passive
    • Power, Circuit Protection
    • Programmers
    • RF, Wireless
    • Semiconductors
    • Sensors, Transducers
    • Test Products
    • Tools
  • Learn
    • eBooks/Tech Tips
    • Design Guides
    • Learning Center
    • Tech Toolboxes
    • Webinars & Digital Events
  • Resources
    • Digital Issues
    • EE Training Days
    • LEAP Awards
    • Podcasts
    • Webinars / Digital Events
    • White Papers
    • Engineering Diversity & Inclusion
    • DesignFast
  • Guest Post Guidelines
  • Advertise
  • Subscribe

How to use a spy camera with Arduino

By Usman ali Butt March 9, 2021

Spy cameras are mainly used for surveillance activities and to ensure safety. They may also be used for commercial purposes, such as to monitor for theft or break-ins at a store or workplace.

Typical cameras are bulky and can be easily be spotted. However, it’s possible to integrate them into another object. To fit one into a wall painting, for instance, it’s first necessary to consider the size and dimension match.   

In this tutorial, we’ll learn how to integrate a camera with Arduino.

Considerations

The camera module.

Before getting started, it’s important to go over a few things:

  • The camera module. The physical camera module is small, which means it’s necessary to first remove all of the casings.
  • The storage module. Recording a video or even storing images requires plenty of storage space to do so. Storage technologies, such as EEPROM, FLASH, or SDCARD offer a fairly large size for storage. Smaller EEPROMS chip sizes exist but are not feasible to use in DIY projects.
  • The power module. Power is another important consideration. Spy cameras must be powered for a long period of time. Also, the standard cell/battery size is much larger than a camera module so we’ll have to consider the options.

One way to save power and storage is to take images on a timed interval, rather than recording an ongoing video. Then, it’s possible to cascade the images in ascending order, generating a video from these images.

In this tutorial, we’re using the Adafruit mini spy camera. This module includes a camera, an SDCARD slot, and power cables. What’s nice about this choice is that it’s unnecessary to program the Adafruit camera. To capture images, we simply need to ground a wire.

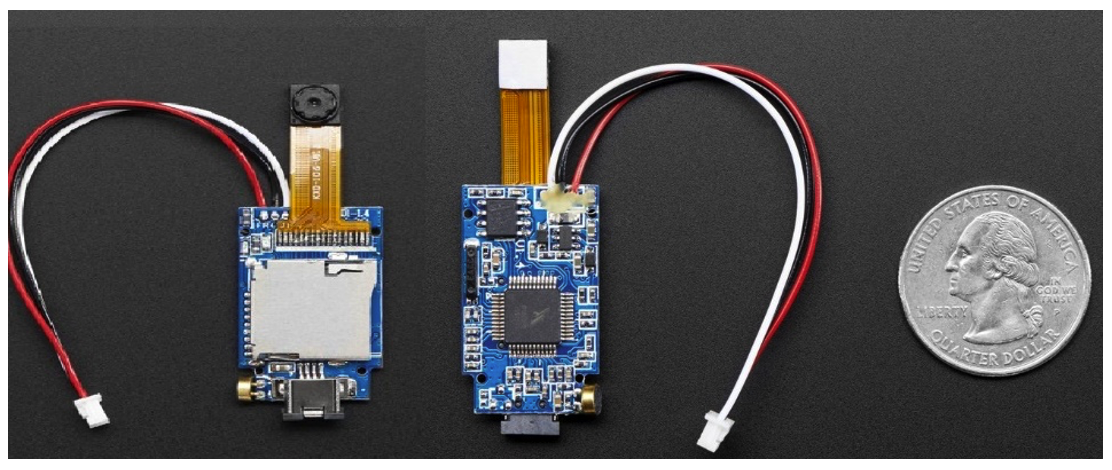
A battery is the only device required to power the module. You’ll note the one we used is nearly equivalent to the camera module size (about the size of a quarter).

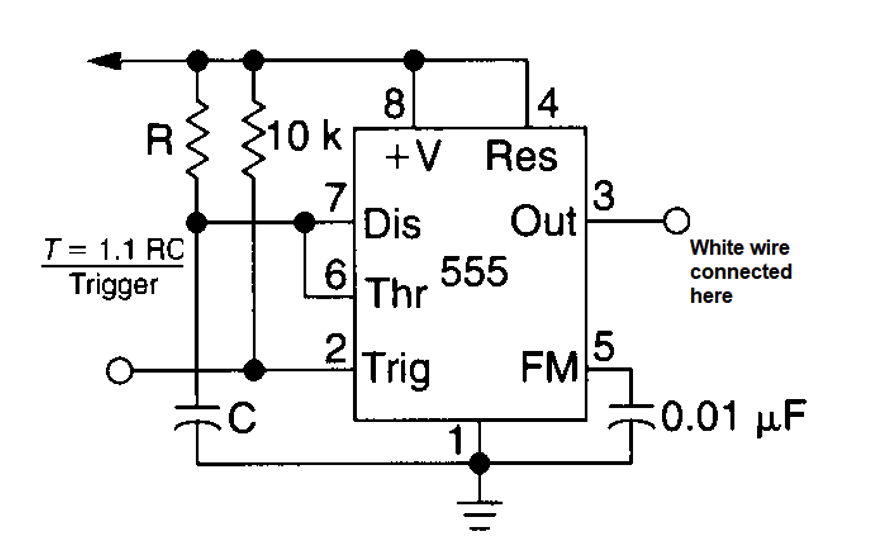
Now, to take images simply attach the white wire to the ground. The camera will snap images every half-second, which is predefined in the camera controller. It’s not possible to change this setting, but you can increase the time delay by using an external circuit that grounds the white wire after the preferred delay.   

A 55 IC can be used to generate the desired trigger for the image capture. Select the input resistor and capacitor value for the desired delay. The equation for the delay calculation is given in the circuit.

The circuit

Of course, another possibility is to use a microcontroller, which can be programmed. For this project, let’s use Arduino.

First, you’ll need to define a single pin and toggle it after the desired time.

The code

const byte camPin = 2; // Camera white wire connected to Arduino pin#2

void setup() {
  pinMode(camPin, OUTPUT);//Capture pin declared as output
}

void loop() {
    !digitalWrite(camPin); //Toggling capture pin after every 5 seconds
    delay(5000); //5 second delay
}

Another idea is to shoot the images at random intervals. The Arduino loop function should then look like this:

void loop() {
!digitalWrite(camPin); //Toggling capture pin after every 5 seconds
delay(random(1000,10000)); // Select random delay between 1 to 10 seconds
}

What’s required

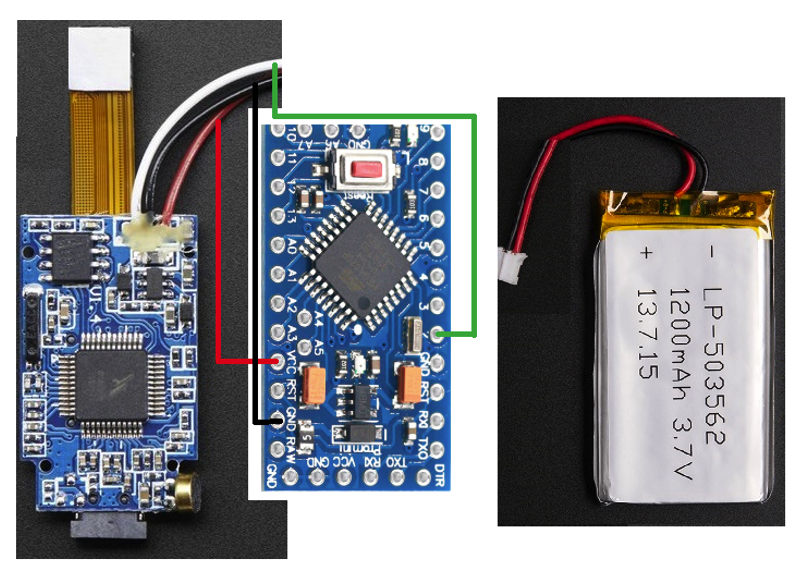
  • Arduino – we used Arduino Nano as it’s compact
  • One camera module – we used the Adafruit mini spy camera
  • One battery

The interconnections between the three peripherals are straightforward. One battery can easily power both the modules. The camera module’s white wire connects with the Arduino’s pin#2.

In this case, the size of the spy camera is still somewhat large. It’s possible to define and custom-generate each module by using FPGA and then printing the custom module. That is a tedious task, however.

Where to purchase the parts?

  • Arduino: Mouser
  • The spy camera: Adafruit

Filed Under: Microcontroller Projects
Tagged With: Arduino
 

Next Article

← Previous Article
Next Article →

Questions related to this article?
👉Ask and discuss on EDAboard.com and Electro-Tech-Online.com forums.


Tell Us What You Think!! Cancel reply

You must be logged in to post a comment.

EE TECH TOOLBOX

“ee
Tech Toolbox: Internet of Things
Explore practical strategies for minimizing attack surfaces, managing memory efficiently, and securing firmware. Download now to ensure your IoT implementations remain secure, efficient, and future-ready.

EE Learning Center

EE Learning Center
“engineers
EXPAND YOUR KNOWLEDGE AND STAY CONNECTED
Get the latest info on technologies, tools and strategies for EE professionals.

HAVE A QUESTION?

Have a technical question about an article or other engineering questions? Check out our engineering forums EDABoard.com and Electro-Tech-Online.com where you can get those questions asked and answered by your peers!


RSS EDABOARD.com Discussions

  • Multiple DC/DC converters and a single input source
  • Voltage mode pushpull is a nonsense SMPS?
  • High Side current sensing
  • Reducing "shoot-through" in offline Full Bridge SMPS?
  • MOSFET thermal noise in Weak vs Strong inversion

RSS Electro-Tech-Online.com Discussions

  • Failure of polypropylene motor-run capacitors
  • Siemens large industrial PLC parts
  • Wideband matching an electrically short bowtie antenna; 50 ohm, 434 MHz
  • Curved lines in PCB design
  • using a RTC in SF basic

Featured – RPi Python Programming (27 Part)

  • RPi Python Programming 21: The SIM900A AT commands
  • RPi Python Programming 22: Calls & SMS using a SIM900A GSM-GPRS modem
  • RPi Python Programming 23: Interfacing a NEO-6MV2 GPS module with Raspberry Pi
  • RPi Python Programming 24: I2C explained
  • RPi Python Programming 25 – Synchronous serial communication in Raspberry Pi using I2C protocol
  • RPi Python Programming 26 – Interfacing ADXL345 accelerometer sensor with Raspberry Pi

Recent Articles

  • What is AWS IoT Core and when should you use it?
  • AC-DC power supply extends voltage range to 800 V DC
  • Infineon’s inductive sensor integrates coil system driver, signal conditioning circuits and DSP
  • Arm Cortex-M23 MCU delivers 87.5 µA/MHz active mode
  • STMicroelectronics releases automotive amplifiers with in-play open-load detection

EE ENGINEERING TRAINING DAYS

engineering

Submit a Guest Post

submit a guest post
Engineers Garage
  • Analog IC TIps
  • Connector Tips
  • Battery Power Tips
  • DesignFast
  • EDABoard Forums
  • EE World Online
  • Electro-Tech-Online Forums
  • EV Engineering
  • Microcontroller Tips
  • Power Electronic Tips
  • Sensor Tips
  • Test and Measurement Tips
  • 5G Technology World
  • Subscribe to our newsletter
  • About Us
  • Contact Us
  • Advertise

Copyright © 2025 WTWH Media LLC. All Rights Reserved. The material on this site may not be reproduced, distributed, transmitted, cached or otherwise used, except with the prior written permission of WTWH Media
Privacy Policy

Search Engineers Garage

  • Electronic Projects & Tutorials
    • Electronic Projects
      • Arduino Projects
      • AVR
      • Raspberry pi
      • ESP8266
      • BeagleBone
      • 8051 Microcontroller
      • ARM
      • PIC Microcontroller
      • STM32
    • Tutorials
      • Audio Electronics
      • Battery Management
      • Brainwave
      • Electric Vehicles
      • EMI/EMC/RFI
      • Hardware Filters
      • IoT tutorials
      • Power Tutorials
      • Python
      • Sensors
      • USB
      • VHDL
    • Circuit Design
    • Project Videos
    • Components
  • Articles
    • Tech Articles
    • Insight
    • Invention Stories
    • How to
    • What Is
  • News
    • Electronic Product News
    • Business News
    • Company/Start-up News
    • DIY Reviews
    • Guest Post
  • Forums
    • EDABoard.com
    • Electro-Tech-Online
    • EG Forum Archive
  • DigiKey Store
    • Cables, Wires
    • Connectors, Interconnect
    • Discrete
    • Electromechanical
    • Embedded Computers
    • Enclosures, Hardware, Office
    • Integrated Circuits (ICs)
    • Isolators
    • LED/Optoelectronics
    • Passive
    • Power, Circuit Protection
    • Programmers
    • RF, Wireless
    • Semiconductors
    • Sensors, Transducers
    • Test Products
    • Tools
  • Learn
    • eBooks/Tech Tips
    • Design Guides
    • Learning Center
    • Tech Toolboxes
    • Webinars & Digital Events
  • Resources
    • Digital Issues
    • EE Training Days
    • LEAP Awards
    • Podcasts
    • Webinars / Digital Events
    • White Papers
    • Engineering Diversity & Inclusion
    • DesignFast
  • Guest Post Guidelines
  • Advertise
  • Subscribe