Engineers Garage

  • Electronic Projects & Tutorials
    • Electronic Projects
      • Arduino Projects
      • AVR
      • Raspberry pi
      • ESP8266
      • BeagleBone
      • 8051 Microcontroller
      • ARM
      • PIC Microcontroller
      • STM32
    • Tutorials
      • Audio Electronics
      • Battery Management
      • Brainwave
      • Electric Vehicles
      • EMI/EMC/RFI
      • Hardware Filters
      • IoT tutorials
      • Power Tutorials
      • Python
      • Sensors
      • USB
      • VHDL
    • Circuit Design
    • Project Videos
    • Components
  • Articles
    • Tech Articles
    • Insight
    • Invention Stories
    • How to
    • What Is
  • News
    • Electronic Product News
    • Business News
    • Company/Start-up News
    • DIY Reviews
    • Guest Post
  • Forums
    • EDABoard.com
    • Electro-Tech-Online
    • EG Forum Archive
  • DigiKey Store
    • Cables, Wires
    • Connectors, Interconnect
    • Discrete
    • Electromechanical
    • Embedded Computers
    • Enclosures, Hardware, Office
    • Integrated Circuits (ICs)
    • Isolators
    • LED/Optoelectronics
    • Passive
    • Power, Circuit Protection
    • Programmers
    • RF, Wireless
    • Semiconductors
    • Sensors, Transducers
    • Test Products
    • Tools
  • Learn
    • eBooks/Tech Tips
    • Design Guides
    • Learning Center
    • Tech Toolboxes
    • Webinars & Digital Events
  • Resources
    • Digital Issues
    • EE Training Days
    • LEAP Awards
    • Podcasts
    • Webinars / Digital Events
    • White Papers
    • Engineering Diversity & Inclusion
    • DesignFast
  • Guest Post Guidelines
  • Advertise
  • Subscribe

How to use a thermal camera with Arduino

By Usman ali Butt March 15, 2021

In this tutorial, we’ll learn the basics of “heat vision” and how to interface a thermal-imaging camera with Arduino. Of course, humans cannot see heat directly, but objects do give off infrared radiation at a certain temperature. Although infrared light is invisible to the naked eye, a thermal camera can detect it.

A thermal camera is a non-contact device that picks up infrared energy (or heat) and then converts it into a visual image. A thermal camera works on the same principle as a conventional imaging camera — the only difference is in the detection of light/photons.

Infrared imaging or “heat vision” has been used in several industries, such as in the military, for surveillance and security, search and rescue, and for medical purposes, as well as in other sectors.

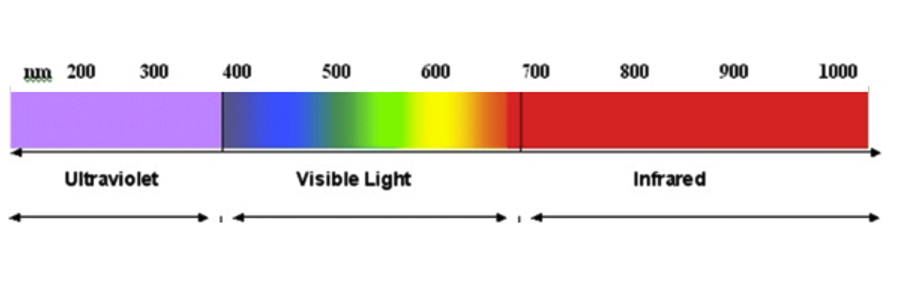
Infrared radiation (IR) is a part of the electromagnetic radiation spectrum. Though humans cannot see it, we can feel it in the form of heat. When IR waves strike a surface, they vibrate and release energy. Sun and fire are sources of IR radiation.

By using IR, it’s possible to view the world within a heat dimension. This is where an IR camera comes in as it captures IR images, which can be useful in many ways. For example, by using infrared-radiation imaging, it’s possible to measure body temperature, differentiate dead cells (versus live ones) in a living being, or even detect movement (say as a security measure against break-ins or theft, etc.).

An IR camera has an array of thermal infrared sensors. All the individual IR detectors work together to capture and build an image. The frame rate of an IR camera is lower than a typical imaging camera (the eye-detection is 32 frames per second). This is because IR photon energy takes longer to be acquired by the IR detector.

The IR detectors work together to form a single image. Each box represents a pixel. Each individual IR detector in array grabs a minute frame, which is equivalent to one pixel. Those pixels with a high, frame-rate capability become a high-definition image or video.

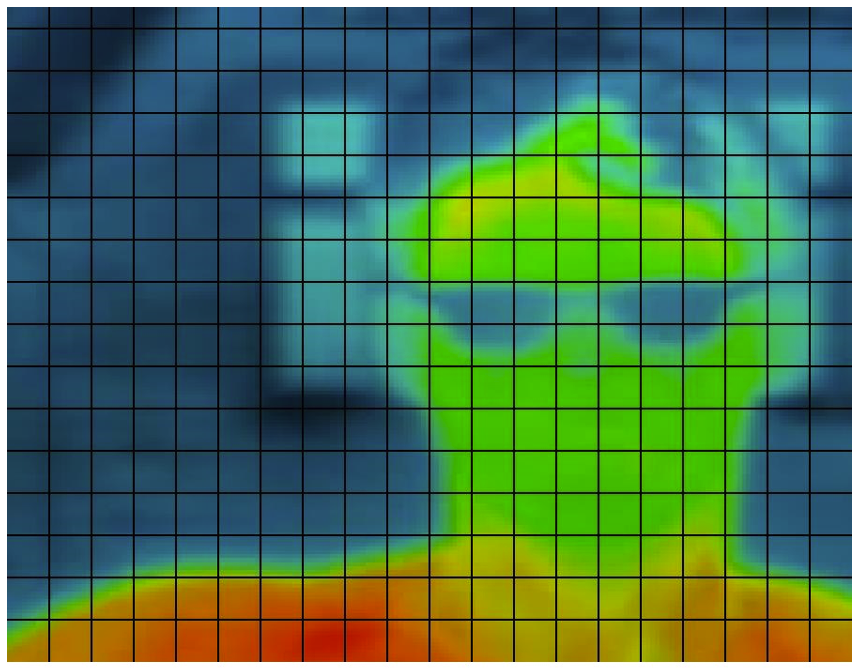
An example of an IR image.The actual pixels are much smaller.

The thermal camera
In this tutorial, we use the Adafruit MLX90640 IR Thermal Camera breakout board.

A few things to note:

  • The camera resolution is 24×32
  • A total of 24*32=768 individual IR detectors forms an image
  • It can measure a temperature between -40 to 300 C with an accuracy of +-2 C
  • The frame rate is 16HZ (half to the human eye)

We’re using the camera in low-resolution because it’s pairing up with the low-power Arduino module, which has limited processing power.

Project circuit diagram

The IR camera’s external interface is an I2C (I-squared-C), so it’s connected with Arduino’s I2C pins, which are present on either side of the board. Both sides are cascaded and only a jumper separates them.

For this project, we used the I2C interface pins that are on the analog side (though you can use another one by shorting the jumper wires).

The camera is powered by Arduino’s internal regulator. We powered it with 5V since that’s what Arduino works on. It makes sense to operate the camera on the same voltage to avoid any logic or data-transfer errors.  

The project code
The Adafruit provides pre-defined Arduino libraries for almost all of its sensors. We used the Adafruit mlx90640 libraries in this project, which saves time and effort going through the datasheet of the camera and writing everything from scratch.

The library functions and commands are explained on the github repository.

Once you’re set up and ready, try measuring the temperature of a person (or pet) by pointing the sensor toward it. The temperature will display on Arduino’s serial monitor. In fact, the individual frame IR detectors’ readings (a total of 768) will display on the serial monitor in grid form.

#include <Adafruit_MLX90640.h>

//Library instance
Adafruit_MLX90640 mlx;

// Buffer to store themal image
float frame[32*24];

void setup() {
  while (!Serial) delay(10);
  Serial.begin(115200);
  delay(100);
  //Serial connected/acctivated at 115200 baud rate

  Serial.println(“Adafruit MLX90640 Simple Test”);
  if (! mlx.begin(MLX90640_I2CADDR_DEFAULT, &Wire)) {
    Serial.println(“MLX90640 not found!”);
    while (1) delay(10);
  }
  Serial.println(“Found Adafruit MLX90640”);

  //Set the sensor mode
  //mlx.setMode(MLX90640_INTERLEAVED);
  mlx.setMode(MLX90640_CHESS);//Chess view(Grid with boxes)

  // Set resolution 16,17,18 or 19 – Current 18
  mlx.setResolution(MLX90640_ADC_18BIT);

 // Set Refresh rate 1,2,4,8,16,32,64 Hz – Current 2 Hz 
  mlx.setRefreshRate(MLX90640_2_HZ);
}

void loop() {
  //Half second delay for camera to cool up
  delay(500);
  //Get the IR frame
  if (mlx.getFrame(frame) != 0) {
    Serial.println(“Failed”);
    return;
  }
  //Give two line spaces
  Serial.println();
  Serial.println();

  //Print the frame temperature on serial monitor
  for (uint8_t h=0; h<24; h++) {//Depecting Row – 24 rows   

    for (uint8_t w=0; w<32; w++) {//Depecting Column – 32 columns
      float t = frame[h*32 + w];
        Serial.print(t, 1);
        Serial.print(“, “);
    }   

    Serial.println();//Next line after each row
  }
}

Where to purchase the parts?

  • Arduino Uno
  • Adafruit MLX90640 thermal camera
  • Jumper wires

Filed Under: Microcontroller Projects
Tagged With: Arduino
 

Next Article

← Previous Article
Next Article →

Questions related to this article?
👉Ask and discuss on EDAboard.com and Electro-Tech-Online.com forums.


Tell Us What You Think!! Cancel reply

You must be logged in to post a comment.

EE TECH TOOLBOX

“ee
Tech Toolbox: 5G Technology
This Tech Toolbox covers the basics of 5G technology plus a story about how engineers designed and built a prototype DSL router mostly from old cellphone parts. Download this first 5G/wired/wireless communications Tech Toolbox to learn more!

EE Learning Center

EE Learning Center
“engineers
EXPAND YOUR KNOWLEDGE AND STAY CONNECTED
Get the latest info on technologies, tools and strategies for EE professionals.

HAVE A QUESTION?

Have a technical question about an article or other engineering questions? Check out our engineering forums EDABoard.com and Electro-Tech-Online.com where you can get those questions asked and answered by your peers!


RSS EDABOARD.com Discussions

  • Inconsistent Charge Termination Voltage with battery charger
  • 21V keeps getting shorted to my UART line.
  • Voltage mode pushpull is a nonsense SMPS?
  • Voltage mode push pull with extra DC blocking capacitor
  • NXP library issue in awr

RSS Electro-Tech-Online.com Discussions

  • Is AI making embedded software developers more productive?
  • Why can't I breadboard this oscillator?
  • using a RTC in SF basic
  • Parts required for a personal project
  • Cataract Lens Options?

Featured – RPi Python Programming (27 Part)

  • RPi Python Programming 21: The SIM900A AT commands
  • RPi Python Programming 22: Calls & SMS using a SIM900A GSM-GPRS modem
  • RPi Python Programming 23: Interfacing a NEO-6MV2 GPS module with Raspberry Pi
  • RPi Python Programming 24: I2C explained
  • RPi Python Programming 25 – Synchronous serial communication in Raspberry Pi using I2C protocol
  • RPi Python Programming 26 – Interfacing ADXL345 accelerometer sensor with Raspberry Pi

Recent Articles

  • GigaDevice launches GD32C231 MCU series with 48MHz Cortex-M23 core and 64KB Flash
  • Advanced Energy releases 425 W CF-rated medical power supply in 3.5 x 6 x 1.5-inch format”
  • LEM combines shunt and Hall effect sensing in 2000 A current measurement unit
  • What is AWS IoT Core and when should you use it?
  • AC-DC power supply extends voltage range to 800 V DC

EE ENGINEERING TRAINING DAYS

engineering

Submit a Guest Post

submit a guest post
Engineers Garage
  • Analog IC TIps
  • Connector Tips
  • Battery Power Tips
  • DesignFast
  • EDABoard Forums
  • EE World Online
  • Electro-Tech-Online Forums
  • EV Engineering
  • Microcontroller Tips
  • Power Electronic Tips
  • Sensor Tips
  • Test and Measurement Tips
  • 5G Technology World
  • Subscribe to our newsletter
  • About Us
  • Contact Us
  • Advertise

Copyright © 2025 WTWH Media LLC. All Rights Reserved. The material on this site may not be reproduced, distributed, transmitted, cached or otherwise used, except with the prior written permission of WTWH Media
Privacy Policy

Search Engineers Garage

  • Electronic Projects & Tutorials
    • Electronic Projects
      • Arduino Projects
      • AVR
      • Raspberry pi
      • ESP8266
      • BeagleBone
      • 8051 Microcontroller
      • ARM
      • PIC Microcontroller
      • STM32
    • Tutorials
      • Audio Electronics
      • Battery Management
      • Brainwave
      • Electric Vehicles
      • EMI/EMC/RFI
      • Hardware Filters
      • IoT tutorials
      • Power Tutorials
      • Python
      • Sensors
      • USB
      • VHDL
    • Circuit Design
    • Project Videos
    • Components
  • Articles
    • Tech Articles
    • Insight
    • Invention Stories
    • How to
    • What Is
  • News
    • Electronic Product News
    • Business News
    • Company/Start-up News
    • DIY Reviews
    • Guest Post
  • Forums
    • EDABoard.com
    • Electro-Tech-Online
    • EG Forum Archive
  • DigiKey Store
    • Cables, Wires
    • Connectors, Interconnect
    • Discrete
    • Electromechanical
    • Embedded Computers
    • Enclosures, Hardware, Office
    • Integrated Circuits (ICs)
    • Isolators
    • LED/Optoelectronics
    • Passive
    • Power, Circuit Protection
    • Programmers
    • RF, Wireless
    • Semiconductors
    • Sensors, Transducers
    • Test Products
    • Tools
  • Learn
    • eBooks/Tech Tips
    • Design Guides
    • Learning Center
    • Tech Toolboxes
    • Webinars & Digital Events
  • Resources
    • Digital Issues
    • EE Training Days
    • LEAP Awards
    • Podcasts
    • Webinars / Digital Events
    • White Papers
    • Engineering Diversity & Inclusion
    • DesignFast
  • Guest Post Guidelines
  • Advertise
  • Subscribe