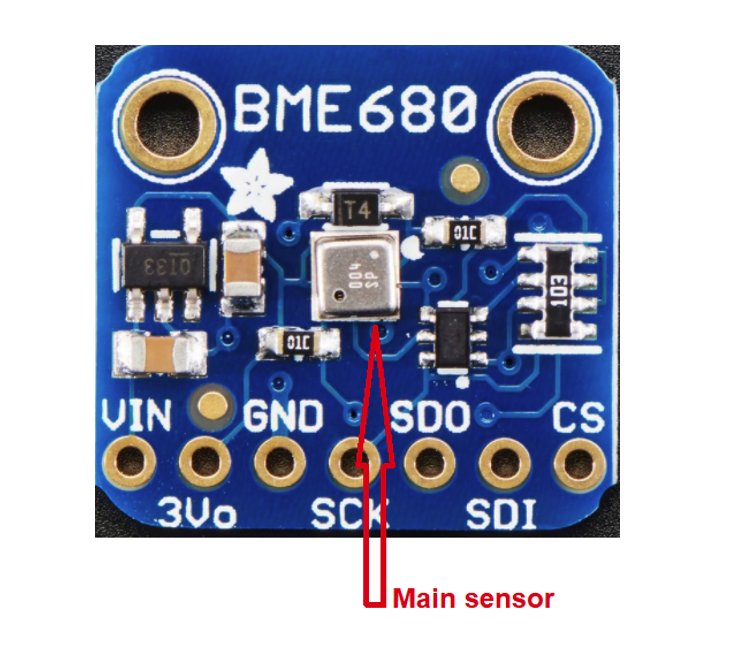
BME680 is a multi-purpose digital sensor, developed by Bosch after years of research, which can measure temperature, humidity, gas, and barometric pressure. Communication with this sensor is possible via the Serial Peripheral Interface (SPI) and I2C protocols.
The temperature and barometric pressure accuracy are +-1 and the humidity is +-3. The gases are measured as volatile organic compounds (VOCs) in the air. VOCs give a single value of resistance for the output. This means that we can predict that gas is present in the air, but are unable to distinguish whether it’s ethanol, carbon monoxide, or alcohol, etc.
For this project, we’ll interface the BME680 sensor with Arduino. The main sensor is small and compact, and external resistors and capacitors are required for proper configuration. For example, both an I2C pull-up and a VOC resistor are needed when a voltage divider is necessary. The BME680 sensor can work on 3.3 and 5V.
Circuit diagram
The circuit diagram for this project is quite simple. We decided to interface the sensor with Arduino Nano using the SPI protocol. Arduino’s SPI pins are available on its digital pins 10 through 13. The sensor is powered using 3.3V output from Arduino.
Here’s a diagram…

The code
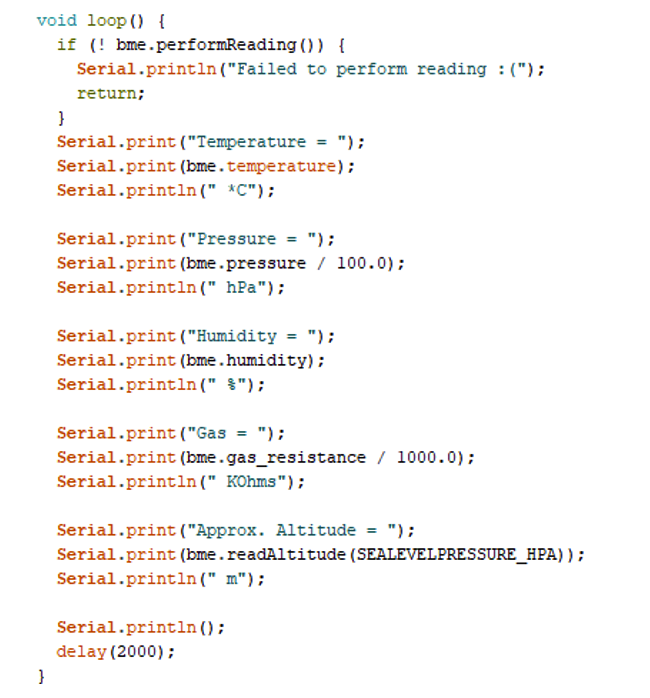
Adafruit offers a predefined library that has nearly all of this sensor’s functions available. However, the Adafruit BME sensor library first requires the Adafruit sensor, as well as Arduino’s SPI and I2C wire library to properly configure and start the BME680.
After importing the library, the SPI pins are declared. The pins must be passed to the BME constructor for initialization.
Also, for the barometric pressure measurement, it’s necessary to specify a reference pressure. So, we used the typical sea-level pressure as the reference for the barometric pressure calculation for this project.

How it works
In the setup function, Arduino’s serial monitor is started at 9600 bps. Next, the sensor must be polled to verify if the connection is established successfully.
In the loop function, the readings are continuously received from the sensor. If the data request is successful, the individual parameter values are displayed on Arduino IDE’s serial monitor.
Note: The gas and pressure values are divided by 1000 and 100, respectively, to assign them units in kOhm and hpa.
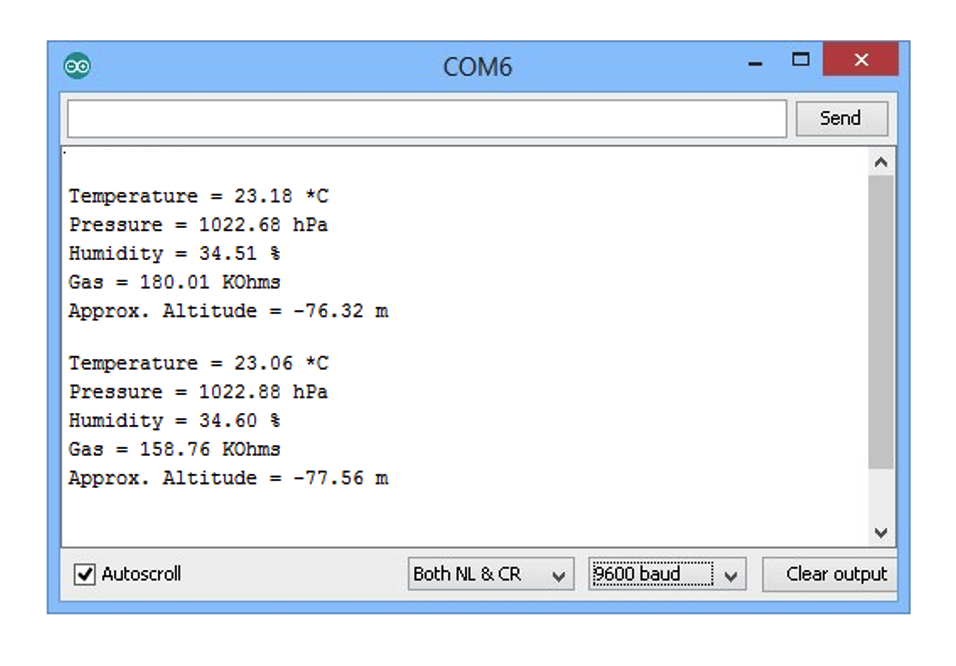
To achieve more stable values for the individual parameters , simply increase the sampling rate for them.
Instructions
1. bme.setTemperatureOversampling(BME680_OS_8X);
2. bme.setHumidityOversampling(BME680_OS_2X);
3. bme.setPressureOversampling(BME680_OS_4X);
4. bme.setIIRFilterSize(BME680_FILTER_SIZE_3);
5. bme.setGasHeater(320, 150); // 320*C for 150 ms
To view the results, open Arduino IDE’s serial monitor at 9600 bps. During the initial boot, the sensor will require a few seconds. After a few readings, the sensor will stabilize and output accurate values.
Where to purchase the parts?
You may also like:


Filed Under: Arduino, Electronic Projects

Questions related to this article?
👉Ask and discuss on Electro-Tech-Online.com and EDAboard.com forums.
Tell Us What You Think!!
You must be logged in to post a comment.