In the previous tutorial, we learned how to use the Nextion HMI editor. In this tutorial, we will is studying the advanced features of the HMI and learn how to interface an external microcontroller with nextion HMI. Our focus will be on communication protocol, command set, and data synchronization.
Nextion HMI talks with external modules on UART serial communication. The default baud rate is 9600 bps. HMI works on 5 V, so UART is 5 V tolerant.

Output from HMI
HMI output a fixed-sized byte array whenever any event of an object is exercised. Let’s see it in the debugger.
First, select the object and activate its events(touch or release). Every object placed on the HMI canvas has events. You can activate them if you want the object to communicate with the external microcontroller. I have an image on page 1 of HMI. I want it to communicate with the external microcontroller.
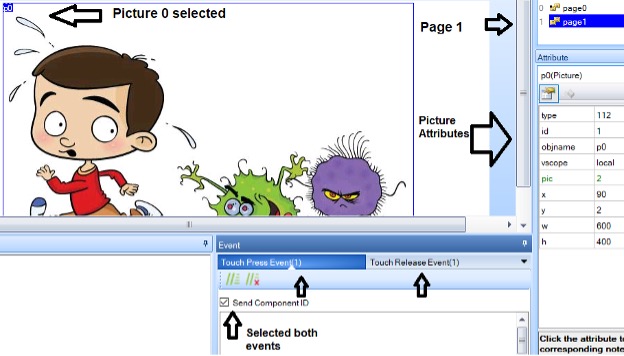
After event selection, compile the code and run the debugger. Click on the picture, and you will see two-byte arrays appearing in the simulator return window.
 The first-byte array is generated on touch, and the second on release. What the byte array represents?
 These bytes are sent through the UART port to the external microcontroller in the real application. Bytes can be interpreted, and a response can be sent back.
The response can be an action of any type.
- Change image, color, text.
- Display text, date, time, temperature, etc
Microcontroller-to-HMI instructions
Let’s see how an external microcontroller can request action on event reception. According to the nextion instruction set, each object attribute can be changed by an external microcontroller. Plenty of instructions are listed on their website. Not all the instructions are supported by each HMI. Enhanced versions support all the instructions, whereas the basic version is limited to instructions. Suppose we want to change the text in the text box.
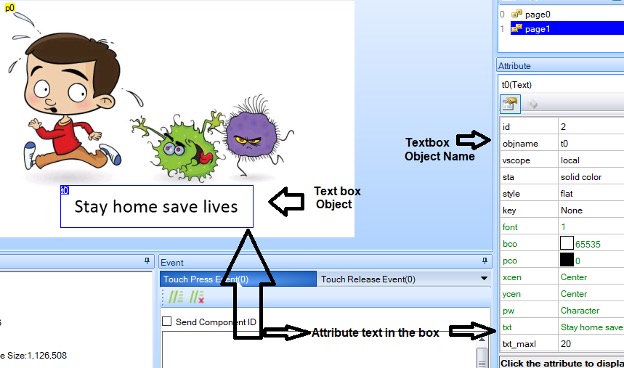
Instruction format is objectname.attribute=Update
t0=object name
txt=attribute (text specifier)
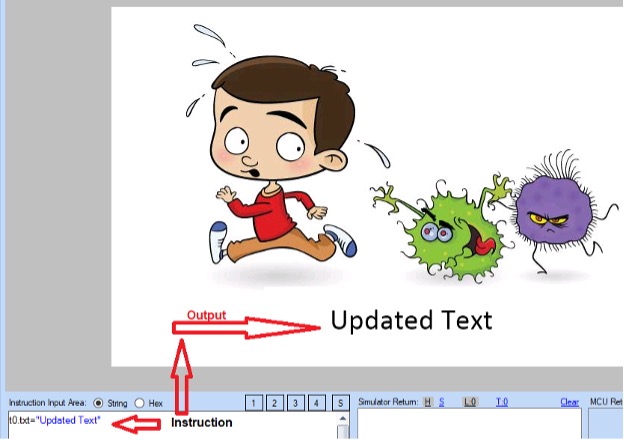
During debugging, you can check the result of the above instruction. Input the instruction in the instruction input area and hit enter. Text will be updated.
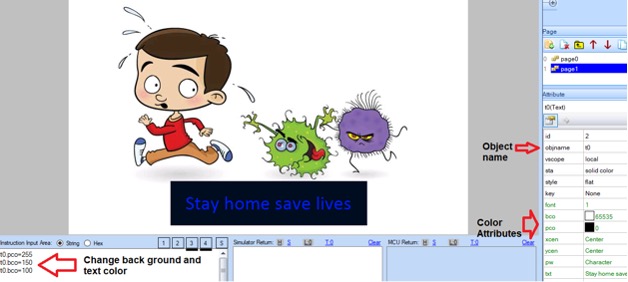
 To change the color of text and background instructions are
 All the instructions are listed on the following link (Nextion instruction list).
Interfacing Arduino with Nextion display
Simple and straight connections. Arduino Tx to Rx of Nextion and Rx to Tx. Nextion operates on 5 volts, so an Arduino regulator is enough to power the Nextion display.
 Writing Arduino code for HMI from scratch is timing consuming and requires plenty of effort. Few predefined libraries are available which can be utilized. Libraries didn’t offer all the functions, but you can define yourself in libraries.
One such library is EasyNextionLibrary.h. A sample code is below.
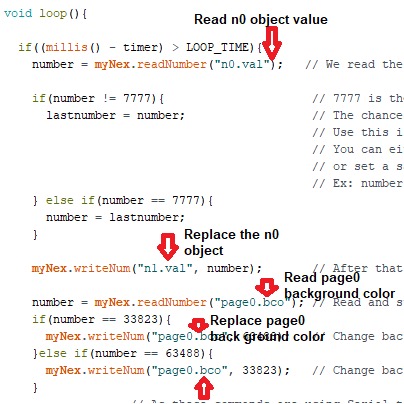
All the instructions are similar to the one explained above.
Do a DIY project with Nextion: Where to purchase parts?
Mouser: Nextion HMI display
Arduino: Arduino Uno
Mouser: Power supply
You may also like:


Filed Under: Microcontroller Projects

Questions related to this article?
👉Ask and discuss on EDAboard.com and Electro-Tech-Online.com forums.
Tell Us What You Think!!
You must be logged in to post a comment.