To explore its potential, collect Arduino Uno board and Ethernet shield along with the Wiznet chip/Freetronics EtherTen. Teleduino is also compatible with Arduino Mega and the awesome EtherMega. One can download the Teleduino Arduino library and install it from resources available. Make sure to arrange a running Arduino IDE v1.0 or greater for the same purpose.
To get identification for your particular Arduino from the rest, request for an API key. Some basic electronics components for testing would be required like LEDs and 560R resistors, sources of analog input like LDR or TMP36 temperature sensor, a solderless breadboard along with Ethernet cable from Arduino stack to the router. Don’t forget to acquire some basic knowledge about networking.
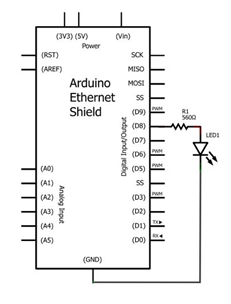
For the beginners, Teleduino system generally uses pin D8 for a status LED, therefore you might need to connect one for experimentation. Here is a portrait for the same.
One can initiate the experiment while dealing with digital outputs, where an LED is controlled by turning it on and off. Another LED is connected with a resistor to D6, for the demonstration purpose, in the same manner as shown in the picture above. Further, a sketch is uploaded to the Arduino after adding your API key. You can get the complete information along with the video on the tronixstuff.
Teleduino is new in the market and therefore, at the initial stage, it is not complex and hence leaves space for lots of possibilities and ideas. One can start experimenting this product in their future projects. Further, Teleduino is a work in progress and therefore experiments may misfire, therefore follow along and see for yourself.
Filed Under: Reviews

Questions related to this article?
👉Ask and discuss on Electro-Tech-Online.com and EDAboard.com forums.
Tell Us What You Think!!
You must be logged in to post a comment.