Engineers Garage

  • Projects and Tutorials
    • Electronic Projects
      • 8051
      • Arduino
      • ARM
      • AVR
      • PIC
      • Raspberry pi
      • STM32
    • Tutorials
    • Circuit Design
    • Project Videos
    • Components
  • Articles
    • Tech Articles
    • Insight
    • Invention Stories
    • How to
    • What Is
  • News
    • Electronic Products News
    • DIY Reviews
    • Guest Post
  • Forums
    • EDABoard.com
    • Electro-Tech-Online
    • EG Forum Archive
  • Digi-Key Store
    • Cables, Wires
    • Connectors, Interconnect
    • Discrete
    • Electromechanical
    • Embedded Computers
    • Enclosures, Hardware, Office
    • Integrated Circuits (ICs)
    • Isolators
    • LED/Optoelectronics
    • Passive
    • Power, Circuit Protection
    • Programmers
    • RF, Wireless
    • Semiconductors
    • Sensors, Transducers
    • Test Products
    • Tools
  • EE Resources
    • DesignFast
    • LEAP Awards
    • Oscilloscope Product Finder
    • White Papers
    • Webinars
  • EE Learning Center
    • Design Guides
      • WiFi & the IOT Design Guide
      • Microcontrollers Design Guide
      • State of the Art Inductors Design Guide
  • Women in Engineering

Introduction To Linux – Create Pipe With C In Linux (Part 12/15)

By Ashish Vara

How to create pipe in Linux
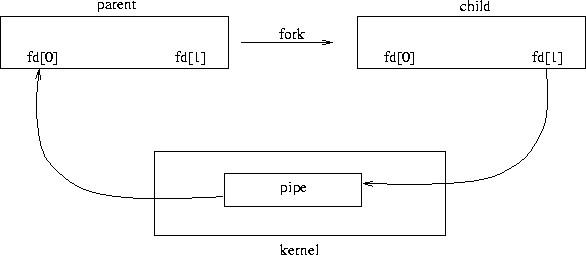
Overview of Pipes in Linux

Fig. 1: Overview of Pipes in Linux


Pipe is one way communication of data between one process to another process. It is a form of communication called Interprocess Communication (IPC). Refer to the tutorial Pipe in Linux before learning this one.

Process creates a new pipe using pipe ( ) system call. It creates a pair of file descriptor: one for read channel and one for write channel. These file descriptors may pass through fork ( ) system call. Fork ( ) creates a new process which shares the pipe with them. It takes no argument and returns the process ID. You can learn more about Fork ( ) system call in Process in Linux tutorial.

It can read from pipe by read ( ) system call with first file descriptor and can write to pipe by write ( ) system call with second file descriptor. It is half duplex pipe so each process must be closed before using another.


Pipe ( ) System Call

Pipe ( ) system call creates a pair of file descriptors for communication between two processes. First file descriptor is associated with read operation and second file descriptor is associated with write operator.

SYNOPSIS of pipe ( ) system call:

            int pipe ( int file_descriptor [2]);

Array file_descriptor is used to store return pair of file descriptor. file_descriptor [0]  refers to the read end of pipe and file_descriptor [1] refers to the write end of pipe.

It returns Zero on success or returns -1 on error and sets the appropriately errno.

Errors may occur as following on return -1:

EFAULT – file_descriptor is not valid.

EMFILE – The per-process limit on the number of open file descriptors has been reached.

ENFILE – The system-wide limit on the total number of open files has been reached.


Create simple demo pipe

This is the basic demo tutorial of how to work with pipe. It is an example of only  transferring the data from one write file descriptor to read file descriptor without creating process. Before making the program, refer to the tutorial How to create first C program in Linux.

//*****************************Pipe_demo.c*********************************//

#include <stdio.h>

#include <stdlib.h>

#include <string.h>


int main()

{

            int no_of_byte;

            char message[1025];

            char  *write_msg = “Hello this is demo tutorial of working of pipe….”;

            int  file_d[2];                                                   // array of file descriptor which stores pair of file descriptors


            pipe(file_d);                                                    // create pipe;

            write(file_d[1] , write_msg , strlen(write_msg)); // write the message to pipe using write file descriptor;


            no_of_byte = read(file_d[0] , message , 1024 ); // read the message from pipe using read file deascriptor;

            if(no_of_byte >= 0)                                        // check the number of byte greater than zero;

            {

                        message[no_of_byte] = 0;                   // store last byte of message NULL;

                        printf(“Read %d byte from pipe : %sn ” , no_of_byte , message); // print the  message which is read from pipe and store it in message [] array;

            } 

            else

            {

                        perror(“read”);

            }

            exit(0);                                                 // exit from program and close the pipe;

}

//*****************************Pipe_demo.c*********************************//

Write or copy same code in your Linux text editor and save it as Pipe_demo.c. You can save file with any name  that you wish.


Compiling the source code

After  writing and checking it for error, the next step is to get ready for compiler.

Compile Pipe_demo.c with GCC by following line:

gcc Pipe_demo.c

After compilation, GCC will generate executable (runnable) file. Here we  haven’t given the name of executable file so compiler automatically gives the a.out name to file. a.out is executable file of Pipe_demo.c and locates it in the same directory where source file is saved.

But a good programmer always gives name of executable file using the following lines instead of upper method:

gcc -o  pipedemo  Pipe_demo.c

Now GCC will generate executable file named pipedemo instead of a.out. Before running the executable file, make sure that the executable file is generated within the same directory where the source file is located.

Running the Executable File

Type the file name followed by dot and a forward slash and press the ENTER key as following:

./pipedemo

Following result will print on the monitor screen:

Read 50 byte from pipe : Hello this is demo tutorial of working of pipe….


Filed Under: Tutorials


Questions related to this article?
👉Ask and discuss on Electro-Tech-Online.com and EDAboard.com forums.


Tell Us What You Think!! Cancel reply

You must be logged in to post a comment.

HAVE A QUESTION?

Have a technical question about an article or other engineering questions? Check out our engineering forums EDABoard.com and Electro-Tech-Online.com where you can get those questions asked and answered by your peers!


Featured Tutorials

  • Introduction to Brain Waves & its Types (Part 1/13)
  • Understanding NeuroSky EEG Chip in Detail (Part 2/13)
  • Performing Experiments with Brainwaves (Part 3/13)
  • Amplification of EEG Signal and Interfacing with Arduino (Part 4/13)
  • Controlling Led brightness using Meditation and attention level (Part 5/13)
  • Control Motor’s Speed using Meditation and Attention Level of Brain (Part 6/13)

Stay Up To Date

Newsletter Signup

Sign up and receive our weekly newsletter for latest Tech articles, Electronics Projects, Tutorial series and other insightful tech content.

EE Training Center Classrooms

EE Classrooms

Recent Articles

  • What are the battery-selection criteria for low-power design?
  • Key factors to optimize power consumption in an embedded device
  • EdgeLock A5000 Secure Authenticator
  • How to interface a DS18B20 temperature sensor with MicroPython’s Onewire driver
  • Introduction to Brain Waves & its Types (Part 1/13)

Most Popular

5G 555 timer circuit 8051 ai Arduino atmega16 automotive avr bluetooth dc motor display Electronic Part Electronic Parts Fujitsu ic infineontechnologies integratedcircuit Intel IoT ir lcd led maximintegratedproducts microchip microchiptechnology Microchip Technology microcontroller microcontrollers mosfet motor powermanagement Raspberry Pi remote renesaselectronics renesaselectronicscorporation Research samsung semiconductor sensor software STMicroelectronics switch Technology vishayintertechnology wireless

RSS EDABOARD.com Discussions

  • Advice for my disabled son please
  • Very low voltage/power Schmitt trigger?
  • 3D IC Design: Is it possible to stack CPU and FPGA?
  • dc to dc converter sparks when inserting fuse
  • 7 segment display connections

RSS Electro-Tech-Online.com Discussions

  • Pet Microchip scan
  • Disabled son needs advice please
  • Modify a digital clamp ammeter ?
  • Confirming whether this circuit will work
  • How does a blinky/flashing ball work?
Engineers Garage
  • Analog IC TIps
  • Connector Tips
  • DesignFast
  • EDABoard Forums
  • EE World Online
  • Electro-Tech-Online Forums
  • Microcontroller Tips
  • Power Electronic Tips
  • Sensor Tips
  • Test and Measurement Tips
  • 5G Technology World
  • About Us
  • Contact Us
  • Advertise

Copyright © 2022 WTWH Media LLC. All Rights Reserved. The material on this site may not be reproduced, distributed, transmitted, cached or otherwise used, except with the prior written permission of WTWH Media
Privacy Policy | Advertising | About Us

Search Engineers Garage

  • Projects and Tutorials
    • Electronic Projects
      • 8051
      • Arduino
      • ARM
      • AVR
      • PIC
      • Raspberry pi
      • STM32
    • Tutorials
    • Circuit Design
    • Project Videos
    • Components
  • Articles
    • Tech Articles
    • Insight
    • Invention Stories
    • How to
    • What Is
  • News
    • Electronic Products News
    • DIY Reviews
    • Guest Post
  • Forums
    • EDABoard.com
    • Electro-Tech-Online
    • EG Forum Archive
  • Digi-Key Store
    • Cables, Wires
    • Connectors, Interconnect
    • Discrete
    • Electromechanical
    • Embedded Computers
    • Enclosures, Hardware, Office
    • Integrated Circuits (ICs)
    • Isolators
    • LED/Optoelectronics
    • Passive
    • Power, Circuit Protection
    • Programmers
    • RF, Wireless
    • Semiconductors
    • Sensors, Transducers
    • Test Products
    • Tools
  • EE Resources
    • DesignFast
    • LEAP Awards
    • Oscilloscope Product Finder
    • White Papers
    • Webinars
  • EE Learning Center
    • Design Guides
      • WiFi & the IOT Design Guide
      • Microcontrollers Design Guide
      • State of the Art Inductors Design Guide
  • Women in Engineering