Engineers Garage

  • Projects and Tutorials
    • Electronic Projects
      • 8051
      • Arduino
      • ARM
      • AVR
      • PIC
      • Raspberry pi
      • STM32
    • Tutorials
    • Circuit Design
    • Project Videos
    • Components
  • Articles
    • Tech Articles
    • Insight
    • Invention Stories
    • How to
    • What Is
  • News
    • Electronic Products News
    • DIY Reviews
    • Guest Post
  • Forums
    • EDABoard.com
    • Electro-Tech-Online
    • EG Forum Archive
  • Digi-Key Store
    • Cables, Wires
    • Connectors, Interconnect
    • Discrete
    • Electromechanical
    • Embedded Computers
    • Enclosures, Hardware, Office
    • Integrated Circuits (ICs)
    • Isolators
    • LED/Optoelectronics
    • Passive
    • Power, Circuit Protection
    • Programmers
    • RF, Wireless
    • Semiconductors
    • Sensors, Transducers
    • Test Products
    • Tools
  • EE Resources
    • DesignFast
    • LEAP Awards
    • Oscilloscope Product Finder
    • White Papers
    • Webinars
  • EE Learning Center
    • Design Guides
      • WiFi & the IOT Design Guide
      • Microcontrollers Design Guide
      • State of the Art Inductors Design Guide
  • Women in Engineering

Ionic Wind Heat Sink

By Shreepanjali Mod

You must have seen a lot of ionic wind cooling projects, however, the one we are going to discuss here is a step ahead from all of those. The best thing about this one is that it is simple to clean its grounding plates which is a herculean tasks with others. The first thing you will need to pick up for this project is acrylic, you can always buy some from a nearby local plastic dealer. You can even check out eBay where lots of people offer acrylic sliced into pieces. Next you need to go for a copper pipe, a high performing heat sink, wire, corona emitters or small nails, and a power source. 
 
The first step is now to mark up the acrylic sheet that we purchased initially. For this purpose, you need to pick up the tube and scribe it with a marker on the inner end. If you get some extra marking over the acrylic or the tube, those can easily be rubbed with alcohol. Now use a scroll saw or band to cut around the outer surface of black line you scribed on the acrylic sheets. 
 
After pursuing the task, you are now prepared with four acrylic discs, even if the cuts are not perfect it’s alright.  You can then assemble the ion wind generator with the help of hot glue and make it airtight. Now take the disc and scribe few holes with points on three of those. The holes need to be 1/16th and 3/4th holes. Ensure, the spacing is for larger size for this purpose. 
 
Now drill the holes in the first disk with the help of a 1/16th inch drilling machine. It is mandatory to drill the holes straight. Now, with the help of 3/4th inch drill bit drill out the holes in the same disk. Ensure the spacing is correct so that there is no overlapping. 
 
Next, with the help of 18-inch copper wire segment strip the 3 inches of its other end and separate the strands in form of 2 different wires. Now insert the tacts in the holes in the acrylic dick and then wrap the wire near the heads with the help of wire as shown in the figure. Take the wire ends and twist those together and finally into one of the given wires. It will keep the whole thing neat and clean.You can now push the tach across the disk. 
 
Now heat the glue and sandwich it between the acrylic disks. Let all cool down and cut the copper pipes in length of 3 inches. Test fit these pipes in the holes in the acrylic sheet that we drilled in last step. Thus, your complete grounding assembly is ready. You can seal the gaps with some hot glue but make sure the complete job is neat and clean. 
 
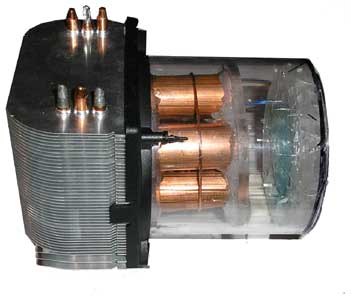
Next part consists of ionic wind generator assembling. Start by test fitting the disks that were sandwiched with the pins at the end of the tube. Since we want the system to grasp some air, we will mark the hole lines near the gap on the top of cooler almost 1/4th inch beneath the lid, this will permit the system to draw in air. Strip the second wire by 10 inches and wrap it carefully near the copper tube assembly. Copper end needs to be twisted tightly for ensuring good contact. 
 
Install the complete system into tube and insert the grounding tube in the rear end of the cooler. Be careful while doing this as it is the power source. Next part is molding the heat sink. You will have to disassemble the heat sink in order to modify it as per your needs. 
 
For further details of these steps, you can check out the link given below.

Filed Under: Reviews


Questions related to this article?
👉Ask and discuss on Electro-Tech-Online.com and EDAboard.com forums.


Tell Us What You Think!! Cancel reply

You must be logged in to post a comment.

HAVE A QUESTION?

Have a technical question about an article or other engineering questions? Check out our engineering forums EDABoard.com and Electro-Tech-Online.com where you can get those questions asked and answered by your peers!


Featured Tutorials

  • PS2 Keyboard To Store Text In SD Card Using Arduino Circuit Setup On Breadboard
    How To Use PS2 Keyboard To Store Text In SD Card Using Arduino- (Part 42/49)
  • Wireless Path Tracking System Using Mouse, XBee And Arduino Circuit Setup On Breadboard
    How To Make A Wireless Path Tracking System Using Mouse, XBee And Arduino- (Part 43/49)
  • How to Make a Wireless Keyboard Using Xbee with Arduino- (Part 44/49)
  • Making Phone Call From GSM Module Using Arduino Circuit Setup On Breadboard
    How to Make Phonecall From GSM Module Using Arduino- (Part 45/49)
  • How to Make a Call using Keyboard, GSM Module and Arduino
    How To Make A Call Using Keyboard, GSM Module And Arduino- (Part 46/49)
  • Receiving SMS Using GSM Module With Arduino Prototype
    How to Receive SMS Using GSM Module with Arduino- (Part 47/49)

Stay Up To Date

Newsletter Signup

Sign up and receive our weekly newsletter for latest Tech articles, Electronics Projects, Tutorial series and other insightful tech content.

EE Training Center Classrooms

EE Classrooms

Recent Articles

  • Renesas delivers intelligent sensor solutions for IoT applications
  • Microchip Technology releases AVR-IoT Cellular Mini Development Board
  • Qualcomm acquires Cellwize to accelerate 5G adoption and spur infrastructure innovation
  • MediaTek’s chipset offers high-performance option for 5G smartphones
  • Nexperia’s new level translators support legacy and future mobile SIM cards

Most Popular

5G 555 timer circuit 8051 ai Arduino atmega16 automotive avr bluetooth dc motor display Electronic Part Electronic Parts Fujitsu ic infineontechnologies integratedcircuit Intel IoT ir lcd led maximintegratedproducts microchip microchiptechnology Microchip Technology microcontroller microcontrollers mosfet motor powermanagement Raspberry Pi remote renesaselectronics renesaselectronicscorporation Research samsung semiconductor sensor software STMicroelectronics switch Technology vishayintertechnology wireless

RSS EDABOARD.com Discussions

  • Adaptive filters fundamental
  • Using LTspice to check Current sense transformer reset?
  • Thermal pad construction on pcb
  • lna+mixer noise figure problem
  • Reference driver for negative/above rail voltages.

RSS Electro-Tech-Online.com Discussions

  • Help diagnosing a coffee maker PCB
  • Capacitor to eliminate speaker hum
  • Identify a circuit.
  • How is this tester made?
  • undefined reference header file in proteus
Engineers Garage
  • Analog IC TIps
  • Connector Tips
  • DesignFast
  • EDABoard Forums
  • EE World Online
  • Electro-Tech-Online Forums
  • Microcontroller Tips
  • Power Electronic Tips
  • Sensor Tips
  • Test and Measurement Tips
  • 5G Technology World
  • About Us
  • Contact Us
  • Advertise

Copyright © 2022 WTWH Media LLC. All Rights Reserved. The material on this site may not be reproduced, distributed, transmitted, cached or otherwise used, except with the prior written permission of WTWH Media
Privacy Policy | Advertising | About Us

Search Engineers Garage

  • Projects and Tutorials
    • Electronic Projects
      • 8051
      • Arduino
      • ARM
      • AVR
      • PIC
      • Raspberry pi
      • STM32
    • Tutorials
    • Circuit Design
    • Project Videos
    • Components
  • Articles
    • Tech Articles
    • Insight
    • Invention Stories
    • How to
    • What Is
  • News
    • Electronic Products News
    • DIY Reviews
    • Guest Post
  • Forums
    • EDABoard.com
    • Electro-Tech-Online
    • EG Forum Archive
  • Digi-Key Store
    • Cables, Wires
    • Connectors, Interconnect
    • Discrete
    • Electromechanical
    • Embedded Computers
    • Enclosures, Hardware, Office
    • Integrated Circuits (ICs)
    • Isolators
    • LED/Optoelectronics
    • Passive
    • Power, Circuit Protection
    • Programmers
    • RF, Wireless
    • Semiconductors
    • Sensors, Transducers
    • Test Products
    • Tools
  • EE Resources
    • DesignFast
    • LEAP Awards
    • Oscilloscope Product Finder
    • White Papers
    • Webinars
  • EE Learning Center
    • Design Guides
      • WiFi & the IOT Design Guide
      • Microcontrollers Design Guide
      • State of the Art Inductors Design Guide
  • Women in Engineering