Engineers Garage

  • Projects and Tutorials
    • Electronic Projects
      • 8051
      • Arduino
      • ARM
      • AVR
      • PIC
      • Raspberry pi
      • STM32
    • Tutorials
    • Circuit Design
    • Project Videos
    • Components
  • Articles
    • Tech Articles
    • Insight
    • Invention Stories
    • How to
    • What Is
  • News
    • Electronic Products News
    • DIY Reviews
    • Guest Post
  • Forums
    • EDABoard.com
    • Electro-Tech-Online
    • EG Forum Archive
  • Digi-Key Store
    • Cables, Wires
    • Connectors, Interconnect
    • Discrete
    • Electromechanical
    • Embedded Computers
    • Enclosures, Hardware, Office
    • Integrated Circuits (ICs)
    • Isolators
    • LED/Optoelectronics
    • Passive
    • Power, Circuit Protection
    • Programmers
    • RF, Wireless
    • Semiconductors
    • Sensors, Transducers
    • Test Products
    • Tools
  • EE Resources
    • DesignFast
    • LEAP Awards
    • Oscilloscope Product Finder
    • White Papers
    • Webinars
  • EE Learning Center
  • Women in Engineering

IOT Based Weather Monitoring System Using Particle Photon

By Hai Prasaath K

Weather Monitoring Systems are used to monitor the continuously changing climatic conditions. The data gathered by such devices is used to forecast weather as well as keep a log of the environmental changes at a place. Such data is extremely useful in the study of earth and analyzing the changing climatic and environmental conditions at a place. Further, the data and analytics so collected can be utilized in a variety of applications like agriculture, geology, mining and weather forecast. In this project, a simple weather monitoring system is designed which can monitor the temperature and humidity of a place. 
The weather monitoring system designed in this project is an IOT device built on Particle Photon. Particle Photon is an Arduino compatible IOT board. For writing the program code for any Photon, developer needs to create an account on Particle website and register the Photon board with his user account. The program code then can be written on Web IDE at the Particle’s website and transferred to a registered IOT board over the internet. If the selected Particle board, Photon here, is switched on and connected to cloud service of the Particle, the code is burnt to the selected board over the air via internet connection and the board starts operating according to the transferred code. 
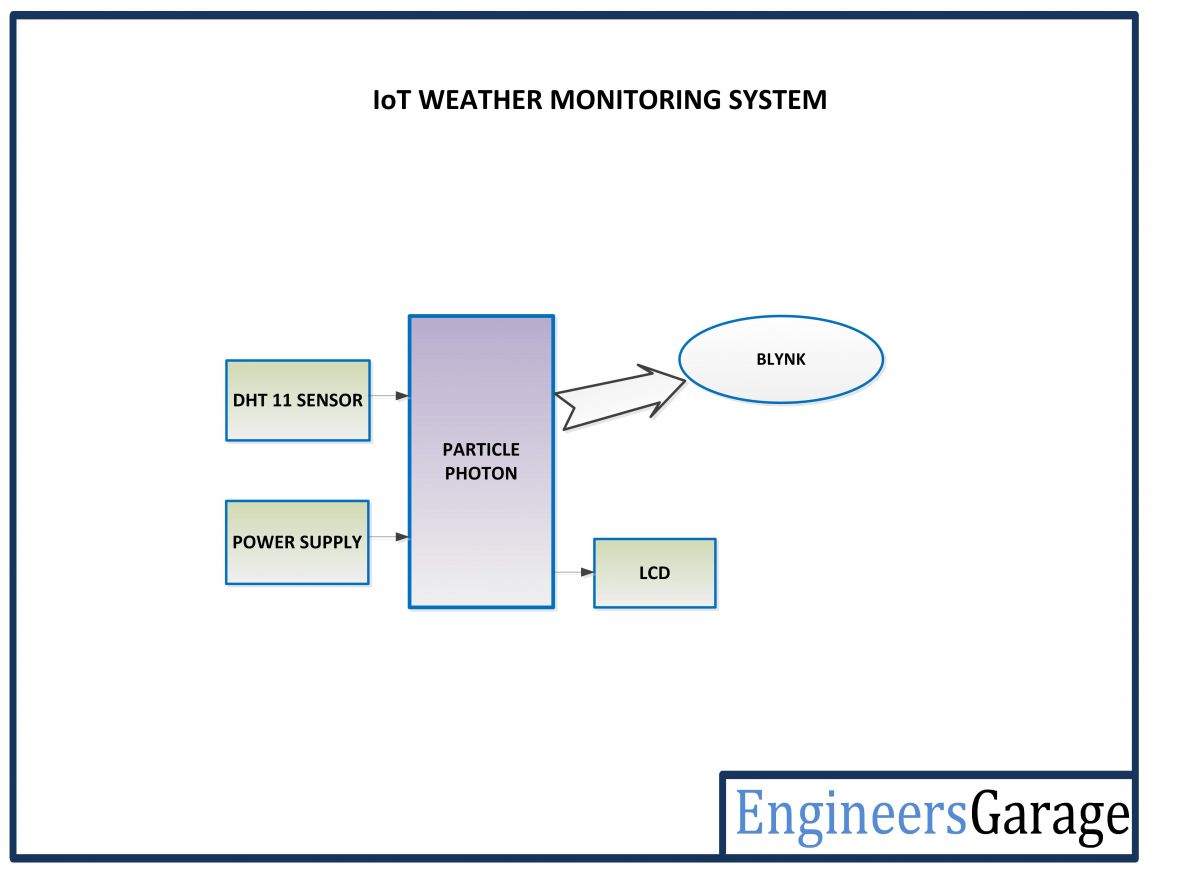
In the project, the Particle Photon is interfaced with DHT-11 temperature and humidity sensor. The temperature and humidity measured by the sensor have their values displayed on an LCD screen mounted on the device. The board remain connected with a remote server via Wi-Fi connection and keeps sending the sensor data to the cloud service. The Blynk app is used to monitor data from the cloud service, so the real-time data can be accessed from any smart phone supported by android or IOS.   
  
Blynk is a mobile app for Internet of Things which can work with a variety of IOT boards like Arduino, Raspberry Pi, ESP8266, SparkFun and others. For connecting the app with an IOT board, the user needs to get an Authorization Token (Auth Token). First, the user needs to download Blynk App for android or IOS and install it on a smart phone. The user now has to create a new account and create a new project. During project creation, the IOT board (Particle Photon in this case) and the connection type (Wi-Fi in this case) needs to be selected. On creating new project, Auth Token is sent to the registered email of the user. For coding the target board, the Blynk library must be downloaded from the official website of the Blynk and the library files should be added to the Sketchbook Folder of the Arduino IDE. Now the target board can be coded by specifying its Auth Token in the Arduino Sketch.  
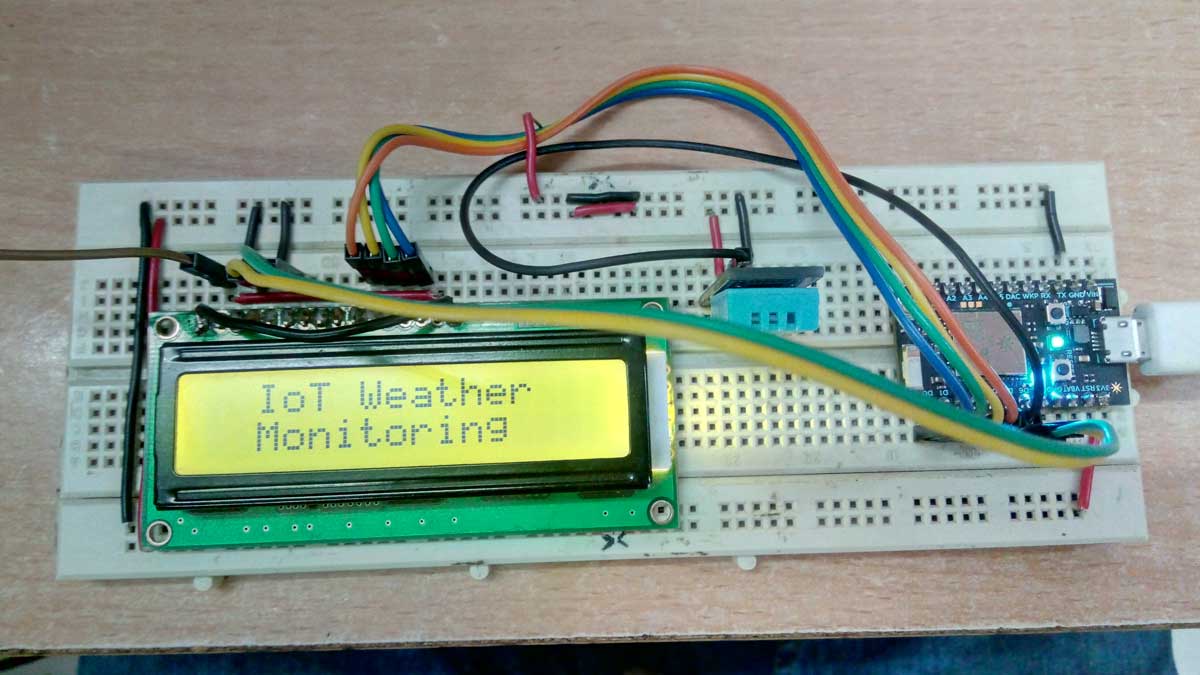
Prototype of Particle Photon and Blynk based IOT Weather Monitoring System
Fig. 1: Prototype of Particle Photon and Blynk based IOT Weather Monitoring System

Components Required – 

List of Components required for Particle Photon and Blynk based IOT Weather Monitoring System
Fig. 2: List of components required for Particle Photon and Blynk based IOT Weather Monitoring System
Block Diagram – 

Block Diagram of Particle Photon and Blynk based IOT Weather Monitoring System


Fig. 3: Block Diagram of Particle Photon and Blynk based IOT Weather Monitoring System

Circuit Connections – 
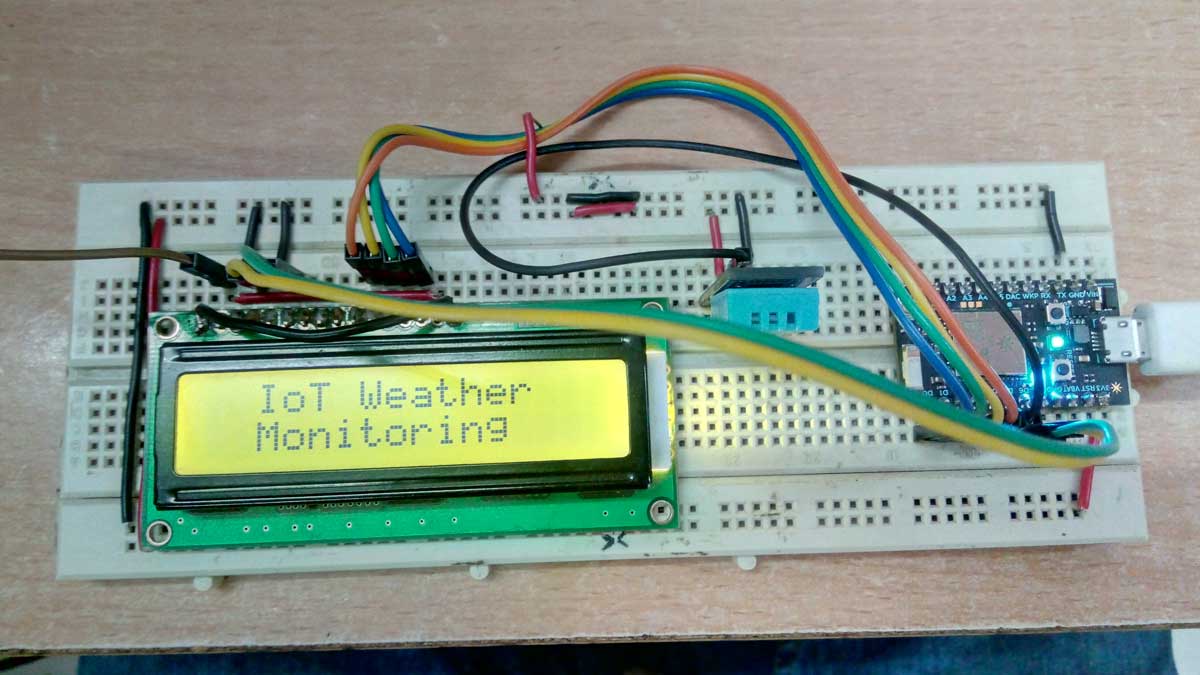
The Weather Monitoring Device is built on Particle Photon. The device is assembled by interfacing DHT 11 Temperature and Humidity Sensor and a 16X2 character LCD with the IOT board. The assembled circuit has the following circuit connections – 
Image of Particle Photon and Blynk based IOT Weather Monitoring System
Fig. 4: Image of Particle Photon and Blynk based IOT Weather Monitoring System

Particle Photon – Photon is a popular IOT board available from the Particle platform. The board houses STM32F205 120Mhz ARM Cortex M3 microcontroller and has 1 MB flash memory, 128 Kb RAM and 18 mixed signal general purpose input output (GPIO) pins with advanced peripherals. The module has on-board Cypress BCM43362 Wi-Fi chip for Wi-Fi connectivity and Single band 2.4GHz IEEE 802.11b/g/n for Bluetooth. The board comes equipped with 2 SPI, one I2S, one I2C, one CAN and one USB interface. The particle Photon has the following pin configuration – 
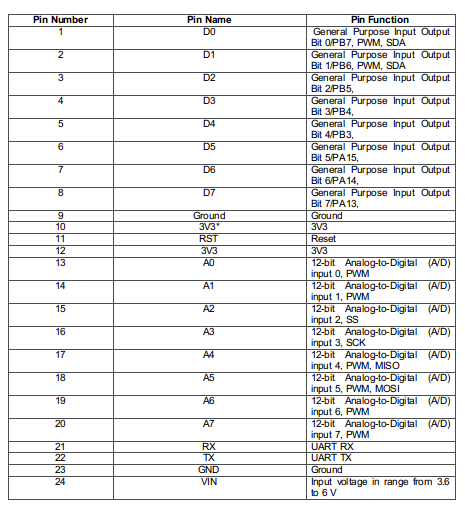
Table Listing Pin Configuration of Particle Photon
Fig. 5: Table listing pin configuration of Particle Photon
Table Listing Pin Configuration of Particle Photon
Fig. 6: Table listing pin configuration of Particle Photon
It should be noted that 3V3 is a filtered output used for analog sensors. This pin is the output of the on-board regulator and is internally connected to the VDD of the Wi-Fi module. When powering the Photon via VIN or the USB port, this pin will output a voltage of 3.3 V DC. This pin can also be used to power the Photon directly (max input 3.3 V DC). When used as an output, the max load on 3V3 is 100 mA. The PWM signals have a resolution of 8-bit and run on a frequency of 500 Hz. In the circuit, 6 GPIO pins of the module are used to interface the character LCD and one pin is used to interface the DHT-11 temperature and humidity sensor. 
16X2 LCD: The 16X2 LCD display is used to display the values of the measured temperature and humidity. It is connected to the Particle Photon by connecting its data pins D7 to D4 to the pins D0 to D3 of the Particle board. The E and RS pins of the LCD are connected to pins D5 and D6 of the Particle board respectively. The RW pin of the LCD is grounded.
Table Listing Circuit Connections between Character LCD and Arduino UNO
Fig. 7: Table listing circuit connections between Character LCD and Arduino UNO
DHT-11 Temperature and Humidity Sensor – The DHT -11 sensor reads the ambient temperature and humidity and relays the data to microcontroller as digital data. The data pin of temperature and humidity sensor DHT11 is connected to pin D4 of the Particle Photon. The VCC and ground pins of the sensor are connected to the common VCC and ground. 
Power Supply – In the circuit, Particle Photon and sensor modules need a 5V regulated DC for their operation. The AC main is used as the primary source of power. The supply from the mains is stepped down by a transformer and rectified by a full-bridge rectifier. The rectified output is regulated to 5V and 12V using 7805 and 7812 ICs. The pin 1 of both the voltage regulator ICs is connected to the anode of the battery and pin 2 of both ICs is connected to ground. The respective voltage outputs are drawn from pin 3 of the respective voltage regulator ICs. A LED along with a 10K Ω pull-up resistor is also connected between common ground and output pin to get a visual hint of supply continuity.
How the circuit works – 
After assembling the circuit, the program code can be loaded to the Particle board using Arduino IDE. The library files for the Blynk App must be included in the sketchbook folder of the Arduino to generate the code that can connect with the Blynk App. The code for the target board (Particle Photon in this case) must have the code template as mentioned in the example sketch below – 
Example Sketch of Particle Photon for Blynk App
The code template given at the above link add the Blynk library to the Particle Photon exposing the variables to the Blynk Cloud. The new code must be flashed to the New Dev Kit. The Photon must be connected to an Internet Hotspot via Wi-Fi. The program code for the photon can be transferred to the board over the air. As the code is transferred to the board, it starts operating according to it. 
The DHT11 Temperature and Humidity Sensor is a digital sensor with inbuilt capacitive humidity sensor and Thermistor. It relays a real-time temperature and humidity reading every 2 seconds. The sensor operates on 3.5 to 5.5 V supply and can read temperature between 0° C and 50° C and relative humidity between 20% and 95%. The DHT11 detects water vapors by measuring the electrical resistance between the two electrodes. The humidity sensing component is a moisture holding substrate with electrodes applied to the surface. When water vapors are absorbed by the substrate, ions are released by the substrate which increases the conductivity between the electrodes. The change in resistance between the two electrodes is proportional to the relative humidity. Higher relative humidity decreases the resistance between the electrodes, while lower relative humidity increases the resistance between the electrodes. The DHT11 measures temperature with a surface mounted NTC temperature sensor (Thermistor) built into the unit.
The DHT 11 Sensor sends data in the digital form to the controller pin on one-wire protocol which must be implemented on firmware side. First the data pin is configured to input and a start signal is sent to it. The start signal comprises of a LOW for 18 milliseconds followed by a HIGH for 20 to 40 microseconds followed by a LOW again for 80 microseconds and a HIGH for 80 microseconds. After sending the start signal, the pin is configured to digital output and 40-bit data comprising of the temperature and humidity reading is latched out. Of the 5-byte data, the first two bytes are integer and decimal part of reading for relative humidity respectively, third and fourth bytes are integer and decimal part of reading for temperature and last one is checksum byte. The one-wire protocol is implemented on the firmware using an open-source library available for Photon. 
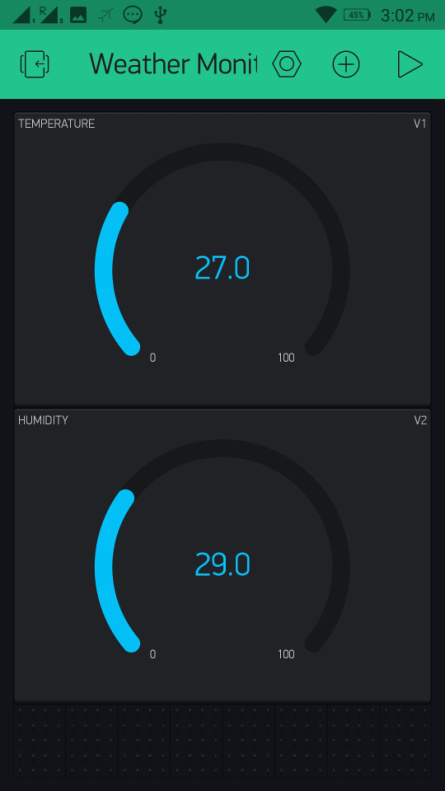
The temperature and humidity measured through the DHT 11 sensor is displayed on the character LCD and sent to the Blynk Cloud through Wi-Fi connection. The project uses Blynk App’s dashboard to display temperature and humidity. The app emulates the prototyping board on the Smartphone where buttons, sliders, displays, graphs and other functional widgets can be dragged and dropped. In a matter of minutes these widgets can control and get data from the prototyping board like Arduino, Raspberry Pi, and in this case Particle Photon. In the app designed for the project, there are two gauge widgets used to display the value of temperature and humidity. To learn more about using the Blynk App, check out the following document on the Blynk website – 
Getting Started with Blynk 
Mobile Screenshot of Blynk App UI for Particle Photon based IOT Weather Monitoring System
Fig. 8: Mobile Screenshot of Blynk App UI for Particle Photon based IOT Weather Monitoring System

The data is displayed on the app in real-time and gets updated in every 2 seconds. Check out the program code to learn how Photon reads temperature and humidity from DHT-11 sensor and send it to the Blynk App. 

Programming Guide – 
First of all the library for DHT sensor and LiquidCrystal Library is imported. The library is automatically added by the particle’s Web IDE. A constant is defined to denote pin to which DHT 11 sensor is interfaced and a constant is defined to denote variant of DHT sensor. An object of LCD type is instantiated and mapped to the pins connecting the LCD with the Particle board. A function dht_wrapper is declared and called in instantiation of DHT object. Some variables to hold the sample timing for DHT sensor and counter value are declared. A character array is declared to hold the sensor data to be sent to the webpage. Another character array holding the Auth Token is defined. The auth token that was sent to the user mail should be stored in this character array.
Screenshot of Embedded C Code used on Particle Photon for IoT Weather Monitoring System
Fig. 9: Screenshot of Embedded C Code used on Particle Photon for IoT Weather Monitoring System
The setup() function is called in which the baud rate for serial communication with the internet hotspot is set to 9600 baud per second. The LCD object is initialized by calling begin() method on the LCD object where the LCD object is initialized to 16X2 display. Some initial messages are flashed to the LCD and DHT sample time is set to 0 for the first sample. A variable is exposed to the Particle using variable() method and a string is sent to the Cloud using Publish() method. The Blynk app is initialized using begin() method on the Blynk object where variable carrying Auth Token is passed as parameter. Inside the dht_wrapper() function, isrCallback() method is called on the DHT object which runs interrupt service routine for the object.   
Screenshot of Setup Function in Embedded C Code used on Particle Photon for IoT Weather Monitoring System
Fig. 10: Screenshot of Setup Function in Embedded C Code used on Particle Photon for IoT Weather Monitoring System 
The loop() function is called which iterates infinitely. In the loop() function, run() method is called on the Blynk object. This function is called to process the incoming commands and manage the Blynk connection. By calling Millis() function, it is checked if the board has already started the code execution and if it has done so, then the sample data from the DHT sensor is collected using the acquire() method on the DHT object. If the board has already acquired data from the sensor, the data from the DHT sensor is fetched using getCelcius() and getHumidity() methods on the dht object. The data is stored in variables, wrapped in proper strings and sent to the data logging URL using publish() method on Particle object. Blynk.virtualwire() function is used to transfer the data to the Blynk cloud and displayed in the dashboard android application. The counter variable is incremented for each sample collection. 
Screenshot of Loop Function in Embedded C Code used on Particle Photon for IoT Weather Monitoring System
Fig. 11: Screenshot of Loop Function in Embedded C Code used on Particle Photon for IoT Weather Monitoring System 
Check out the complete code from the code section. Get a particle board and the other few components, assemble circuit and start coding. This IOT project is really going to be fun.  

Project Source Code

//Program to 

// This #include statement was automatically added by the Particle IDE.

#include 


// This #include statement was automatically added by the Particle IDE.

#include 


#define BLYNK_PRINT Serial  // Set serial output for debug prints

//#define BLYNK_DEBUG       // Uncomment this to see detailed prints


#include 


#define DHTTYPE DHT11

#define DHTPIN 4

#define DHT_SAMPLE_INTERVAL 60000


LiquidCrystal lcd(6, 5, 0, 1, 2, 3);


void dht_wrapper(); // must be declared before the lib initialization


// Lib instantiate

PietteTech_DHT DHT(DHTPIN, DHTTYPE, dht_wrapper);


// globals

unsigned int DHTnextSampleTime;     // Next time we want to start sample

bool bDHTstarted;     // flag to indicate we started acquisition

int n;                              // counter


//this is coming from http://www.instructables.com/id/Datalogging-with-Spark-Core-Google-Drive/?ALLSTEPS

char resultstr[64]; //String to store the sensor data


// You should get Auth Token in the Blynk App.

// Go to the Project Settings (nut icon).

char auth[] = "0395c08357fd480ba67b172ccdfa7039";


// Attach a Button widget (mode: Switch) to the Digital pin 7 - and control the built-in blue led.

// Attach a Graph widget to Analog pin 1

// Attach a Gauge widget to Analog pin 2


char VERSION[64] = "0.04";


void setup()

{

    Serial.begin(9600);


    lcd.begin(16,2);


   lcd.setCursor(0,0);

   lcd.print("IoT Weather");

   lcd.setCursor(0,1);

   lcd.print("  Monitoring   ");

   delay(2000);

   lcd.clear();

   lcd.setCursor(0,0);

   lcd.print("ENGINEERS GARAGE");

   delay(2000);

   lcd.clear();


    delay(5000); // Allow board to settle


    DHTnextSampleTime = 0;  // Start the first sample immediately

    Particle.variable("result", resultstr, STRING);


    Particle.publish("DHT11 - firmware version", VERSION, 60, PRIVATE);


    Blynk.begin(auth);

}


void dht_wrapper()

{

    DHT.isrCallback();

}


void loop()

{

    Blynk.run();


     if (millis() > DHTnextSampleTime) {


if (!bDHTstarted) { // start the sample

    DHT.acquire();

    bDHTstarted = true;

}


    if (!DHT.acquiring()) { // has sample completed?


  float temp = (float)DHT.getCelsius();

  int temp1 = (temp - (int)temp) * 100;


    lcd.clear();

    lcd.setCursor(0,0);

    lcd.print("T:");

    lcd.print((int)temp1);

    lcd.write(1);

    lcd.print("C");


  char tempInChar[32];

  sprintf(tempInChar,"%0d.%d", (int)temp, temp1);

  Particle.publish("The temperature from the dht11 is:", tempInChar, 60, PRIVATE);


  //virtual pin 1 will be the temperature

  Blynk.virtualWrite(V1, tempInChar);


  //google docs can get this variable

  sprintf(resultstr, "{"t":%s}", tempInChar);


  float humid = (float)DHT.getHumidity();

  int humid1 = (humid - (int)humid) * 100;


    lcd.clear();

    lcd.setCursor(0,0);

    lcd.print("Humidty:");

    lcd.print((int)humid1);


  sprintf(tempInChar,"%0d.%d", (int)humid, humid1);

  Particle.publish("The humidity from the dht11 is:", tempInChar, 60, PRIVATE);


  //virtual pin 2 will be the humidity

  Blynk.virtualWrite(V2, tempInChar);


  n++;  // increment counter

  bDHTstarted = false;  // reset the sample flag so we can take another

  DHTnextSampleTime = millis() + DHT_SAMPLE_INTERVAL;  // set the time for next sample

 }


}

    delay(2000);

}
 

Project Video


Filed Under: Electronic Projects, IoT
Tagged With: IoT
 

Questions related to this article?
👉Ask and discuss on EDAboard.com and Electro-Tech-Online.com forums.


Tell Us What You Think!! Cancel reply

You must be logged in to post a comment.

HAVE A QUESTION?

Have a technical question about an article or other engineering questions? Check out our engineering forums EDABoard.com and Electro-Tech-Online.com where you can get those questions asked and answered by your peers!


Featured Tutorials

  • Designing Gate Driver Circuit and Switching Mechanism for Modified Sine Wave Inverter – (Part 9/17)
  • Completing Modified Sine Wave Inverter Design with Full Bridge Circuit and Step Up Transformer – (Part 10/17)
  • Designing an Offline UPS – Part (12 /17)
  • How to reduce Switching Time of a Relay – (Part 15/17)
  • Testing MOSFET – (Part 16/17)
  • Driving High Side MOSFET using Bootstrap Circuitry – (Part 17/17)

Stay Up To Date

Newsletter Signup

Sign up and receive our weekly newsletter for latest Tech articles, Electronics Projects, Tutorial series and other insightful tech content.

EE Training Center Classrooms

EE Classrooms

Recent Articles

  • Designing Gate Driver Circuit and Switching Mechanism for Modified Sine Wave Inverter – (Part 9/17)
  • Completing Modified Sine Wave Inverter Design with Full Bridge Circuit and Step Up Transformer – (Part 10/17)
  • Designing an Offline UPS – Part (12 /17)
  • How to reduce Switching Time of a Relay – (Part 15/17)
  • Testing MOSFET – (Part 16/17)

Most Popular

5G 555 timer circuit 8051 ai Arduino atmega16 automotive avr dc motor display Electronic Part Electronic Parts Fujitsu ic infineontechnologies integratedcircuit Intel IoT ir lcd ldr led maximintegratedproducts microchip microchiptechnology Microchip Technology microcontroller microcontrollers mosfet motor powermanagement Raspberry Pi remote renesaselectronics Research robot samsung semiconductor sensor software STMicroelectronics switch Technology vishayintertechnology wireless

RSS EDABOARD.com Discussions

  • Please help to identify the signal input port on board
  • Hotplugging UART
  • RF switch selection
  • sensitivity in filters and number of bits of system
  • MDO4104-6 Front Panel Not Working

RSS Electro-Tech-Online.com Discussions

  • Passthrough charging-simple but impossible to achieve?
  • geared motor to revolve oval platform
  • software PWM
  • None existant errors (MPLAB X)
  • How can a 13 bit number represent 16 bit number?Or why is fragmentation offset multiple of 8?
Engineers Garage
  • Analog IC TIps
  • Connector Tips
  • DesignFast
  • EDABoard Forums
  • EE World Online
  • Electro-Tech-Online Forums
  • Microcontroller Tips
  • Power Electronic Tips
  • Sensor Tips
  • Test and Measurement Tips
  • 5G Technology World
  • About Us
  • Contact Us
  • Advertise

Copyright © 2022 WTWH Media LLC. All Rights Reserved. The material on this site may not be reproduced, distributed, transmitted, cached or otherwise used, except with the prior written permission of WTWH Media
Privacy Policy | Advertising | About Us

Search Engineers Garage

  • Projects and Tutorials
    • Electronic Projects
      • 8051
      • Arduino
      • ARM
      • AVR
      • PIC
      • Raspberry pi
      • STM32
    • Tutorials
    • Circuit Design
    • Project Videos
    • Components
  • Articles
    • Tech Articles
    • Insight
    • Invention Stories
    • How to
    • What Is
  • News
    • Electronic Products News
    • DIY Reviews
    • Guest Post
  • Forums
    • EDABoard.com
    • Electro-Tech-Online
    • EG Forum Archive
  • Digi-Key Store
    • Cables, Wires
    • Connectors, Interconnect
    • Discrete
    • Electromechanical
    • Embedded Computers
    • Enclosures, Hardware, Office
    • Integrated Circuits (ICs)
    • Isolators
    • LED/Optoelectronics
    • Passive
    • Power, Circuit Protection
    • Programmers
    • RF, Wireless
    • Semiconductors
    • Sensors, Transducers
    • Test Products
    • Tools
  • EE Resources
    • DesignFast
    • LEAP Awards
    • Oscilloscope Product Finder
    • White Papers
    • Webinars
  • EE Learning Center
  • Women in Engineering