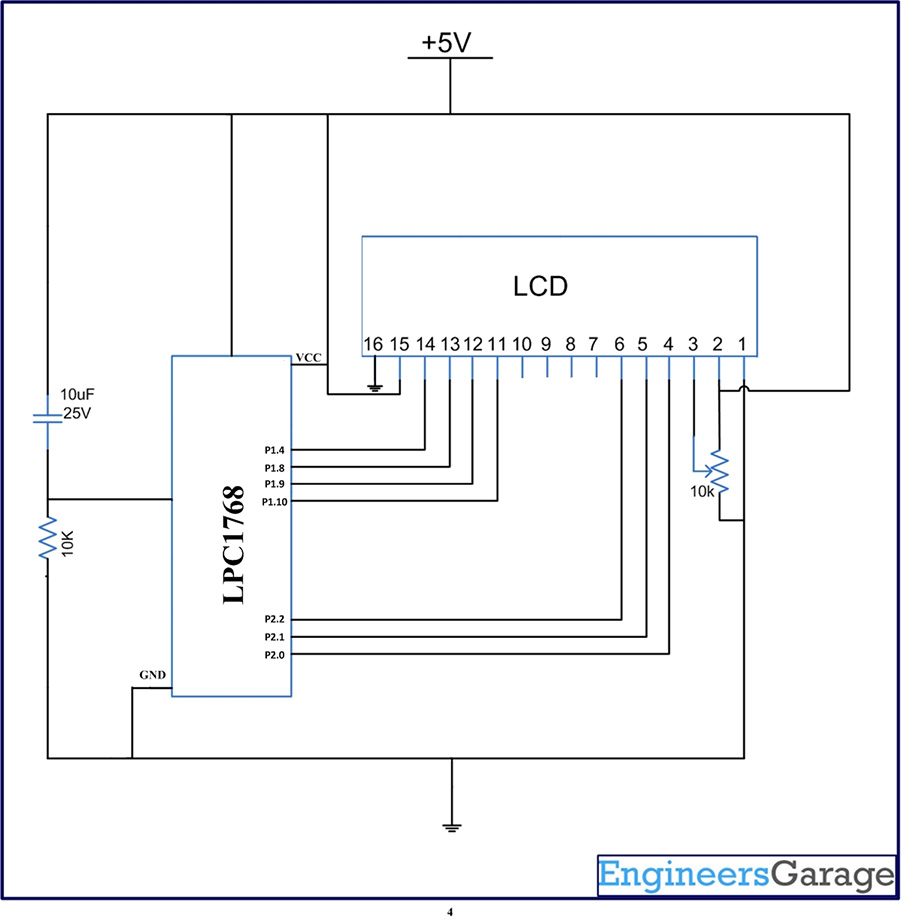
Interfacing of 5V LCD with a 3.3V Controller like LPC1768 is little tricky to handle. This is the Article to explain how a 16x2 LCD is interfaced with LPC1768 in 4-bit mode. LCD in 4 bit, which means we are going to use 4 lines instead of 8 line which save 4 GPIOs which can be used for other purposes. For setting up the Environment for the development of ARM cortex M3 is well discussed in this article.
The LPC 1768 is ARM Cortex- M3 based Microcontrollers for embedded application features in low power consumption and a high level of integration. The ARM Cortex M3 is designed in a such way to enhance debug features and a higher level of system integration. It clocks at a CPU frequency of 100 MHz, and incorporates a 3-stage pipeline and uses a Harvard architecture with separate local instruction and data buses for third bus peripherals. The ARM Cortex- M3 CPU have an internal pre-fetch unit to support speculative branching. The peripheral components include 512KB of flash memory, 64kb of data memory, Ethernet MAC, USB OTG, 4 UART’s, 8-channel general purpose DMA controller, 2 SSP Controllers, 10-bit DAC, Quadrature encoder interface, SPI interface, 3 I2C bus interface, 2 input plus 2 outputs I2S bus interface, 4 general purpose timers, ultra-low power Real-Time Clock (RTC) with separate battery supply, and up to 70 general purpose I/O pins, 6-output general purpose PWM. The LPC1768/66/65/64 are pin-compatible with the 100-pin LPC236x ARM7-based Microcontroller series.
16X2 LCD Basics:
The Chinese LCD used here is JHD162A. It has a KS0066U/ HD44780U controller. It has a 16 pin interface device which consists of 2 rows with 16 characters each. The operating voltage is 5V. Also, it has an LED backlight. There are 2 modes of operation:
1) Instruction Mode: To initialize and configure the LCD before its use
2) Data Mode: Displays the characters for the respective codes that are given to the LCD via Data Pins.
LCD Pin Description:
|
Pin No |
Symbol |
I/O |
Description |
|
1 |
VSS |
– |
Ground |
|
2 |
VCC |
|
+5V |
|
3 |
VEE |
|
Contrast Control |
|
4 |
RS |
Input |
Command/Data Register |
|
5 |
R/W |
Input |
Read/Write Register |
|
6 |
E |
Input/Output |
Enable |
|
7 |
DB0 |
Input/Output |
Not Used in 4-Bit Mode |
|
8 |
DB1 |
Input/Output |
Not Used in 4-Bit Mode |
|
9 |
DB2 |
Input/Output |
Not Used in 4-Bit Mode |
|
10 |
DB3 |
Input/Output |
Not Used in 4-Bit Mode |
|
11 |
DB4 |
Input/Output |
Data Bus in 4-Bit Mode |
|
12 |
DB5 |
Input/Output |
Data Bus in 4-Bit Mode |
|
13 |
DB6 |
Input/Output |
Data Bus in 4-Bit Mode |
|
14 |
DB7 |
Input/Output |
Data Bus in 4-Bit Mode |
|
15 |
VCC |
– |
For LCD Back Light |
|
16 |
VSS |
– |
For LCD Back Light |
Fig. 1: Pin Description of LCD
Initializing LCD Module:
Once you have verified all the connections from MCU to HFC4050 to LCD Module, we can go ahead to display text on the LCD. But first, the LCD needs to be initialized properly. (According to the Datasheet) Before initializing the LCD, you will need to wait for a minimum time of about 15 milliseconds after the input voltage supply is stable and greater than 4.5 Volts.
The first step is to make sure that the RS and Enable are held LOW. Next is to input some commands to the LCD using the Data pins. These commands will not be executed until a pulse is supplied to the Enable pin. After supplying the command with a pulse, Enable has to be made High and then Low after a short delay. Then, the command is executed.
The LCD can be configured in 4-bit mode by sending the appropriate command which is called “Function set” to it. The Function set is a hexadecimal command of the LCD MPU unit, which selects working modes of the LCD. The “Function Set” is mentioned in following table:

Fig. 2: Function Set Of LCD To Configure In 4bit Mode
Description:
DL – Data Length (DL = 1 8bit, DL = 0 4bit)
N – No. of Lines (N = 1 2Lines, N = 0 1Lines)
F – Fonts (F = 1 5×10 dots, F = 0 5×7 dots)
According to the table, the value of Function Set for 4 –bit mode will be 0010 0000(0x20) because DL=0. The value “Function Set” for the LCD configuration 2 line (N=1), 5X7 dots (F=0) and 4-bit (DL=0) mode will be 0010 1000(0x28).
When the power supply is given to the LCD, it remains in 8-bit mode. Now, if 0x20 is sent, lower nibble will not be received by LCD because four data lines (D4-D7) are connected, so 0x02 is sent instead of 0x20. For more details about the LCD interfacing refer these Links.
How to interface LCD in 4 bit mode with AVR microcontroller.
How to interface LCD with LPC2148.
Create a project using Keil uvision4 for LPC1768 Microcontroller:
In this section, we will start creating a project in Keil MDK we have already installed Keil µVision and Co-MDK Plug-in + CoLinkEx Drivers required for the CoLinkEx programming adapter. You can start by downloading the project files and kick start your practical experiment.
Code Description:
These functions explained are included by making a LCD library and included in the coding files.
The below function is to send command bytes to the LCD:
Lcd_CmdWrite ()
The below function is to send Data bytes to the LCD:
Lcd_DataWrite ()
Initialization of 4-bit mode:
Lcd_CmdWrite(0x02); // Initialize LCD in 4-bit mode
Lcd_CmdWrite(0x28); // enable 5×7 mode for chars
Lcd_CmdWrite(0x0E); // Display OFF, Cursor ON
Lcd_CmdWrite(0x01); // Clear Display
Lcd_CmdWrite(0x80); // Move the cursor to beginning of the first line
You may also like:
Project Source Code
###The codes are linked in Description ###
Circuit Diagrams
Project Components
Project Video
Filed Under: ARM., Tutorials
Filed Under: ARM., Tutorials



Questions related to this article?
👉Ask and discuss on Electro-Tech-Online.com and EDAboard.com forums.
Tell Us What You Think!!
You must be logged in to post a comment.