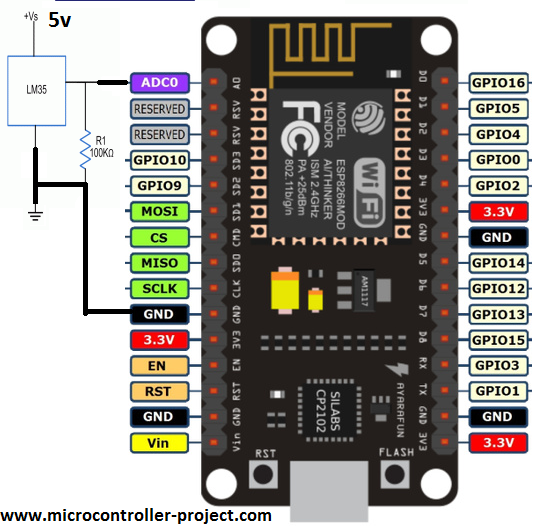
This is a simple DIY project on internet of things applications. How to monitor room temperature over WiFi? One can see temperature on his mobile, laptop or desktop computer by this DIY project. Popular LM35 temperature sensor is interfaced with Nodemcu ESP8266-12e WiFi module. Nodemcu gets raw temperature voltage form lm35, converts the voltage in actual temperature by utilizing its analog to digital converters. Final temperature is calculated in Celsius form. Once Celsius temperature is calculated it is converted to Fahrenheit and both values are forwarded to clients connected to nodemcu. One can see the temperature on mobile and desktop devices.
Nodemcu is working as server. Serving a web page. Mobile or desktop device is our client. Fetching temperature from server. Note: Both the server and client must be connected to same WiFi network in order to work properly. I write a nice tutorial on LM35 Pinout and working principle. If you are new and does not know about the pin out and working of LM35 temperature sensor than i advice you to first go through a simple tutorial. LM35 pin out working and configuration.
If you have taken the above tutorial you can easily understand the values calculated below. Most of the DIY projects to which i have gone through does not explain how to convert the LM35 output voltage in to actual temperature reading. Even most the online tutorials on LM35 are not calculating the precise temperature reading and their temperature measuring technique is even totally wrong. Their for i decided to explain deeply actually whats going on.
Driving formula for nodemcu and lm35 temperature conversion ratio
- Nodemcu analog pins can measure up to 3.3 volts OR the voltage on which it is working 3.3 volts.
- Nodemcu analog pin resolution is 1023 starting from 0. On 3.3 volts input it counts to 1023.
- Lm35 max voltage output is 1500mV( At 150 degree centigrade). 1500mV is equal to 1500/1000 = 1.5 volts. So Lm35 at max outputs 1.5 volts.
- Nodemcu analog pin count for 1.5 volts equals to (1.5 / 3.3)*1023 = 465 . At 3.3 volts its 1023 and at 1.5 volts its 465.
- New Nodemcu-Lm35 Resolution = 465 / 150 = 3.1 . Now if nodemcu analog pin counts 3.1 its equal to 1 degree change in centigrade/Celsius temperature of LM35.
Since Lm35 works on 5 volt it is powered through an external 5 volt signal. Nodemcu works on 3.3 volt so its not possible to power lm35 with nodemcu output voltage. Lm35 output is connected to analog channel 0 of nodemcu. Note both the lm35 and nodemcu ground should be connected with each other for proper analog signal measurement.
Coming to the code portion. Code is written and compiled in arduino ide. ESP8266WiFi.h library is used in the project. Make sure you have installed this library in your arduino library package. Now enter the SSID and Password of WiFi router to which you want your nodemcu to be on. Your client(mobile, desktop or laptop) must be connected to the same WiFi router to which you are going to connect your server(nodemcu).
Select correct board in your arduino ide and upload the code in nodemcu. After uploading the code in nodemcu open arduino serial monitor. You will see that nodemcu will be assigned an IP by your WiFi router and nodemcu server is initializing. After successful server booting a URL will be displayed on the serial monitor.

This URL is the actually the web address of web page served by the server(nodemcu). Enter this URL in your mobile or desktop browser you will see a web page like. A button with text Update Temperature is present on the page. Every time you press the button Celsius and Fahrenheit values of temperature will be updated.
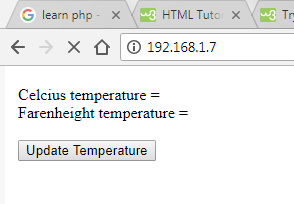
Nodemcu Lm35 temperature sensor web page
What happens when you press the “Update Temperature” button? Loop function is always looking for the client request. When update button is pressed HTTP request arrives to server(nodemcu). In loop function it is compared with the request format embedded in the code. If client request matches the format of the request in server code. Server starts reading other parameters of request and performs the functions as requested in the client request. In our case its up date the lm35 temperature sensors readings and provide instant temperature readings. Nodemcu grabs the updated readings and before closing the client request it replies back with the updated temperature values.
Download the project code. Code is written in arduino ide. Folder contains the project .ino file. You might need to include the header ESP8266WiFi.h library in your arduino libraries folder. Please give us your feed back on the project.
You may also like:


Filed Under: Electronic Projects, ESP8266., Microcontroller Projects

Questions related to this article?
👉Ask and discuss on EDAboard.com and Electro-Tech-Online.com forums.
Tell Us What You Think!!
You must be logged in to post a comment.