LPG is present in almost every household today either in a cylinder or from piping, but what fraction of these households has devices to detect LPG leaks? Given that many people lose their lives on account of the same, it is surprising that not much has been done.
It is actually very simple to build your very own LPG leakage detector and here you will learn how to do just that. The LPG leakage detector circuit here senses concentration of LPG in the vicinity and will display the same on an LCD. It will also compare the same with a threshold and sound a buzzer if it crosses 75% of the threshold. The user can enter the desired threshold using the keypad provided and can also calibrate the sensor as per need.
ATmega328p Development Stick
The project is designed around the ATmega328p Development Stick from Knewron, which is a great & compact unit. It consists of on-board support for a standard 16×2 HD44780 compatible LCD operated in 4-bit mode. It has the 32pin TQFP version of the ATmega328p with all I/Os broken out via headers, in fact it has two sets of each pin which comes in very handy during design and testing.
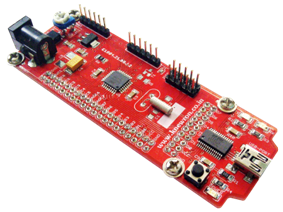
Fig. 1: Typical Image of ATMega328P Development Stick
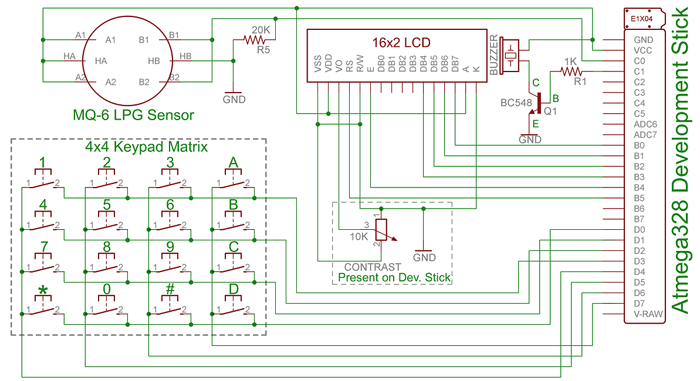
For this project we shall be interfacing a standard LCD module, 4×4 keypad, buzzer and a gas sensor which will utilize 1 ADC pin, and after interfacing everything, we will have used up most of the pins available from the tiny MCU. The gas sensor will be interfaced to channel 0 of the ADC, i.e. pin PC0, while the buzzer will be hooked up to pin PC1. The 4×4 keypad will be interfaced to port D, making use of all the pins PD0-PD7. Lastly, we just need to mount an LCD to the header pins already populated on the stick (PORT B); that’s how easy it is since the potentiometer needed to vary the display contrast is already on the board.
Keypad
The keypad chosen is pretty much a standard layout used in small embedded systems. It consists of 4 rows and 4 columns of pushbuttons configured in a matrix form and hence it’s called a 4×4 matrix. There exist several methods to read these kinds of keypads, some involve using interrupts to initiate key scans, while others require multiple read scans to detect if multiple keys are pressed; but for this application we do not need to worry about multiple keys being pressed, other safeguards to check validity of key strokes have been implemented; also an interrupt scheme is not required since our controller is not heavily loaded.
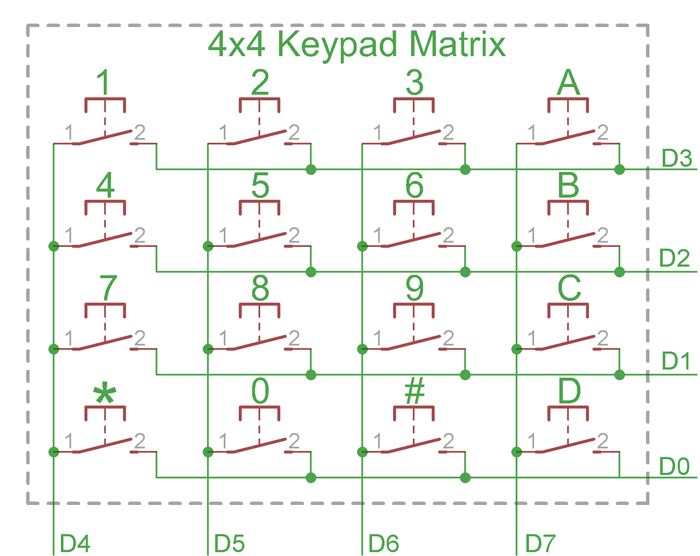
Fig. 2: Circuit Diagram of 4X4 Keypad
Figure above shows actual matrix arrangement of keypad where we have 4 rows and 4 columns connected. The theory is that if we initially set the columns to outputs while making the rows inputs with pull up resistors in place, we can individually set each column to logic 0 (GND), while keeping the other three to logic 1 (5V); by reading the lower nibble i.e. the rows, we can determine if a key is pressed, if a particular input is low, then the key corresponding to that row has been pressed.
It is worth noting that the priorities of the keys are fixed in the order of scanning (reading), meaning if both the keys 1 and 6 are pressed then the MCU will read only key 1 from the first column and will ignore the other since the routine will have returned a value corresponding to key 1. This however is not bad, since there is no definite way to differentiate between to simultaneous key presses; one can take exact time of pressing into consideration but the fact that two keys have been pressed together is an indication of an error from the user’s point.
Timer
It is well known that variations in gases are relatively slow compared to other phenomenon, hence it does not make sense reading the sensor at fast rates, but this causes a problem since our MCU runs at much faster rates. This is exactly where a timer comes in to picture. We can use the onboard timers from the ATmega328p and keep track on longer time intervals, in our case 100ms. So we sample the sensor every 100ms and obtain 5 such readings, we then average those 5 and use the resultant for our computation.
The first thing we need to understand is that the timer works on clock cycles; just like the main MCU; and has a definite count beyond which is overflows. For the 8 bit timer it is 255 while it is 65535 for the 16bit timer (Timer 1) which we will be using. The timer clock is a factor of the main MCU clock and can be set accordingly; this is controlled using the prescalar value stored in special function register. Available prescalar options are divide by 1, 8, 64, 256 and 1024. Since the MCU is clocked at 8MHz (using internal RC), we can divide the timer clock by 256 to obtain a tick of 1 / (8000000 / 256) = 32 micro-sec. Now to obtain a time interval of 100ms, we need 500 ms / 32 micro-sec clicks, i.e. (100e-3) / (32e-6) which is 3125.
Since the timer counts up from 0-65535 per clock tick, and overflows when it transitions from 65535 to 0, hence generating an overflow interrupt, we need to load the timer count with (65535 – 3125), so that it counts 3125 clicks giving us a time interval of 100ms. We also need to enable the timer overflow interrupt.
The interrupt is automatically generated every 100ms and we can carry out our routines in the interrupt service routine (a function called when interrupt is generated). For our application we just set a 100ms flag & disable the timer interrupt in the service routine; the flag is cleared, count reloaded and interrupt enabled when the 100ms routine is called in the main loop.
Components and Diagrammatic Details
Gas Sensors
The gas sensor utilized here is readily available and have several compatible units capable of sensing various gases. They gas sensors are commonly known as MQ series sensors; we shall be using the MQ-6 LPG sensor now. Few other useful sensors available which are very similar in operation include:
MQ-7 – Carbon Monoxide
MQ-3 – Alcohol
MQ-4 – Methane
MQ-8 – Hydrogen
There exist many more sensors; it is also worth noting that each sensor is capable of sensing other gases too, however it is designed for a particular gas listed and hence is most sensitive to that particular one as is evident in response curves given in datasheet.
Sensor works by using a heater to heat the air present around the chemical sensor, this heat acts as a catalyst to chemical reactions releasing electrons and ions as per the gas to be sensed, the electrons released flow as current and hence develop and output voltage across the load resistor. The voltage developed varies between 0-5V and hence can be detected using an ADC. It is worth reading the datasheet and obtaining the load resistance values as well as the heater voltage requirements. The MQ-6 has a recommended load resistance value of 20Kohms and a range of 10K-47Kohms. The heater also requires a constant voltage of 5V.
Some sensors specify a burn in time (24-48hours), for which the sensor has to kept powered on so that the readings obtained are reliable, this however can be avoided in our case since we are interested in relative values and not absolute. It has been found that by giving the sensor a few seconds it settles down to a stable (low) value to begin sensing. The MQ-6 LPG sensor has a sensing range from 200-1000ppm.
ADC Section
The ADC unit on the MCU works by taking the ADC reference voltage and breaking it down into smaller chunks based on the ADC resolution. The ADC resolution is nothing but the number of bits used to represent the output. The ATmega328p has a 10-bit ADC, meaning the output can range from 0-1023. So the MCU breaks down the reference voltage to 1024 chunks. The development board has the ADC reference voltage tied to 5V, so taking that as reference the ADC breaks it down into 1024 chunks of about 5V / 1024 = 4.8mV each. So if the ADC gives you a value of 10, it means the voltage at the ADC pin is 10 * 4.8mV = 48mV, similarly for a full scale output of 1023, the voltage at the ADC pin is 1023 * 4.8mV which is about 4910mV (the error is due to rounding of the bit value as well as the ADC precision of +/- 0.5 LSB – 1 LSB).
For this application we are just interested in obtaining the raw ADC values from the sensor so we shall use this to compute intermediate parameters which will ultimately be used to compute gas concentration.
Display Section
A standard 16×2 character LCD module is used in 4 bit mode for display purpose. Interfacing an LCD is pretty straightforward and is self-explanatory from the source code itself.
Block Diagram & Circuit
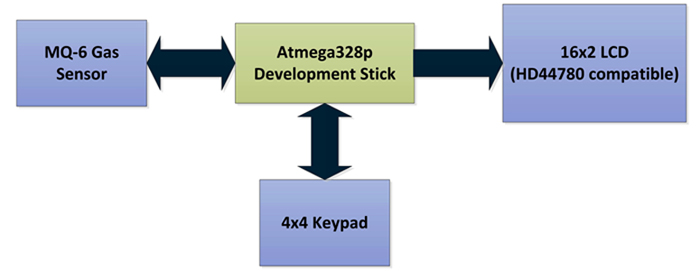
Fig. 3: Block Diagram of AVR ATMega328P based LPG Leakage Detector
Figure 2 shows block diagram of the project while Figure 3 details out further circuit. The development stick constantly scans the keypad for any valid inputs, while also obtaining sensor values from the gas sensor; it then computes the gas concentration and displays the same onto the LCD.
The circuit is designed around the ATmega328p Development Stick. The VCC signal from the stick is 5V and is used to power the LCD. Most of the connections are self-explanatory, however do note that the LCD contrast potentiometer and the transistor to control the LCD backlight are already present on the development stick.
The gas sensor has 6 pins; however, pin set (A1, HA, A2) and set (B1, HB, B2) are interchangeable. In our schematic we apply 5V across heater pins HA, HB and supply pins A1, A2 with 5V and hence the output is obtained at the junction of pins B1, B2. We use a load resistor between this output and ground to form the voltage divider needed as per datasheet.
Since the buzzer can take up more current than what the I/O pin can provide, it is safer to use a transistor in switch mode to activate the buzzer. The transistor used is a NPN transistor, so when a positive voltage (I/O pin to logic high) is applied to the base, it moves into saturation and turns ON the buzzer by allowing current to flow from the collector to emitter. By applying logic low to the base of the transistor, we can turn the buzzer OFF.
The BC548 is a general purpose NPN transistor which is commonly available. The 1K resistor to the base of the transistor is a current limiting resistor which prevents excessive current from being drawn, however you can use any value between 330E to 1K safely.
The overall working is illustrated in flow chart shown in Figure.
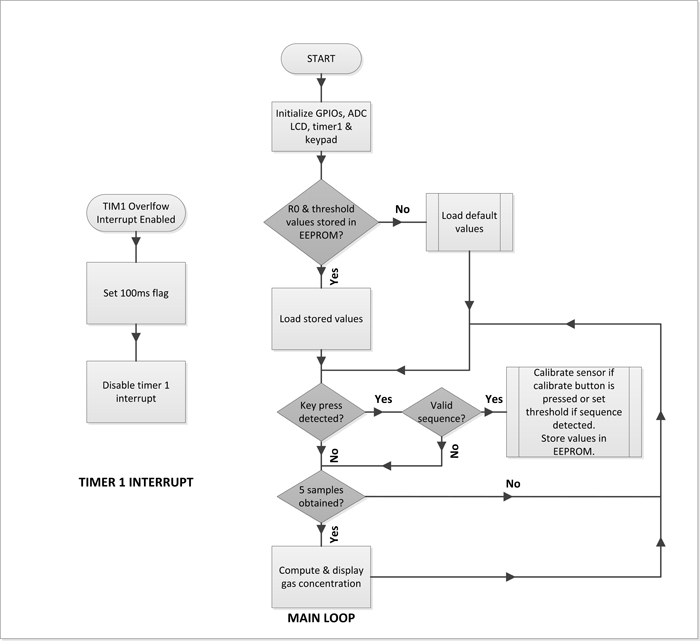
Fig. 4: Flow Chart of AVR Code for LPG Leakage Detection
Sensor Calibration
The user has the option of pressing the ‘C’ button on the keypad to initiate calibration. The MCU will obtain 5 sensor readings spaced 100ms apart and each time it will compute the sensor resistance R0, it will then average the five readings and store this in EEPROM. Prior to calibration the MCU will use a default value of R0 = 10.
EEPROM Storage
To store the values in EEPROM we make use of the standard AVR EEPROM library. Calibration data is stored at address 1 and to ensure the validity of the data, test bytes are placed at location 0x00 as well as 0x03. Also the threshold value is stored at address 6, with test bytes at address 5 & 8. Each time on boot; the MCU checks if these test bytes are present, if so it reads the calibration value and threshold and uses them for computation, if not it uses the default value for operation. Default threshold is set to 250ppm.
Keypad Sequence
In order to initiate calibration, the user has to press key ‘C’. The sensor will automatically be calibrated. To enter a threshold, the sequence is as follows:
1. Press ‘*’ key.
2. Enter the 4 digit threshold less than 9999 (max sensor ppm); typical value could be about 250.
3. Press key ‘#’ to end.
Reading Gas Concentration
Let’s see how we obtain the sensor readings and we can then move on to convert the same into actual concentration values in parts per million (ppm). The sensor can be seen (in its theoretical model) as a variable resistor, dependent upon the concentration of the gas in its vicinity. Now, by knowing the sensor resistance, we can correlate that information and obtain the concentration levels. That seems easy doesn’t it?
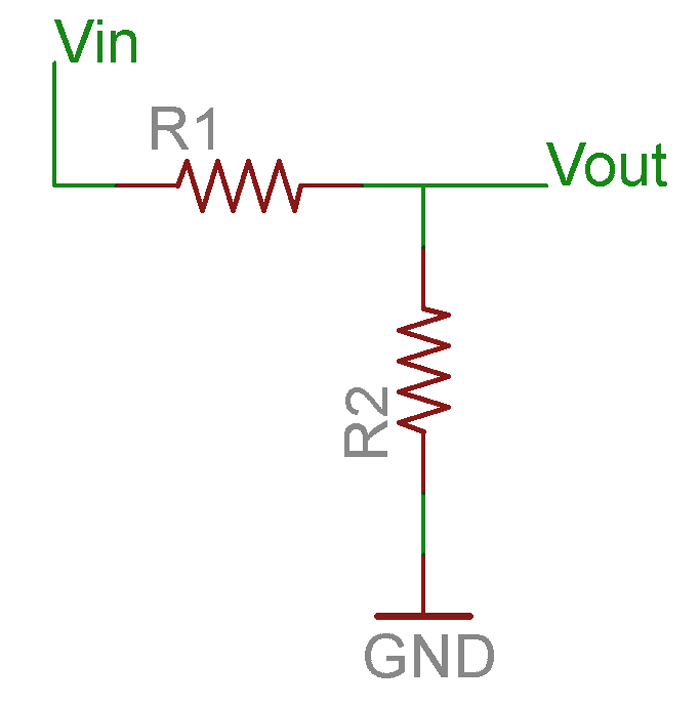
Fig. 5: Simplified Circuit Diagram of Gas Concentration Reader
Let’s get one principle cleared before we move on. Consider a voltage divider circuit; shown above; comprising of two resistors. It enables you to obtain a voltage output which is less than that inputted, simply because the voltage gets divided between the two resistors and since the current flowing through the two series resistances is same, the output voltage is dependent on the resistance values of the components.
In case of sensor; let VC be the applied sensor voltage, i.e. 5V, and let Vout be the voltage drop across the load resistance.
Now by the voltage divider principle, we have
VOUT = VC (RL / (RL + RS))
…where RS = sensor resistance, RL = load resistance
This can be expressed as
RS = ((VC – VOUT) * RL) / VOUT
Now since we are dealing with ADC counts, we can substitute VC = 5V = 5V * 1023 / 1024 (the difference is on account of ADC conversion error of +/- 0.5LSB – 1 LSB), and VOUT = 5*(RAW_ADC/1024). Upon simplification we have,
RS = RL * (1023 – RAW_ADC) / RAW_ADC
And this is the equation we are interested in to use in our main program.
So by just substituting the RAW_ADC values in the equation above, we can obtain the sensor resistance at that level of concentration, dividing this value with R0 – the sensor resistance in clean air, we can obtain the RS / R0; a ratio which is the Y-axis of the logarithmic graph in the datasheet.
Application
We can also take this one step further by finding the equation of the curve and then substituting the RS / R0 ratio to directly yield the ppm.
The MCU compares the current concentration with the threshold set and if the current value exceeds 75% of the threshold, then it activates the buzzer which remains on till the concentration drops below 75% again.
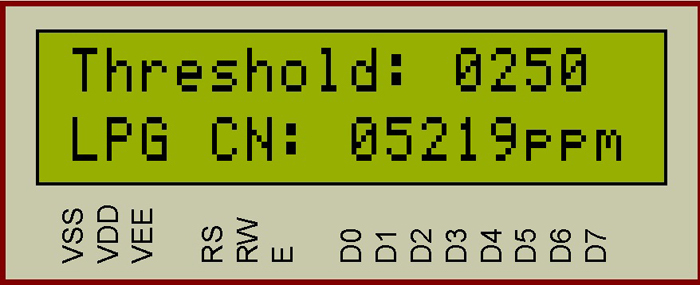
Fig. 6: Representational Image of Character LCD with Pin Descriptions
The same logic can be applied for working with any other similar sensor of MQ series.
Application
Having done all of this it is meaningful to use this device for real work; here is how you can do it…
REMEMBER TO DO IT CAREFULLY AND AT YOUR OWN RISK
Use a source of LPG / iso-butane and check the variation of output for different quantities of gas released. The safest source is a cigarette lighter. You can use a gas stove, but please observe safety and adult supervision is a must.
2. Press the button on the cigarette lighter gently so as to avoid igniting it and place the sensor close to it and measure the output.
3. Repeat the procedure again by keeping the lighter a few inches away from the sensor.
4. Use the two readings to obtain a good threshold to determine if a gas leak is present.
5. Set this as your threshold and now securely place the sensor in your kitchen next to the stove. You will be alerted by the LEDs if any leakage is detected.
6. To go one step further; you can add cell phone / GSM module connectivity such that it will notify you if any leakage is detected in your absence.
Although the gas stove would be a good source of reference, due to safety concerns using it as a primary source to set the threshold is not recommended. You can however place the sensor very close to the burner, without it being ignited, then you could verify the change in readings, however, you must be careful not to keep the burner on for more than 3-4 seconds, also make sure that the kitchen is well ventilated and that there are no sources of sparks nearby during the exercise.
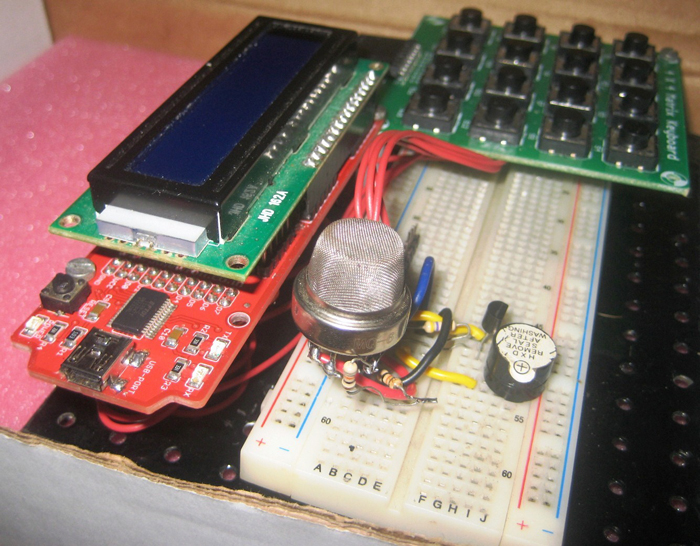
Fig. 7: Prototype of AVR based LPG Gas Detector
Working Set Up
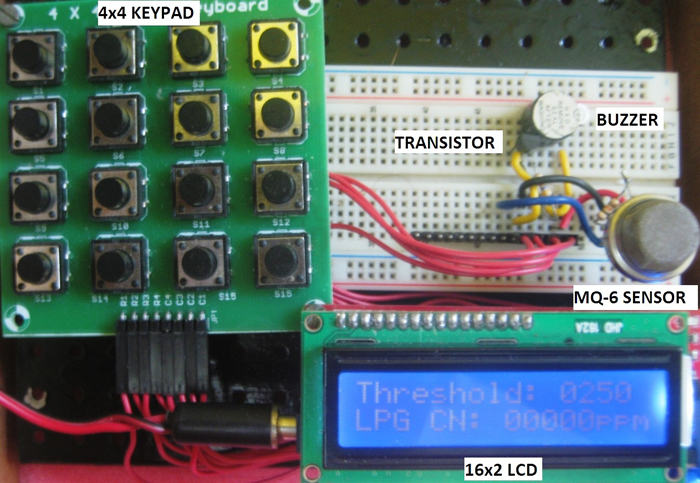
Fig. 8: Image showing diffent components of LPG Detection Kit
Circuit Diagrams
Filed Under: Electronic Projects


Questions related to this article?
👉Ask and discuss on Electro-Tech-Online.com and EDAboard.com forums.
Tell Us What You Think!!
You must be logged in to post a comment.