Engineers Garage

  • Projects and Tutorials
    • Electronic Projects
      • 8051
      • Arduino
      • ARM
      • AVR
      • PIC
      • Raspberry pi
      • STM32
    • Tutorials
    • Circuit Design
    • Project Videos
    • Components
  • Articles
    • Tech Articles
    • Insight
    • Invention Stories
    • How to
    • What Is
  • News
    • Electronic Products News
    • DIY Reviews
    • Guest Post
  • Forums
    • EDABoard.com
    • Electro-Tech-Online
    • EG Forum Archive
  • Digi-Key Store
    • Cables, Wires
    • Connectors, Interconnect
    • Discrete
    • Electromechanical
    • Embedded Computers
    • Enclosures, Hardware, Office
    • Integrated Circuits (ICs)
    • Isolators
    • LED/Optoelectronics
    • Passive
    • Power, Circuit Protection
    • Programmers
    • RF, Wireless
    • Semiconductors
    • Sensors, Transducers
    • Test Products
    • Tools
  • EE Resources
    • DesignFast
    • LEAP Awards
    • Oscilloscope Product Finder
    • White Papers
    • Webinars
  • EE Learning Center
    • Design Guides
      • WiFi & the IOT Design Guide
      • Microcontrollers Design Guide
      • State of the Art Inductors Design Guide
  • Women in Engineering

Making and displaying Custom characters on lcd with Arduino Uno and 16×2 lcd

By EG Projects

This project is about displaying custom characters on 16×2 character lcd using arduino uno microcontroller. With ardunio uno its very easy to display custom characters on lcd. In arduino their is built in structure to generate custom character like many other features which make it perfect board for embedded system projects or diy(do it yourself) projects etc. 

What are custom characters?

Custom characters are self made characters which we design by our self. We have full control on designing them with some constraints which i will discuss later. Like if we want to display a smiley 🙂 on 16×2 lcd. We don’t have an ASCII character for smiley to display it on 16×2 lcd. Example of custom characters is below.     
Example of custom characters displayed on 16x2 lcd

Example of custom characters displayed on 16×2 lcd

How custom characters are made and displayed on 16×2 lcd?

Before beginning any further i recommend you to please take the 16×2 lcd display introduction tutorial. Taking the tutorial will let you know about the pin out and internal structure of 16×2 lcd.   

  • 16×2 lcd working and internal structure

16×2 lcd has an internal ​CG-RAM(character generated ram) in which we can generate or place our custom character. CG-RAM size is 64 bytes. We can generate/place 8 characters of size 5×8 at a time in CG-RAM. We can also place 5×10 size characters in CG-RAM but only 4.

5×8 represents the dimension of the matrix in which a particular character can be displayed. 5 represents the number of coulombs and 8 represents the number of rows. 5×8 combined is a matrix size. Matrix is composed of pixels which we turn on and off to represent or make a character. For example to display a smiley 🙂 in 5×8 dimension individual pixels on and off will be same like below.   

5x8 pixel dimension of custom character display

5×8 pixel dimension of custom character display

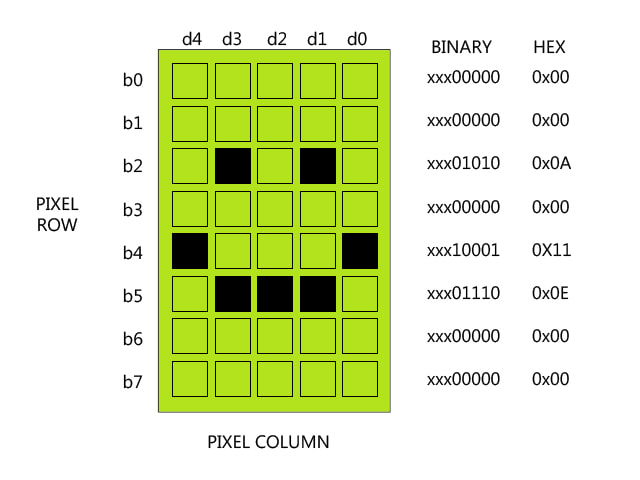
For each 5×8 matrix with custom character in it we have to translate it in to its equivalent bits. For example the binary value of rows in 5×8 matrix is shown below. Against each binary value its HEX code is also given.

  • Each switched on pixel binary value is ‘1‘.
  • Each switched off pixel binary value is ‘0‘.
16x2 custom character smiley binary bits

16×2 custom character smiley binary bits

The above binary or hex values are then arranged in a byte array. Byte array is then placed in to CG-RAM of 16×2 lcd. Now when we want to display this smiley character on lcd screen we just call its address in CG-RAM and finally the character will appear on 16×2 lcd screen.

I almost explained every thing above, about generating custom characters in 16×2 lcd CG-RAM and displaying them on lcd screen. But still their are few things which are not part of this tutorial. Like custom character address in CG-RAM. Its because the arduino ide has pre-defined library which places the custom characters in CG-RAM and call it when needed for display. If you want to know about whats happening behind the library then  i recommend you to please learn about the custom character generation in internal hardware level first before proceeding.

  • How to generate and display custom characters on 16×2 lcd.

Arduino custom characters displayed on 16×2 lcd – Circuit diagram

For this project you only need a 16×2 character lcd and arduino uno microcontroller/board. You can use any other character lcd according to your wish but remember to change the lcd.begin(no of coulombs of lcd, no of rows of lcd) command in code and insert the dimensions of the lcd you are interfacing with arduino uno. Almost all the character lcd’s have same pin out and uses same hd44780 lcd controller. So their will be no difference in circuit diagram or remaining code. Hd44780 lcd controller is responsible to display characters on character lcd, communicate with external devices and CG-RAM also resides in HD44780 lcd controller.  

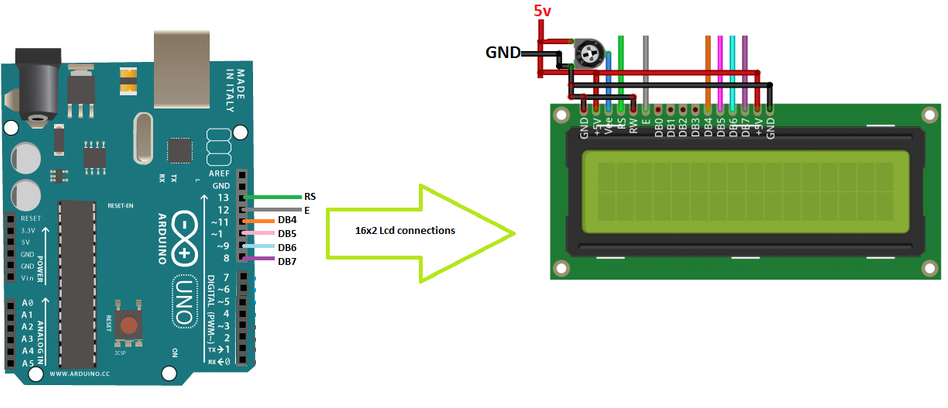
In this project i am using 16×2 lcd in 4-bit mode so you have to make pin connections according to the 4-bit mode. Its not very hard just connect in the order given below

  • LCD RS pin to digital pin 13 of arduino uno
  • LCD Enable pin to digital pin 12 of arduino uno
  • LCD D4 pin to digital pin 11 of arduino uno
  • LCD D5 pin to digital pin 10 of arduino uno
  • LCD D6 pin to digital pin 9 of arduino uno
  • LCD D7 pin to digital pin 8   of arduino uno
Custom characters displayed on 16x2 lcd using arduino uno

Custom characters displayed on 16×2 lcd using arduino uno

Arduino custom character display – Project code

The code of the project is simple. I am going to display 8 custom character on 16×2 lcd. First the required characters byte array are declared in code. Byte arrays are declared in binary as well as hexadecimal format.

The createChar() command in ardunio ide is very important. It creates/puts the character matrix/array against an addres in CG-RAM of 16×2 lcd. In other microcontrollers we have to write the memory address where we want to place our newly created custom character but in ardunio the createChar() command creates the required character automatically and place it against an address in CG-RAM. createChar() function is part of LiquidCrystal library. If we open the library and see the function statements they are communicating with the HD44780 lcd controller and CG-RAM address are defined in the function. 

Arduino code steps to create and display custom characters on 16×2 lcd

byte a[8]={B00000,B01010,B00100,B00100,B00000,B01110,B10001,};
The above statement is a byte array of a custom character in binary format.
lcd.createChar(2 , a);
The above command places the a[] byte array custom character against address 2 in CG-RAM. Real address is different its not 2 see library for real address.
lcd.write(2);
The above command displays the custom character placed against the address 2 in CG-RAM. 
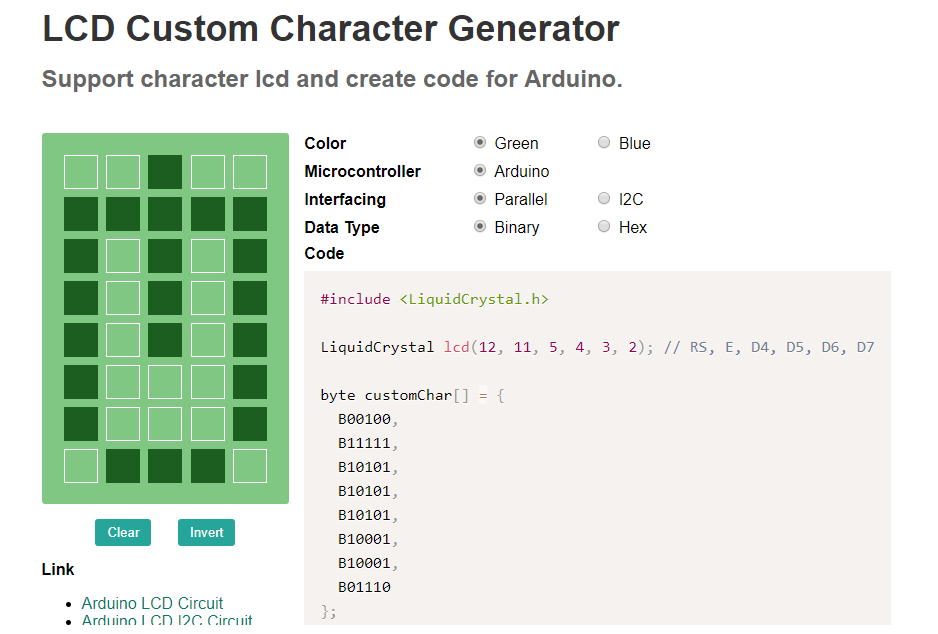
Numerous custom character generators are available online i usually use maxpromer its easy to use and biggest advantage of it is. It can generate whole arduino code in just seconds. Just give it a try i bet you gone love it.
maxpromer custom character generator online

maxpromer custom character generator online

More projects regarding custom characters, arduino and other microcontroller. All the projects are open source. Each and every statement with circuit diagram of the projects are well explained in the tutorials. 

Custom urdu language display on lcd with arduino uno

8051 microcontroller and 16×2 lcd custom characters display

Custom character display on 16×2 lcd using pic microcontroller

Download the project code written in arduino ide. Code is open source. Please provide us your feed back on the project. Write your questions and queries in the comments section below.
Arduino custom character code


Filed Under: Arduino, Microcontroller Projects


Questions related to this article?
👉Ask and discuss on EDAboard.com and Electro-Tech-Online.com forums.


Tell Us What You Think!! Cancel reply

You must be logged in to post a comment.

HAVE A QUESTION?

Have a technical question about an article or other engineering questions? Check out our engineering forums EDABoard.com and Electro-Tech-Online.com where you can get those questions asked and answered by your peers!


Featured Tutorials

  • Introduction to Brain Waves & its Types (Part 1/13)
  • Understanding NeuroSky EEG Chip in Detail (Part 2/13)
  • Performing Experiments with Brainwaves (Part 3/13)
  • Amplification of EEG Signal and Interfacing with Arduino (Part 4/13)
  • Controlling Led brightness using Meditation and attention level (Part 5/13)
  • Control Motor’s Speed using Meditation and Attention Level of Brain (Part 6/13)

Stay Up To Date

Newsletter Signup

Sign up and receive our weekly newsletter for latest Tech articles, Electronics Projects, Tutorial series and other insightful tech content.

EE Training Center Classrooms

EE Classrooms

Recent Articles

  • Key factors to optimize power consumption in an embedded device
  • EdgeLock A5000 Secure Authenticator
  • How to interface a DS18B20 temperature sensor with MicroPython’s Onewire driver
  • Introduction to Brain Waves & its Types (Part 1/13)
  • An Embedded Developer’s Perspective on IOT (Internet of Things)

Most Popular

5G 555 timer circuit 8051 ai Arduino atmega16 automotive avr bluetooth dc motor display Electronic Part Electronic Parts Fujitsu ic infineontechnologies integratedcircuit Intel IoT ir lcd led maximintegratedproducts microchip microchiptechnology Microchip Technology microcontroller microcontrollers mosfet motor powermanagement Raspberry Pi remote renesaselectronics renesaselectronicscorporation Research samsung semiconductor sensor software STMicroelectronics switch Technology vishayintertechnology wireless

RSS EDABOARD.com Discussions

  • Dynamic power consumption.
  • Limits of duty cycle for ICM7555 IC?
  • pmos folded cascode vs nmos folded cascode for LDO
  • Pic 16f877A Hex file
  • Need help to choose accelerometer

RSS Electro-Tech-Online.com Discussions

  • Need help working with or replacing a ferrite tube
  • Trying to make a custom automated water container for my UV purifier. Can anyone help with where to begin?
  • Help wanted to power an AC120v induction motor ( edited from Brushless motor - thank you @SHORTBUS= )
  • Funny Images Thread!
  • How does a NOAC work?
Engineers Garage
  • Analog IC TIps
  • Connector Tips
  • DesignFast
  • EDABoard Forums
  • EE World Online
  • Electro-Tech-Online Forums
  • Microcontroller Tips
  • Power Electronic Tips
  • Sensor Tips
  • Test and Measurement Tips
  • 5G Technology World
  • About Us
  • Contact Us
  • Advertise

Copyright © 2022 WTWH Media LLC. All Rights Reserved. The material on this site may not be reproduced, distributed, transmitted, cached or otherwise used, except with the prior written permission of WTWH Media
Privacy Policy | Advertising | About Us

Search Engineers Garage

  • Projects and Tutorials
    • Electronic Projects
      • 8051
      • Arduino
      • ARM
      • AVR
      • PIC
      • Raspberry pi
      • STM32
    • Tutorials
    • Circuit Design
    • Project Videos
    • Components
  • Articles
    • Tech Articles
    • Insight
    • Invention Stories
    • How to
    • What Is
  • News
    • Electronic Products News
    • DIY Reviews
    • Guest Post
  • Forums
    • EDABoard.com
    • Electro-Tech-Online
    • EG Forum Archive
  • Digi-Key Store
    • Cables, Wires
    • Connectors, Interconnect
    • Discrete
    • Electromechanical
    • Embedded Computers
    • Enclosures, Hardware, Office
    • Integrated Circuits (ICs)
    • Isolators
    • LED/Optoelectronics
    • Passive
    • Power, Circuit Protection
    • Programmers
    • RF, Wireless
    • Semiconductors
    • Sensors, Transducers
    • Test Products
    • Tools
  • EE Resources
    • DesignFast
    • LEAP Awards
    • Oscilloscope Product Finder
    • White Papers
    • Webinars
  • EE Learning Center
    • Design Guides
      • WiFi & the IOT Design Guide
      • Microcontrollers Design Guide
      • State of the Art Inductors Design Guide
  • Women in Engineering