This post is about displaying custom urdu font characters on 16×2 character lcd display with the help of 89c51 microcontroller. Previously i discussed about ‘How to display custom character on 16×2 lcd display with 8051(89c51,89c52) microcontroller?’. This tutorial is made by following the same steps enlisted in the above tutorial. The only difference is, in this tutorial i calculated the character data arrays for each character/alphabet of urdu language. Urdu language is spoken in India, Pakistan, Bangladesh and Afghanistan. Pakistan national language is Urdu. Urdu alphabets are shown below.

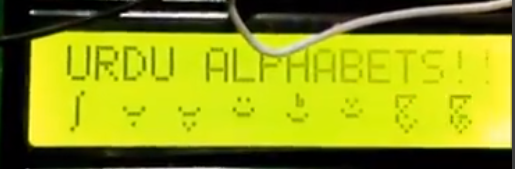
Urdu alphabets OR characters
16×2 lcd custom characters End Result
Urdu characters displayed on 16×2 lcd with 89c51 microcontroller
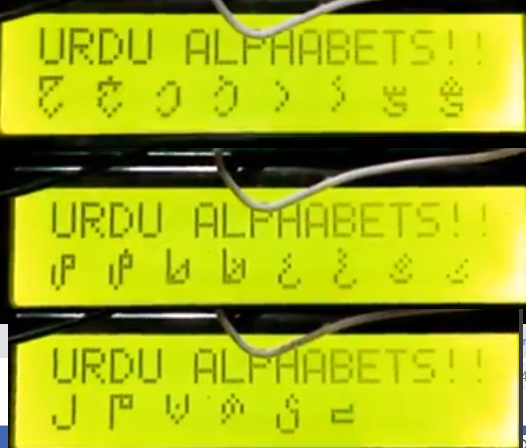
Urdu language alphabets on 16×2 lcd
CG-RAM(character generated ram) of HD44780 lcd controller
Making and displaying custom urdu characters on 16×2 lcd display is not an easy task. If you are newbie and previously have no experience with character lcd’s. Then first take the tutorial on How to make and display custom characters on 16×2 lcd? Tutorial will help you to understand how the 16×2 lcd works, about its pin out and internal register structure, about CG ram? how to store data(characters) in CG (character generated) ram? and lastly how to print the custom characters that are made in CG-ram on 16×2 lcd screen?
Note: Every character lcd irrespective of its size(16×1, 16×2, 20×4 etc) has HD44780 lcd controller in it. So custom character display technique is same for each lcd display. Some bigger size lcd’s have two HD44780 controllers in them. Each controlling a single half of lcd. For those lcd’s custom character display technique is still same because of the same HD44780 controller behind the lcd. CG-Ram can store up to 8 characters at a time. If you exceed this limit the new characters will be replaced by the previous one. For example if at first location we placed ‘>’ and then next 7 characters are placed in CG-RAM. Now the CG-RAM is fully occupied. Suddenly we send the ninth character ‘%’ to HD44780 controller to place it in CG-RAM. The HD44780 controller will accept the new character but place it at the first location. Where previously ‘>’ was present. Now ‘>’ is replaced with ‘%’.
Note: Every character lcd irrespective of its size(16×1, 16×2, 20×4 etc) has HD44780 lcd controller in it. So custom character display technique is same for each lcd display. Some bigger size lcd’s have two HD44780 controllers in them. Each controlling a single half of lcd. For those lcd’s custom character display technique is still same because of the same HD44780 controller behind the lcd. CG-Ram can store up to 8 characters at a time. If you exceed this limit the new characters will be replaced by the previous one. For example if at first location we placed ‘>’ and then next 7 characters are placed in CG-RAM. Now the CG-RAM is fully occupied. Suddenly we send the ninth character ‘%’ to HD44780 controller to place it in CG-RAM. The HD44780 controller will accept the new character but place it at the first location. Where previously ‘>’ was present. Now ‘>’ is replaced with ‘%’.
Custom language alphabets display on 16×2 lcd – Project circuit diagram
Connect 16×2 lcd data pins to Port-1 of 89c51 microcontroller. 16×2 lcd is interfaced with 89c51 microcontroller in 8-bit mode(Don’t understand take Tutorial ). Connect rs(register select) pin of lcd display to Port-3 pin#3 and en(enable) pin of lcd to Port-3 pin#6, ground rw(read/write) pin of lcd display. Grounding the rw pin tells the HD44780 controller that we only want to write to lcd display. If you don’t know how the 16×2 lcd works and how to connect it to the microcontroller here is a good tutorial 16X2 lcd working and pinout.
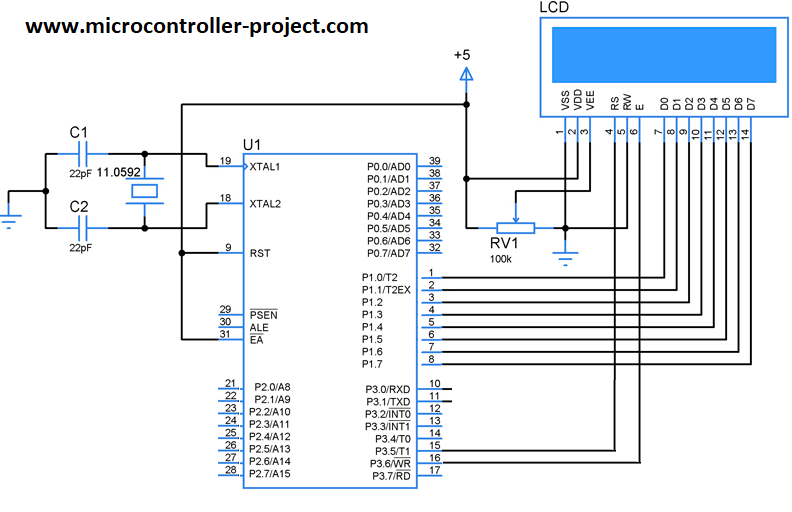
Custom characters display on 16×2 lcd with 89c51 microcontroller – Circuit diagram
In the above code i first created and placed the initial eight alphabets of urdu language in CG-RAM and then displayed them on the lcd screen. After a few seconds delay i again made the eight characters and placed them in CG-RAM of 16×2 lcd display. The new eight alphabets replaces the previous ones and then i called them to display on 16×2 lcd. This process repeats unless all the alphabets are displayed on lcd. Whole code is placed in while(1) loop so the code runs again and again with the same logic.
Some more tutorials on displaying custom characters on 16×2 lcd screen. Each project is made with different microcontroller. All projects are open source you can modify the circuit and code according to your needs.
Download the project code files. Code is written in keil uvision ide. Code is open source Don’t forget to provide us your feedback on the project.
Filed Under: 8051, Electronic Projects, Microcontroller Projects

Questions related to this article?
👉Ask and discuss on Electro-Tech-Online.com and EDAboard.com forums.
Tell Us What You Think!!
You must be logged in to post a comment.