Engineers Garage

  • Projects and Tutorials
    • Circuit Design
    • Electronic Projects
      • 8051
      • Arduino
      • ARM
      • AVR
      • PIC
      • Raspberry pi
      • STM32
    • Tutorials
    • Components
  • Articles
    • Tech Articles
    • Insight
    • Invention Stories
    • How to
    • What Is
  • News
    • EE Design News
    • DIY Reviews
    • Guest Post
    • Sponsored Content
  • Forums
    • EDABoard.com
    • Electro-Tech-Online
    • EG Forum Archive
  • Digi-Key Store
    • Cables, Wires
    • Connectors, Interconnect
    • Discrete
    • Electromechanical
    • Embedded Computers
    • Enclosures, Hardware, Office
    • Integrated Circuits (ICs)
    • Isolators
    • LED/Optoelectronics
    • Passive
    • Power, Circuit Protection
    • Programmers
    • RF, Wireless
    • Semiconductors
    • Sensors, Transducers
    • Test Products
    • Tools
  • EE Resources
    • DesignFast
    • LEAP Awards
    • Oscilloscope Product Finder
    • Video
    • White Papers
    • Webinars
  • EE Learning Center
  • Women in Engineering

Spectroscopic sensor interface with Arduino

February 25, 2021 By Usman ali Butt

In this tutorial, we’ll learn how to interface a spectroscopic sensor with Arduino. Spectroscopy refers to the study of the spectra produced when material interacts with or emits light. Researchers analyze the change(s) in a light spectrum and its attributes — such as its frequency or wavelength — when it’s exposed to matter (a gas, liquid, solid, etc.).

Depending on its physical properties, matter will either allow the light to pass or absorb some or all of its frequencies. For example, black bodies fully absorb light — including all of the frequencies in an electromagnetic spectrum. This means that we can distinguish materials (or matter) by exposing them to a known light source and studying their frequency absorption.

Currently, there is only one cost-effective spectrometer that’s available for a do-it-yourself (DIY) project such as this, the AS7265x. It’s a combination of three individual sensors that offer:

1. Visible light (VL): AS72651
2. Ultraviolet light (UV): AS72652
3. Near-infrared light spectrum (NIR): AS72653

Each sensor has a dedicated LED adjacent to it and, combined, they form a triad.

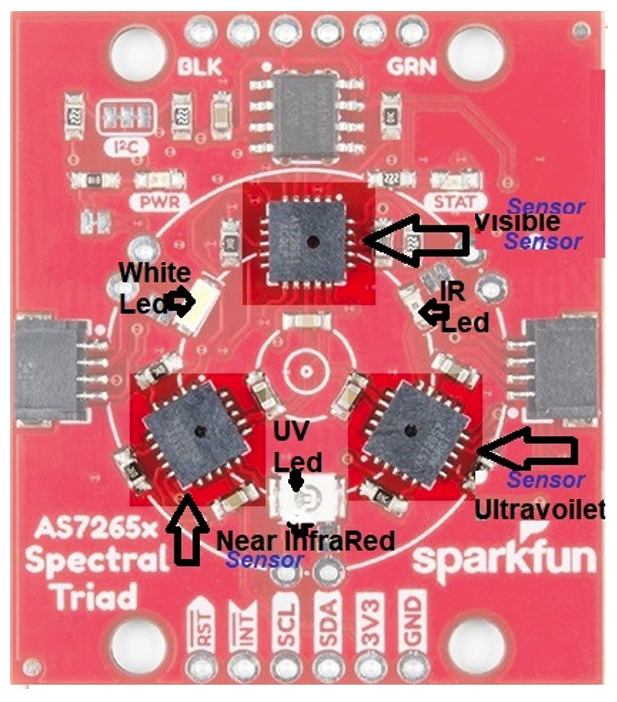
These onboard LED’s are powerful enough to illuminate nearby objects and reflect back the light. However, you can also use external LED’s for a greater level of reflected/incident light frequencies.

Unfortunately, the spectral triad can only cover a small portion of the light spectrum. DIY sensors are limited. To cover the full spectrum, individual sensors can be cascaded together.

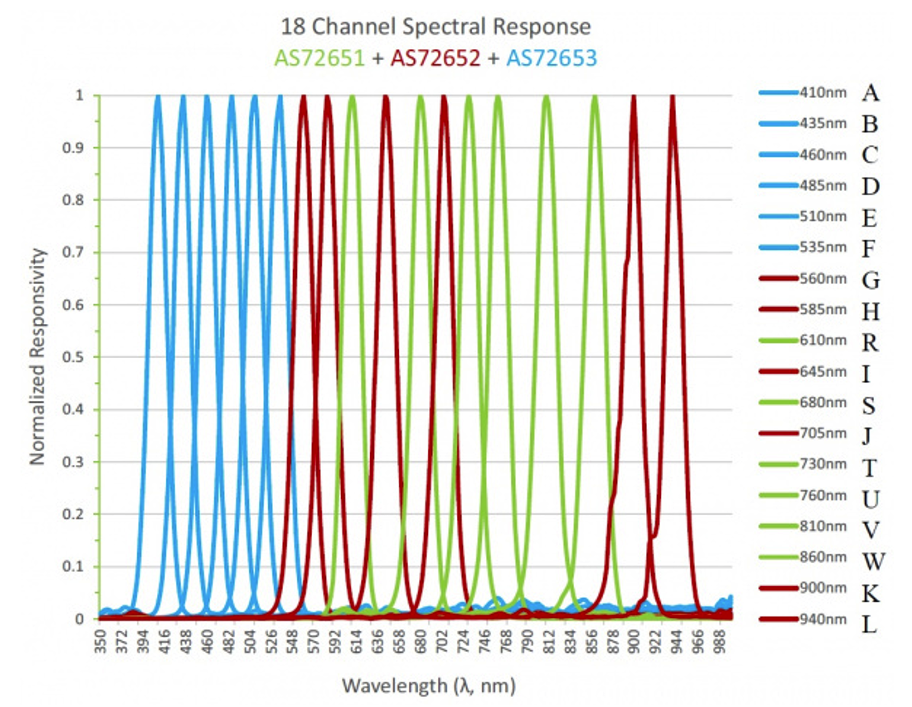
The AS7265x triad outputs 18 values (A, B, C, D, E, F, G, H, R, I, S, J, T, U, V, W, K, L), which correspond to 18 different light frequencies. When a light source that’s within the sensor range (VI, UV, NIR) is detected, the light’s frequency is rounded off to the nearest range within these 18 frequencies.

Here’s the frequency range…

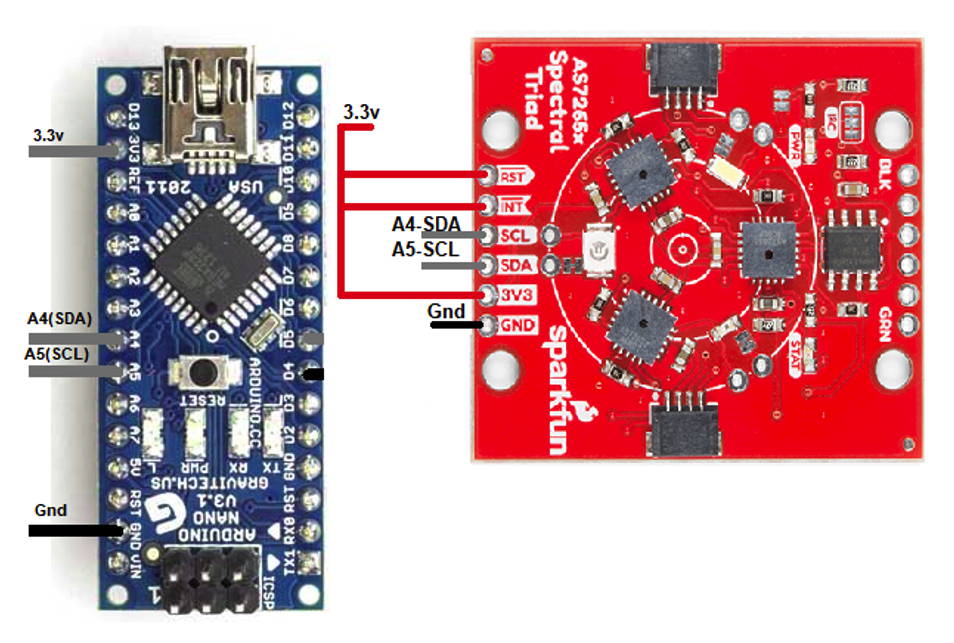
Essentially, the AS7265x “communicates” with the I2C protocol’s external modules. It operates on 3.3V, which is ideal for the I2C port. The visible light sensor acts as the master while the NIR and UV light spectrums are slaves.

Arduino NANO is best suited for this project and its connections with the sensor are shown here…
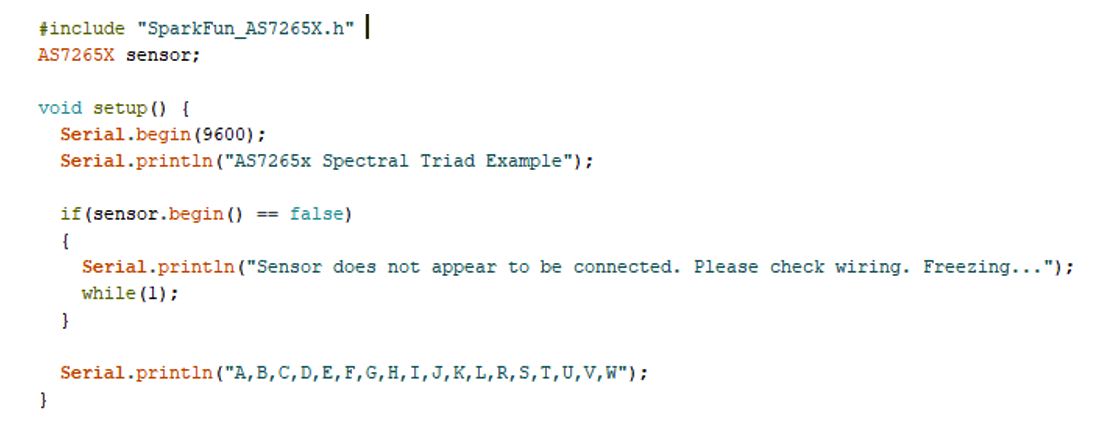
The code
First, import and initiate the SparkFun library for the AS7265x sensor. The setup function for Arduino’s serial monitor is initialized at a 9600 baud rate.

Then, the sensor must be started and polled to ensure its fully powered up and working.

In the loop function, the statement takeMeasurements() will note the frequencies that are reflected from the exposed object or material. To determine which of the 18 frequencies are absorbed, you’ll need to call all of the frequencies’ status functions. The getCalibratedx() function will let you see the status of the individual frequencies.

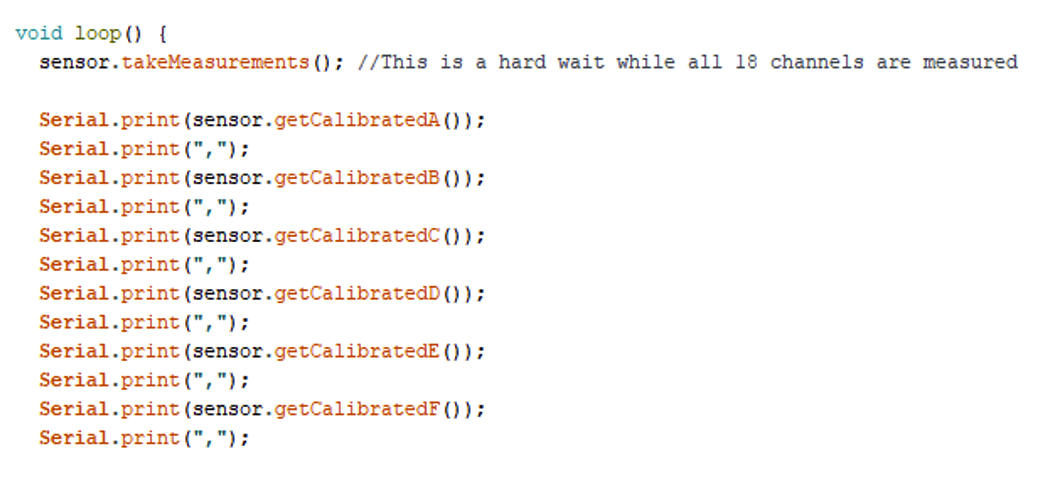
The above function only measures the raw light and natural frequencies in a particular environment. To measure their exact values, it’s necessary to switch on the sensor’s VI, UV, and NIR LED’s.

This statement allows us to take readings with the LED switched on:

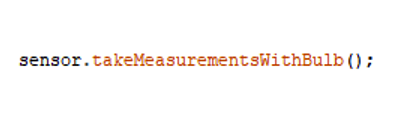
Otherwise, you can switch on the LED’s permanently by placing these statements in the setup loop:

For the results, open the serial monitor at the 9600 baud rate. The spectral properties of the material/matter can be studied using the above DIY spectrometer.

Here’s what you’ll need:

  • Arduino Nano: Mouser
  • The AS7265x sensor: Mouser

You may also like:


  • Interface SparkFun 9DoF sensor stick with Arduino Uno

  • Infrared Sensors or IR Sensors

  • Infrared Imaging or Thermal Imaging : History

  • First Spectroscopic Probe Of Element Nobelium

Related Articles Read More >

How to monitor pH levels in an aquarium using Arduino
TV remote hack using Arduino and IR sensor
Gesture sensor using Arduino
How to build a metal detector using an inductive proximity sensor with Arduino

HAVE A QUESTION?

Have a technical question about an article or other engineering questions? Check out our engineering forums EDABoard.com and Electro-Tech-Online.com where you can get those questions asked and answered by your peers!


Featured Tutorials

  • Introduction to Wireless Modules
  • ADC with NRF24LE1 (Part 2/14)
  • Interrupts with NRF24LE1 (Part 3/14)
  • Power Failure Indicator in NRF24LE1 (Part 4/14)
  • Using EEPROM of NRF24LE1 (Part 5/14)
  • PWM with NRF24LE1 (Part 6/14)

Stay Up To Date

Newsletter Signup

EE Training Center Classrooms

“ee

“ee

“ee

“ee

“ee

Recent Articles

  • What are Application Specific ICs?
  • Introduction to LUFA
  • What are the different types of integrated circuits?
  • Introduction to Wireless Modules
  • ADC with NRF24LE1 (Part 2/14)

RSS EDABOARD.com Discussions

  • Inductive Current , High Current Track
  • Mains voltage range in India?
  • Thyristor choice?
  • Inspecting split AC control board not running the fan
  • Trying to repair an RF generator

RSS Electro-Tech-Online.com Discussions

  • Tesla coil progress
  • Two switch forward topology WEIRD waveform and efficiency issue
  • EasyEDA Discovery / Tip
  • Ideas for a homemade tv set?
  • How to breadboard with WSON devices.
Engineers Garage
  • Analog IC TIps
  • Connector Tips
  • DesignFast
  • EDABoard Forums
  • EE World Online
  • Electro-Tech-Online Forums
  • Microcontroller Tips
  • Power Electronic Tips
  • Sensor Tips
  • Test and Measurement Tips
  • 5G Technology World
  • About Us
  • Contact Us
  • Advertise

Copyright © 2021 WTWH Media LLC. All Rights Reserved. The material on this site may not be reproduced, distributed, transmitted, cached or otherwise used, except with the prior written permission of WTWH Media
Privacy Policy | Advertising | About Us

Search Engineers Garage

  • Projects and Tutorials
    • Circuit Design
    • Electronic Projects
      • 8051
      • Arduino
      • ARM
      • AVR
      • PIC
      • Raspberry pi
      • STM32
    • Tutorials
    • Components
  • Articles
    • Tech Articles
    • Insight
    • Invention Stories
    • How to
    • What Is
  • News
    • EE Design News
    • DIY Reviews
    • Guest Post
    • Sponsored Content
  • Forums
    • EDABoard.com
    • Electro-Tech-Online
    • EG Forum Archive
  • Digi-Key Store
    • Cables, Wires
    • Connectors, Interconnect
    • Discrete
    • Electromechanical
    • Embedded Computers
    • Enclosures, Hardware, Office
    • Integrated Circuits (ICs)
    • Isolators
    • LED/Optoelectronics
    • Passive
    • Power, Circuit Protection
    • Programmers
    • RF, Wireless
    • Semiconductors
    • Sensors, Transducers
    • Test Products
    • Tools
  • EE Resources
    • DesignFast
    • LEAP Awards
    • Oscilloscope Product Finder
    • Video
    • White Papers
    • Webinars
  • EE Learning Center
  • Women in Engineering