ESP8266 and ESP32 are popular WiFi development boards. These microcontroller boards are ideal for building the internet of things (IoT). We covered how to connect ESP8266 and ESP32 (or any MicroPython port) with a network connection for use as a WiFi station here. We used the MicroPython network module.
This network module provides a driver to create a network interface. The interface depends on the networking medium (WiFi or Ethernet) and the port-specific hardware for that medium. Using a network interface like WLAN (WiFi) or Ethernet, ESP8266/ESP32 or any MicroPython port can connect to the internet. The same module is also useful for managing certain router configurations.
MicroPython’s socket or the usocket module is required to access different network services. Examples of network services include the World Wide Web (WWW), Domain Name Search (DNS), email, file server, time services, VoIP, wireless-sensor network, directory services, file sharing, file server, instant messaging, network-management protocols, and there are others.
Once ESP8266/ESP32 are connected to the internet via WiFi or Ethernet (using a network module), they can be used for several IoT-based applications. For the IoT, ESP8266 and ESP32 connect with the internet/network services via low-level access, which is provided via basic socket support from the underlying operating systems/firmware.
For example, MicroPython provides the socket and usocket modules for socket-level network programming of supported ports and boards. The socket module is a re-implementation of a subset of the CPython module with the same name. The usocket module is an extended implementation of MicroPython’s built-in socket module.
With the help of sockets, ESP8266/ESP32 can be configured as a TCP/IP server or client. The boards can also be configured as a UDP server or client. ESP8266/ESP32 or any MicroPython port can be used for any networking role as a web server or client.
In this article, we’ll cover the basics of the Transmission Control Protocol/Internet Protocol (TCP/IP) and UDP networks. We’ll also discuss how ESP8266/ESP32 can be configured as a web server or client within a wide area network using socket module. Lastly, we’ll test a simple IoT application of ESP8266/ESP32 as web server.
What is a Python socket?
Sockets are used for low-level network programming. In programming, a socket is the endpoint of a communication between two programs running on a network. They facilitate bidirectional communication between two networked devices. A typical application of sockets is a client-server application where one of the networked devices is a server, and the other is a client.
The sockets offer inter-process communication (IPC), which means the sockets (or endpoints) communicate within a process — between processes on one or more than one machine. Unix domain sockets communicate between processes on the same machine. Internet sockets, Berkley sockets, or BSD sockets communicate between processes on different machines. The network wherein two devices are engaged in socket-level communication can be a local area network (LAN), wide area network (WAN), or the internet.
CPython’s socket module facilitates an interface to the Berkeley socket API that directly maps to the OS/firmware-level system calls. The MicroPython’s socket module is a re-implemented subset of the same module.
It’s worth noting that in networking, the term “socket” refers to a device’s network port and IP address. The port is the endpoint that specifies the type of network service or the specific process. It’s a 16-bit identifier for the combined network protocol and network service. The network protocol can be the TCP/IP or UDP.
This table lists some of the commonly used port numbers for different TCP/IP and UDP network services.
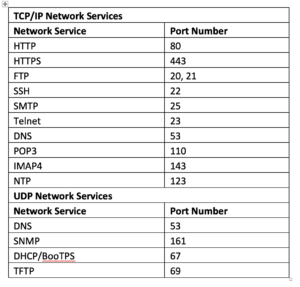
Port numbers for different TCP/IP and UDP network services.
The Internet Protocol (IP) address is a numerical identifier of a device connected to the computer network that uses IP for communication. The combination of an IP address and port number (i.e., socket) is a unique identifier of:
- The origin/destination device in the computer network
- The network protocol (IP protocol) used for the communication
- The network service/process involved in the communication.
Socket = IP Address + Network Port Number
MicroPython sockets refer to the programming sockets — not the network sockets (IP address and port number). However, some socket API methods use network socket (IP address and port number) as parameters like the connect() method. The parameter is accepted as a separate hostname and port number.
Low-level vs. high-level access
Standard Python provides two types of access to computer networks: low-level and high-level.
- Low-level access is provided by the sockets. The sockets use the system calls of the underlying operating system/firmware to communicate with the device at the other end of the network. Sockets can implement connection-oriented and connectionless protocols.
- High-level access is provided by implementing application-layer internet protocols, such as HTTP, FTP, DNS, etc.
MicroPython only offers low-level access to the network programming because its target devices are microcontrollers and embedded controllers. The direct implementation of high-level access is resource intensive and not feasible with platforms like microcontrollers.
MicroPython easily configures low-level access supported ports as servers or clients. The socket programming even permits a server to communicate with multiple clients simultaneously.
TCP/IP vs. UDP network protocols
Two widely used networking protocols are TCP and UDP. Both protocols are part of the TCP/IP suite, a set of layered protocols used for communication over the internet. This suite is based on a client-server model where clients send requests to the server. The server can cater to the requests of multiple clients.
There are four layers of TCP/IP:
- Application layer – protocols like HTTP, HTTPS, and FTP are implemented.
- Transport layer – data is communicated as a datagram using the TCP.
- Network layer – connection to the internet is established via IP, where the origin and destination devices are identified by IP addresses.
- Data-link layer – data is transmitted over the internet as bits to the destination device.
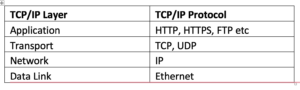
A breakdown the TCP/IP network architecture.
TCP and UDP are the two transport layer protocols. The sockets can use TCP and UDP to configure the client-server. TCP is the more reliable protocol as it error-checks extensively. For this reason, it’s used by several application-layer protocols, such as HTTP, HTTPS, FTP, SMTP, etc.
One benefit of UDP is that it uses fewer resources. But, overall, it’s less reliable with limited error checking. Services like VoIP often use UDP.
Most IoT devices rely on the TCP protocol for communicating data between a TCP server and TCP clients, mainly where the HTTP, HTTPS, or SMTP protocols work at the application layer. IoT boards are often configured as a TCP server or TCP client.
Address families
Origin and destination devices are identified by IP addresses at the network layer. However, there are different types of IP addresses. Each type is recognized by its address family.

The address families and their identifiers in socket programming.
Defining a socket
In network programming, a socket is defined by a constructor method, socket.socket(), which takes two parameters. One of the parameters is an address family, specified by the identifiers mentioned in the table above. The second parameter is the transport protocol, either TCP or UDP.
The TCP network is specified by socket.SOCK_STREAM. The UDP network is specified by socket.SOCK_DGRAM. A typical definition of a socket in Python is:
import socket
s = socket.socket(socket.AF_INET, socket.SOCK_STREAM)
If the AF_INET address family is used, the IPv4 address is specified with a hostname and port number (i.e., by a networking socket). The hostname can be a string representing an internet website/location or the numerical IP address of a website/device. The port number is an integer that specifies the network service. For example, the port number specifies HTTP, 443 specifies HTTPS, etc.
TCP server or client?
When designing an IoT application, one of the first questions is whether the MicroPython port/IoT board should be configured as a TCP server or client. In the client-server model, a client makes a request to the server and the server caters to that request. The server cannot initiate communication.
This is an important consideration when configuring an IoT device over a network. The device must be configured as a TCP server if it is designed for operating control operations or other components. This ensures it can receive control commands from client devices like a computer, mobile, or remote control.
The IoT device should be configured as a TCP client if the control operations depend on feedback from an IoT server or cloud platform. The same is true if the device is designed to display or manipulate data from a remote IoT server/cloud.
For example, the board should be configured as a TCP server if the device operates a relay from the MicroPython port/IoT board via a webpage. Contrarily, it should be configured as a TCP client if the MicroPython port/IoT board display time is received from a time server.
The socket module
MicroPython’s socket module provides access to the internet or Berkeley/BSD socket interface. MicroPython firmware’s socket module directly implements a file-like (stream) interface. This is unlike CPython’s socket module, and why the socket objects don’t need to be converted to file-like objects using the makefile() function.
The socket module is imported in a MicroPython script using this statement:
import socket
The module contains a class socket that includes all methods for creating and configuring an internet socket interface. The constructor method is called to do so. It has this prototype:
class socket.socket(af=AF_INET, type=SOCK_STREAM, proto=IPPROTO_TCP, /)
The constructor method takes three parameters:
- The address family determines the type of IP address used in the network layer.
- The socket type determines the selection of TCP or UDP network.
- The protocol number determines the type of TCP or UDP protocols to be used.
The protocol number is optional and should be avoided. It’s typically omitted by MicroPython’s ports and is automatically selected by the socket type.
The following socket module method configures a MicroPython port as a TCP server…
socket.bind(address): binds the socket to an IP address. The socket must not be bound already.
socket.listen(): allows the TCP server to accept connections. A backlog parameter can be passed to this method, which specifies the number of unaccepted connections before refusing new connections. If the parameter is not provided, any reasonable value is chosen by the server.
socket.accept(): lets the server accept a new connection. The socket must be bound to an IP address already and be listening for connections. This method returns a pair of values: conn and address. The conn is a new socket object that’s used to transmit and receive data on the new connection. The address is the IP address of the device on the other end of the network with which data is communicated.
The following socket module method configures a MicroPython port as a TCP client…
socket.connect(address): connects the client socket to a remote server socket. The remote server socket’s IP address is passed as a parameter.
The following socket module methods manage data communication on the TCP server and client.
socket.send(bytes): used to send data to the other socket and must be connected to a remote socket. The method returns the number of bytes sent to the remote socket. Both server and client sockets use this method.
socket.sendto(bytes, address): used to send data to a remote socket, which is determined by the IP address that’s passed as a parameter. The socket must not already be connected to the remote socket. This method is more useful on a TCP server, which can engage with multiple clients.
socket.sendall(bytes): used to send all data to the remote socket by transmitting it into consecutive chunks. The socket must be connected to the remote socket. This method’s behavior for non-blocking sockets is undefined.
socket.write(buf): sends a buffer of bytes to the remote socket. The socket must be connected to a remote socket. This method writes all data to the remote socket following a “no short writes” policy. This poses no problem for the blocking sockets to which data is always sent successfully. For non-blocking sockets, this method returns the number of bytes sent — which can be less than the actual size of the buffer. It’s known how many bytes are successfully sent to the non-blocking socket.
socket.recv(bufsize): receives data from the remote socket. It returns a byte object representing the received data. The maximum size of the received data is determined by the size of the buffer object that’s passed as a parameter.
socket.recvfrom(bufsize): receives data from the remote socket. The socket must be connected to a remote socket. The method returns the byte object — representing the received data and IP address — of the remote socket. This method is more useful on a TCP server, which can connect to multiple clients.
socket.read([size]): reads from the remote socket up to the number of bytes, specified as a size parameter. If no size parameter is specified, it reads all data from the remote socket until it receives EOF (i.e., until the remote socket is closed). This method follows a “no short reads” policy that lets it read all the requested data. For the non-blocking sockets, this method is still unable to read all the data.
socket.readinto(buf[, nbytes]): reads data from the remote socket into a buffer object. If the bytes parameter is specified, it reads only the specified number of bytes into the buffer. This method returns the number of bytes read and stored into the buffer object and follows a “no short reads” policy like the socket.read()method.
socket.readline(): reads a line terminated by a newline character from the remote socket. It returns the line read from the remote socket.
socket.close(): closes a socket and releases the resources held by it. Once a socket is closed, any future operations fail. When a socket is closed, the remote socket can receive an EOF indication, provided it’s supported by the protocol. But the sockets are automatically closed when the garbage is collected, and they must be explicitly closed to improve efficiency.
The following socket module methods modify or change the socket behavior…
socket.setsockopt(level, optname, value): Note that the sockets default to a standard behavior. The behavior of a socket can be modified by changing various socket options. This method sets the value of a given socket option. The socket options that can be set with this method are provided as constants starting from SO_ or SOL_ in the socket module. The value that can be passed to the socket options is an integer or a byte object.
socket.setblocking(flag): sets a socket to blocking or non-blocking mode. If the flag is set to True, the socket is set to the blocking mode. If the flag is set to False, the socket is set to the non-blocking mode. This method serves as shorthand for the socket.settimeout()method. The socket’s default mode is blocking. A blocking socket does not return to the program until the requested event is complete. The non-blocking sockets immediately reply to the program, revealing if the requested action is complete or not. A blocking socket returns an error number if the requested event/action is in progress.
socket.settimeout(value): sets a timeout for the blocking sockets. The timeout is specified as a non-negative floating-point value. If the timeout value is set to ‘0,’ the socket is put in the non-blocking mode. If the timeout value is set to none, the socket is put to the blocking mode. This method is not available with every MicroPython ports/boards.
socket.makefile(mode=’rb’): returns a file object associated with the socket. MicroPython’s makefile() method does not support errors, encoding, and newline parameters as the CPython’s makefile() method. It also does not support buffering streams. If the buffer parameter is set, it’s ignored and considered ‘0’ (i.e., unbuffered). The only parameter it takes is ‘mode.’ Only the binary modes rb, wb, and rwb are supported. If a file object returned by this method is closed, the original socket is also closed.
The functions provided by the socket module are as follows…
socket.getaddrinfo(): converts a network socket (i.e., host/port) to a sequence of 5-tuple that can be used to create a socket. The 5-tuple’s format is (family, type, proto, canonname, sockaddr). This method is often used to resolve textual hostnames. The following example prints the resolved IP address of engineersgarage.com.
import socket
sockaddr = socket.getaddrinfo(‘www.engineersgarage.com’, 80)[0][-1]
print(sockaddr)
When running the above code, the following IP address is returned after resolving the hostname…
 socket.inet_ntop(af, bin_addr): converts a binary network address to a textual representation as per the specified address family. Here’s a valid example of this function:
socket.inet_ntop(socket.AF_INET, b”\x7f\0\0\1″)
The result of this function call is: ‘127.0.0.1’
socket.inet_pton(af, txt_addr): converts a textual network address of the given address family to its binary representation. Here’s a valid example of this function:
socket.inet_pton(socket.AF_INET, “127.0.0.1”)
The result of this function call is: b’\x7f\0\0\1′
MicroPython’s socket module does not support socket.error exceptions.
The usocket module
MicroPython’s usocket module is similar to the socket module, which can be built-in in the MicroPython port/board or installed from micropython-lib. If the script for the socket module is not found, use the script for the usocket module. They both work.
Configuring ESP8266/ESP32 as TCP client using sockets
The following MicroPython code configures ESP8266/ESP32 as a TCP client that reads the HTML source code from a webpage. The webpage must have HTTP protocol and not HTTPS protocol.
import network
station = network.WLAN(network.STA_IF)
if station.isconnected() == True:
print(“Already connected”)
station.active(True)
station.connect(“SSID”, “PASSWORD”)
while station.isconnected() == False:
pass
print(“Connection successful”)
print(station.ifconfig())
def http_get(url):
import socket
_, _, host, path = url.split(‘/’, 3)
addr = socket.getaddrinfo(host, 80)[0][-1]
s = socket.socket()
s.connect(addr)
s.send(bytes(‘GET /%s HTTP/1.0\r\nHost: %s\r\n\r\n’ % (path, host), ‘utf8’))
while True:
data = s.recv(200)
if data:
print(str(data, ‘utf8’), end=”)
else:
break
s.close()
http_get(‘http://micropython.org/ks/test.html’)
You must replace the SSID and PASSWORD at line #7 with the SSID and network key of your own WiFi connection.
The result of the above MicroPython script is shown below.

Reading SSL-encrypted webpages
The ESP8266 configured above cannot read the HTML content of the SSL-encrypted webpages. MicroPython has little support for the SSL protocol. However, it’s possible to read content from the SSL encrypted webpages by using standard Python on a microcomputer.
Try the following Python script on a Raspberry Pi or on your computer.
def http_get(url):
import socket
import ssl
_, _, host, path = url.split(‘/’, 3)
real_host = host.replace(“http://”, “”).replace(“https://”, “”).split(“/”)[0].split(“:”)[0]
s = socket.socket(socket.AF_INET, socket.SOCK_STREAM)
request = bytes(‘GET /%s HTTP/1.1\r\nHost: %s\r\n\r\n’ % (path, host), ‘utf8’)
context = ssl.SSLContext(ssl.PROTOCOL_TLSv1_2)
s = context.wrap_socket(s, server_hostname = real_host)
s.connect((real_host, 443))
s.sendall(request)
contest = s.recv(5000).decode()
print(contest)
while context != b”:
contest = s.recv(5000).decode()
print(contest)
s.close()
http_get(‘https://www.engineersgarage.com/different-types-biometric-sensors-morphological-behavioral/’)
The above Python script reads the HTML source code of an SSL-encrypted webpage from engineersgarage.com. Note the URL of the website and engineersgarage.com use HTTPS protocols. The Python script runs a TCP client and returns the HTML content of the given URL as shown in the images below.


Configuring ESP8266/ESP32 as a TCP server using sockets
The MicroPython script that follows configures ESP8266 as a TCP server. The ESP8266 server uses the connected router’s IP address. When the server is requested by a client, like a computer connected to the same WiFi connection, it returns an HTML page.
import network
import machine
station = network.WLAN(network.STA_IF)
if station.isconnected() == True:
print(“Already connected”)
station.active(True)
station.connect(“SSID”, “PASSWORD”)
while station.isconnected() == False:
pass
print(“Connection successful”)
print(station.ifconfig())
html = “””<!DOCTYPE html>
<html>
<head> <title>ESP8266 Server</title> </head>
<body>
<h1>Welcome to ESP8266 Server</h1>
</body>
</html>
“””
import socket
addr = socket.getaddrinfo(‘0.0.0.0’, 80)[0][-1]
s = socket.socket()
s.bind(addr)
s.listen(1)
print(‘listening on’, addr)
while True:
cl, addr = s.accept()
print(‘client connected from’, addr)
cl_file = cl.makefile(‘rwb’, 0)
while True:
line = cl_file.readline()
if not line or line == b’\r\n’:
break
response = html
cl.send(‘HTTP/1.0 200 OK\r\nContent-type: text/html\r\n\r\n’)
cl.send(response)
cl.close()
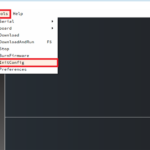
You must replace the SSID and PASSWORD at line #8 of the above code with the SSID and network key of your own WiFi connection. To run the server, upload and run the above MicroPython script on ESP8266 using uPyCraft IDE or Thonny IDE.
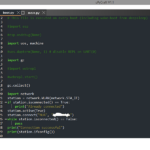
The below screenshot showcases the ESP8266 server running and responding to a client.

To make a request to the ESP8266 server, type the IP address returned by the station.ifconfig() method in your browser’s address bar. The ESP8266 server will return an HTML page as a response to your computer’s browser.
The below screenshot is an example of a webpage returned by the ESP8266 server.

You may also like:

Filed Under: Electronic Projects, ESP8266., Tech Articles

Questions related to this article?
👉Ask and discuss on EDAboard.com and Electro-Tech-Online.com forums.
Tell Us What You Think!!
You must be logged in to post a comment.