Robots are designed to ease and automate the work of humans. They are useful to deploy at places which are not easily accessible. In this tutorial, a humidity and temperature monitoring rover based on IoT ‘s robotic application is designed. Humidity and temperature are the most common physical environments that are needed to be monitored. The four-wheel robot designed in this project can be operated in a range of 30 Metre and can withstand a temperature up to 150 degree Celsius.
The robot can be controlled through a mobile phone which will have a custom app installed on it. The mobile will connect to the robot via Bluetooth. For Bluetooth connectivity, the electronic circuit controlling the robot has HC-05 Bluetooth module interfaced to it. For controlling the robot, any Android based smartphone will be needed to pair with the HC-05 Bluetooth module and launch the custom app designed for this project. The app can be downloaded from this tutorial.
The electronic circuit also has ESP8266 Wi-Fi module interfaced to it. The Wi-Fi module is used to connect with any available internet hotspot and transfer temperature and humidity data to a remote server. An IoT platform is utilized to receive and log data. The same platform is used to monitor data in real time. For recording temperature and humidity information, DHT-11 humidity and the temperature sensor is used in the circuit.
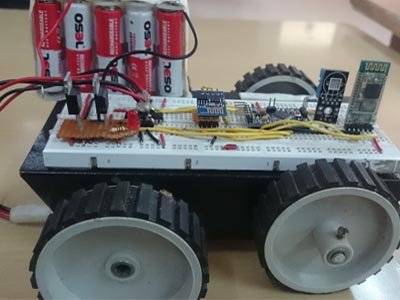
Fig. 1: Prototype of Arduino based ThingSpeak IoT Robot for Temperature and Humidity Monitoring
The control circuitry of the robot is built around Arduino Pro Mini. The Arduino board is preferred as it is the most popular controller board and has large community support. The Pro Mini is used in the circuit due to its rich features packed in a compact size. Also, it is handy to install such a small controller board on any robotic body. The robot is driven by geared DC motors which are controlled through L293D motor driver IC. The Arduino sketch runs on the control circuitry is written and compiled on Arduino IDE while the custom app used for sending control commands is built using MIT App Inventor 2. The IoT platform used for monitoring sensor data is ThingSpeak.
Components Required –
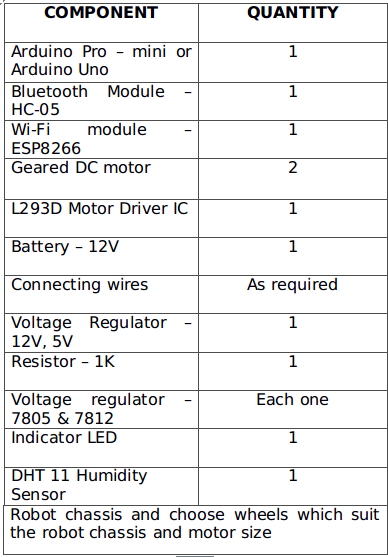
Fig. 2: List of Components required for Arduino based ThingSpeak IoT Robot used for Temperature and Humidity Monitoring
Block Diagram –
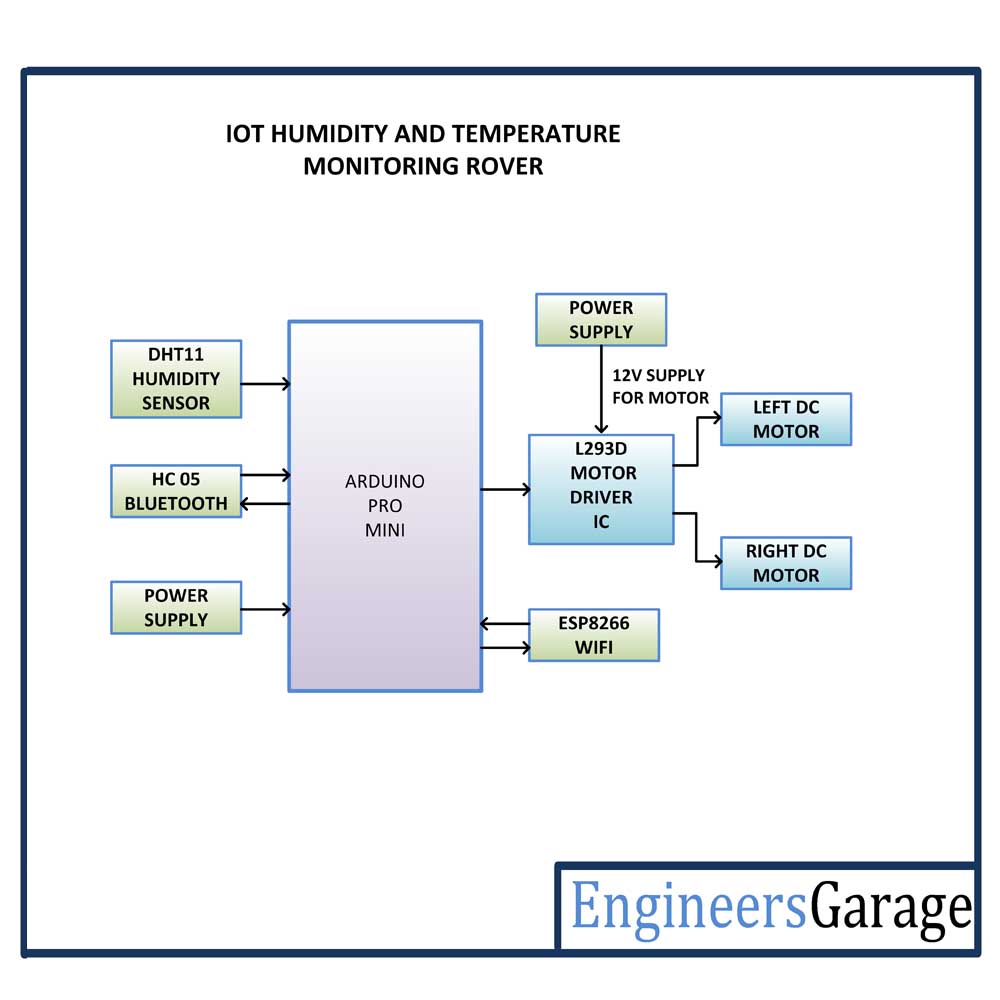
Fig. 3: Block Diagram of Arduino based ThingSpeak IoT Robot for Temperature and Humidity Monitoring
Circuit Connections
The control circuitry of the robot is built around Arduino Pro Mini.
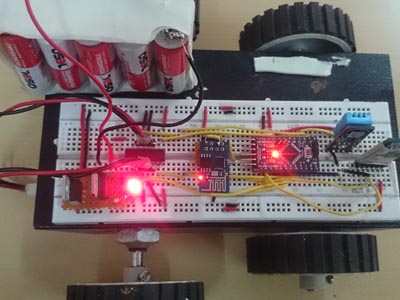
Fig. 4: Image of Arduino based ThingSpeak IoT Circuit attached to Robot Body
The circuit is built by integrating the following sections together –
Power Supply – In the circuit, Arduino Pro Mini, Bluetooth module, and Wi-Fi module need a 5V regulated DC for their operation while the motor driver IC needs 12V DC. A 12V NIMH battery is used as the primary source of power. The supply from the battery is regulated to 5V and 12V using 7805 and 7812 ICs. The pin 1 of both the voltage regulator ICs is connected to the anode of the battery and pin 2 of both ICs is connected to ground. The respective voltage outputs are drawn from pin 3 of the respective voltage regulator ICs. An LED along with a 10K Ω pull-up resistor is also connected between common ground and output pin to get a visual hint of supply continuity. Despite using 12V battery, 7812 is used to provide a regulated and stable supply to the motor driver IC.
Arduino Pro Mini – Arduino Pro Mini is an Atmega 168 based microcontroller board. It has 14 GPIO pins, 6 analog inputs, 6 PWM pins, 2 external interrupts and onboard UART, SPI and I2C. The board is just 1.3 inch by 0.7 inch in size that is six times smaller than Arduino UNO. With such features packed in small size, this board is an ideal for any robotic project. In this project, 4 input output pins of Pro Mini are utilized for interfacing wi the h motor driver IC and Bluetooth module is interfaced with RX and TX pins available for serial communication over UART. One of the pin is utilized for interfacing DHT-11 Sensor and two GPIO pins are used to interface ESP8266 Wi-Fi module.
HC-05 Bluetooth Module – HC-05 Bluetooth module is serial port protocol module. It operates on ISM band 2.4GHz with V2.0+EDR (enhanced data date). It can work in both Master and slave modes. The Bluetooth module has six pins – Enable, VCC, Ground, Transmit Data (TxD), Receive Data (RxD) and State. The Enable and State pin are unused and so not connected in the circuit. The VCC and Ground pins are connected to the common VCC and Ground. The TxD and RxD pins of the module are connected to the pins RX and TX of the Arduino Pro Mini respectively. These connections are summarized in the table below –

Fig. 5: Table listing pin configuration of ESP8266 ESP-12 Wi-Fi Module
ESP8266 Wi-Fi Module – The ESP8266 Wi-Fi Module is used to connect with any available internet hotspot and transfer sensor data to ThingSpeak Platform via Wi-Fi. The ESP8266 Wi-Fi Module is a self-contained SOC with integrated TCP/IP protocol stack that can give any microcontroller access to a Wi-Fi network. The ESP8266 is capable of either hosting an application or off loading all Wi-Fi networking functions from another application processor.
Each ESP8266 module comes pre-programmed with an AT command set firmware. So, one can simply hook this up to an Arduino device. Here it uploads the monitoring data to the cloud. The module comes available in two models – ESP-01 and ESP-12. ESP-12 has 16 pins available for interfacing while ESP-01 has only 8 pins available for use. The ESP-12 has the following pin configuration –
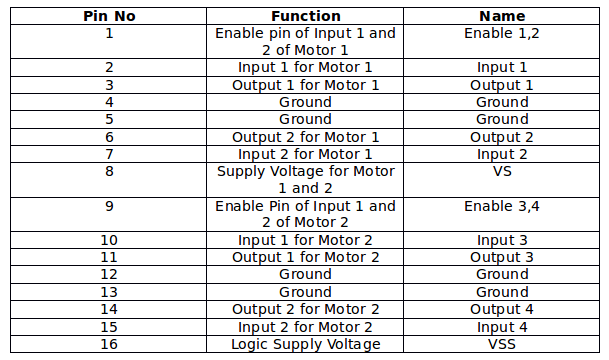
Fig. 6: Table listing pin configuration of ESP8266 ESP-12 Wi-Fi Module
The ESP-12 model is used in the project. The Reset and VCC pins of the module are connected to the 5V DC while Ground pin is connected to the common ground. The Tx and Rx pins of the module are connected to the pins 11 and 10 of the Arduino Pro Mini. The Arduino pins 11 and 10 are configured to serial receiver and transmitter through software serial function.
DHT-11 Temperature and Humidity Sensor – The DHT -11 sensor reads the ambient temperature and humidity and relays the data to microcontroller as digital data. The data pin of temperature and humidity sensor DHT11 is connected to pin 12 of the Arduino Pro Mini. The VCC and ground are connected to the common VCC and ground.
L293D DC Motor Driver IC – The L293D is a dual H-bridge motor driver integrated circuit (IC). The Motor drivers act as current amplifiers since they take a low-current control signal and provide a higher-current signal. This higher current signal is used to drive the motors. It has 16 pins with following pin configuration:

Fig. 7: Table listing pin configuration of L293D Motor Driver IC
There are two DC motors used for making the robotic car. The DC motors are interfaced between pins 3 and 6 and pins 14 and 11 of the motor driver IC.
The L293D IC controls the DC Motors according to the following truth tables:
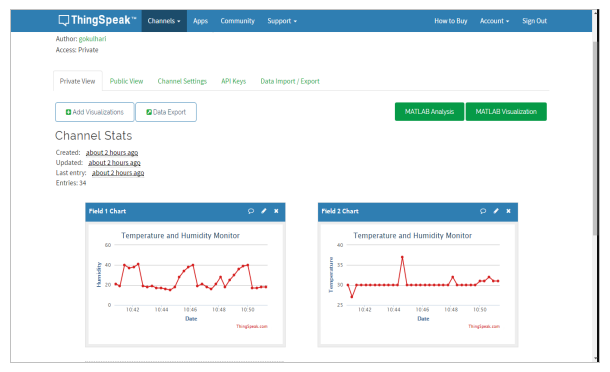
Fig. 8: Truth Table of L293D Motor Driver IC

Fig. 9: Screenshot of User Interface of ThingSpeak Platform
The pin 4, 5, 13 and 12 of the L293D are grounded while pin 1, 16 and 9 are connected to 5V DC and pin 8 is connected to 12V DC. The pins 15, 2, 7 and 10 of the motor driver IC are connected to pins 8, 2, 3 and 7 of the Arduino board. The DC motor attached to right wheel is connected to pins 11 and 14 while motor attached to left wheel is connected to pins 3 and 6 of the motor driver IC.
Geared DC Motors – In this robot, 12V geared DC motors are attached to the wheels. Geared DC motors are available with wide range of RPM and Torque, which allow a robot to move based on the control signal it receives from the motor driver IC.
How the circuit works –
After assembling the robot, it can be used by attaching battery in the circuit. As the robot is powered on, It starts fetching data from the DHT-11 temperature and humidity sensor and look for any available internet hotspot to connect with the ThingSpeak platform. ThingSpeak is an IoT analytics platform service that allows to aggregate, visualize and analyze live data streams in the cloud. ThingSpeak provides instant visualizations of data posted by the IoT devices to ThingSpeak server. With the ability to execute MATLAB code in ThingSpeak one can perform online analysis and processing of the data as it comes in.
The DHT11 detects water vapour by measuring the electrical resistance between two electrodes. The humidity sensing component is a moisture holding substrate with electrodes applied to the surface. When water vapour is absorbed by the substrate, ions are released by the substrate which increases the conductivity between the electrodes. The change in resistance between the two electrodes is proportional to the relative humidity.
Higher relative humidity decreases the resistance between the electrodes, while lower relative humidity increases the resistance between the electrodes. The DHT11 measures temperature with a surface mounted NTC temperature sensor (Thermistor) built into the unit. The humidity and temperature measured by sensor are monitored and recorded through the ThingSpeak IoT platform through the Wi-Fi module which is connected to the controller which provides the serial communication to transfer the data. The recorded data is visible on the platform’s UI.

Fig. 10: Screenshot of User Interface of ThingSpeak Platform
The robot can be moved around by passing commands from a custom android application installed on any smart phone. The custom android application is designed using MIT App Inventor 2. Check out the programming guide to learn how the app is designed using MIT App Inventor. The custom app has buttons to move the robot forward, backward, left, right and to stop it. The user has just tap the direction buttons to transfer the commands. The commands are passed by the app to the Bluetooth module interfaced in the control circuitry in the form of single character strings. The following strings are passed to transfer the control commands –

Fig. 11: Table listing string commands used by IoT Robot
These command strings are interpreted in the Arduino sketch to control the DC motors. The robot can be moved forward, backward, left or right by implementing the following input logic at the motor driver pins –

Fig. 12: Logic Table of L293D Motor Driver IC for IoT Robot
On receiving the string commands, the Arduino sketch just changes the digital output at the input pins of the motor driver IC to control the motion of the robot.
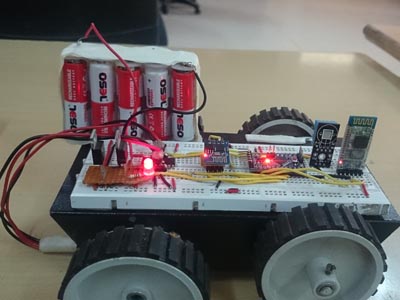
Fig. 13: Image showing Arduino based ThingSpeak IoT Robot
Programming Guide –
The custom app used to control the motion of the robot is built using MIT App Inventor. There are also many android Bluetooth applications available on the Play Store which can be used. If any application available on Play Store is used, the Arduino sketch will need to be modified or changed accordingly. The MIT App Inventor 2 is used to built the app.
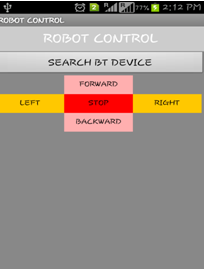
Fig. 14: Screenshot of custom app designed using MIT App Inventor
MIT app Inventor is an easy platform to create an android application. The platform uses logical blocks to create an app. A guide to use MIT app inventor 2 is provided at the official website of the platform. There are also many YouTube tutorials available for reference. The Robot control app created in this project has the following logics that are formed with help of blocks –
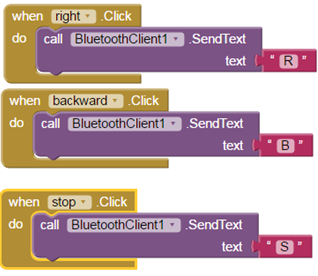
Fig. 15: Screenshot of Logical blocks of the custom app designed using MIT App Inventor

Fig. 16: Screenshot of Logical blocks of the custom app designed using MIT App Inventor
Even more features can be added in the app by including additional logical blocks.
In the control circuitry of the robot, Arduino sketch running on Pro Mini controls the robot’s mechanism. The Arduino sketch starts with the import of header files. The following header files are included in the code for DHT-11 sensor and the software serial functionality –
#include <SoftwareSerial.h>
#include <dht.h>
The following #define directives are used to determine the arduino pins that should be connected to the motor driver IC.
#define LM1 2
#define LM2 3
#define RM1 7
#define RM2 8
The following code block defines the function prototypes that are used to determine the tasks of the motor.
char data = 0;
void moveforward();
void movebackward();
void turnleft();
void turnright();
void robostop();
The following block of code defines the API key that is provided by the ThingSpeak by creating the channel where data has to be recorded. This API key must be replaced by the API key assigned to one by the ThingSpeak platform.
String apiKey = “9W6L82SPOZKQ1A1W”;
The following code defines the software serial pins used for Wi-Fi communication.
SoftwareSerial ser(11,10); // RX, TX
The following block of code is the setup() function where it is used to determine whether the connected pins are used as input or output and enable the serial communication. Here Serial.begin(9600) is used to establish a serial communication between the bluetooth and the arduino and Serial.begin(115200) is used for a serial communication between the Wi-Fi and arduino. It should be noted that new version of Wi-Fi module may work with baud rate of 9600.
void setup()
{
Serial.begin(9600);
pinMode(LM1, OUTPUT);
pinMode(LM2, OUTPUT);
pinMode(RM1, OUTPUT);
pinMode(RM2, OUTPUT);
ser.begin(115200);
To learn about AT commands refer ESP8266 – AT Command Reference.
The complete Arduino Sketch for the IoT based Humidity and Temperature Monitoring Rover can be found under the source code tab.
Note: Find the file for the Bluetooth controlled app below.
You may also like:
Project Source Code
###
//Program to #include#include // include dht sensor library dht DHT; float t=0; float h=0; #define LM1 2 #define LM2 3 #define RM1 7 #define RM2 8 #define DHT11_PIN 12 char data = 0; void moveforward(); void movebackward(); void turnleft(); void turnright(); void robostop(); // replace with your channel's thingspeak API key String apiKey = "9W6L82SPOZKQ1A1W"; // connect 10 to TX of Serial USB // connect 11 to RX of serial USB SoftwareSerial ser(11,10); // RX, TX // this runs once void setup() { // enable debug serial // Serial.begin(115200); Serial.begin(9600); pinMode(LM1, OUTPUT); pinMode(LM2, OUTPUT); pinMode(RM1, OUTPUT); pinMode(RM2, OUTPUT); // enable software serial ser.begin(115200); // reset ESP8266 WiFi connection AT+CIPMUX=1 AT+CWJAP ser.println("AT"); delay(1000); ser.println("AT+GMR"); delay(1000); ser.println("AT+CWMODE=3"); delay(1000); ser.println("AT+RST"); delay(5000); ser.println("AT+CIPMUX=1"); delay(1000); String cmd="AT+CWJAP="Gokul","22031994""; ser.println(cmd); delay(1000); ser.println("AT+CIFSR"); delay(1000); } // the loop void loop() { if(Serial.available()>0) { data = Serial.read(); Serial.print(data); Serial.print("n"); if(data == 'F') { Serial.println("Forward"); moveforward(); } else if(data == 'B') { Serial.println("Backward"); movebackward(); } else if(data == 'L') { Serial.println("Left"); turnleft(); } else if(data == 'R') { Serial.println("Right"); turnright(); } else if(data == 'S') { Serial.println("Stop"); robostop(); } } delay(1000); int chk = DHT.read11(DHT11_PIN); Serial.print("Temperature = "); t = DHT.temperature; Serial.println(t); Serial.print("Humidity = "); h = DHT.humidity; Serial.println(h); esp_8266(); } void esp_8266() { // TCP connection AT+CIPSTART=4,"TCP","184.106.153.149",80 String cmd = "AT+CIPSTART=4,"TCP",""; cmd += "184.106.153.149"; // api.thingspeak.com cmd += "",80"; ser.println(cmd); Serial.println(cmd); if(ser.find("Error")) { Serial.println("AT+CIPSTART error"); return; } // prepare GET string GET https://api.thingspeak.com/update?api_key=LHAG4NSIYJ5UWS6U&field1=0rnrn String getStr = "GET /update?api_key="; getStr += apiKey; getStr +="&field1="; getStr +=String(h); getStr +="&field2="; getStr +=String(t); getStr += "rnrn"; // send data length cmd = "AT+CIPSEND=4,"; cmd += String(getStr.length()); ser.println(cmd); Serial.println(cmd); delay(1000); ser.print(getStr); Serial.println(getStr); delay(10000); } void moveforward() { digitalWrite(LM1, HIGH); digitalWrite(LM2, LOW); digitalWrite(RM1, HIGH); digitalWrite(RM2, LOW); } void movebackward() { digitalWrite(LM1, LOW); digitalWrite(LM2, HIGH); digitalWrite(RM1, LOW); digitalWrite(RM2, HIGH); } void turnleft() { digitalWrite(LM1, HIGH); digitalWrite(LM2, LOW); digitalWrite(RM1, LOW); digitalWrite(RM2, LOW); } void turnright() { digitalWrite(LM1, LOW); digitalWrite(LM2, LOW); digitalWrite(RM1, HIGH); digitalWrite(RM2, LOW); } void robostop() { digitalWrite(LM1, LOW); digitalWrite(LM2, LOW); digitalWrite(RM1, LOW); digitalWrite(RM2, LOW); } ###
Circuit Diagrams
Project Datasheet
Project Video
Filed Under: Electronic Projects
Filed Under: Electronic Projects





Questions related to this article?
👉Ask and discuss on Electro-Tech-Online.com and EDAboard.com forums.
Tell Us What You Think!!
You must be logged in to post a comment.