Most of the electronic toys we see around these days are microcontroller based and hence, even though microcontroller based toys carry out immense potential for creating the excitement in electronics, it becomes slightly difficult to start on them. Easing out on that obstacle is this musical doll project which does not need coding at all and focuses on the pure electronics.
The circuit is based on IC555 and UM66 ICs. Apart from these two ICs, the circuit uses the following components:
1. Variable Resistor
2. Zener Diode
3. LDR
4. Transistor BC548
5. Capacitor
6. Resistor
7. Battery

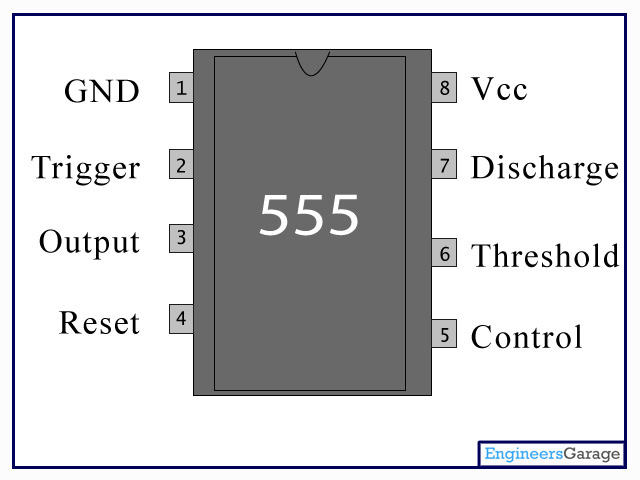
Fig. 1: Pin Out Image Of IC555
Working
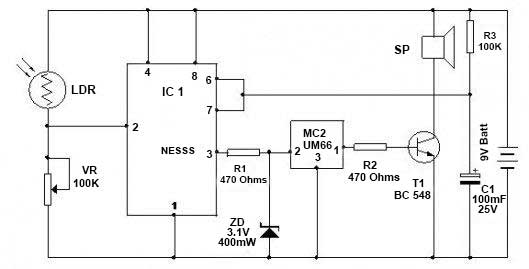
When LDR is in light, it conducts and keeps the trigger pin 2 of IC1 high. IC1 will be off. IC1 is a short duration monostable timer with R3 and C1 as timing elements to give 2 minutes high output from IC1. When the shadow of the hand falls on LDR, it ceases to conduct and trigger pin 2 of IC1 becomes low and it triggers. The output from IC1 is around 9 volts which is dropped to 3 volts by the Zener. IC2 is melody generator and gives output when IC1 triggers. T1 amplifies the sound. After 2 minutes, IC1 turns off and melody stops.
Assemble the circuit as compact as possible to enclose inside the doll. Use a 12 volt mini battery (one used in Car lock remote). Place the LDR on the hat of the doll. Use a small Mylar speaker (one used in toys).
Application
This is a funny circuit for the kids. This Music Doll gives melody when the hand of the kid approaches the doll. It is a simple Do it yourself (DIY) Project for the beginners who wish to start project building.
Circuit Diagrams
Filed Under: Electronic Projects


Questions related to this article?
👉Ask and discuss on Electro-Tech-Online.com and EDAboard.com forums.
Tell Us What You Think!!
You must be logged in to post a comment.