This is a simple tutorial on how to interface rain water or soil moisture level sensor with nodemcu esp8266-12e WiFi module. Monitoring the status of your garden over WiFi earns the project title of smart garden. We will monitor rain and moisture level composition of soil. User can see the status of his/her garden now on his desktop or mobile. Simple and popular moisture level sensor is used in the project.
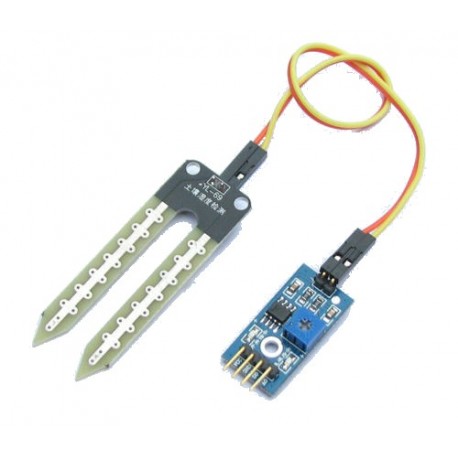
Water moisture level sensor
|
Sensor is composed of two legs. Sensor works on 3.3 volt to 5 volt power supply. On each leg a conducting material is pasted, normally nickel or copper. An electric power is supplied across legs. One leg is connected to + of power supply and other leg is connected to – of supply. Both the legs are set a part from each other. In normal condition no charge flows through the legs because the circuit is open. As soon as we insert the legs in ground the moisture in ground lowers the resistance between legs and depending on the moisture level the voltage flows between the completed circuit. If moisture composition is high resistance between legs will be low and more voltage comes across legs. If moisture level is low little voltage will flow across the legs.
Another module supplied with the legs is voltage control circuit. It houses a variable resistance and lm393 op amp on it. |
It has four pins. Two power pins and two sensor output pins. Sensor output pins are
- A0 – Analog output pin. Outputs analog voltage which corresponds to the moisture level of soil or about water rain detection. For which purpose sensor is use.
- D0 -Output digital signal. We set threshold value by variable resistor present on the sensor control board. Now when the moisture level increased or decreased the threshold value digital pin becomes high.
I am going to use both the output pins in the project. Normally many tutorials on the internet use only one output pin and left the other vacant. From A0 i am going to measure the moisture level in soil. A threshold value is set and D0 is used to generate alert when ever the sensor value reaches the threshold.
Project circuit diagram
Nodemcu works on 3.3 volts and soil moisture rain water leakage sensor also works between 3.3 to 5 volts. So we can power the same circuit using a same power source. Water leakage sensor can also be powered with nodemcu output power. Analog channel-0 of nodemcu is connected to A0 output of rain water sensor. Digital pin# 13 of nodemcu is connected to D0 output of soil moisture level sensor.
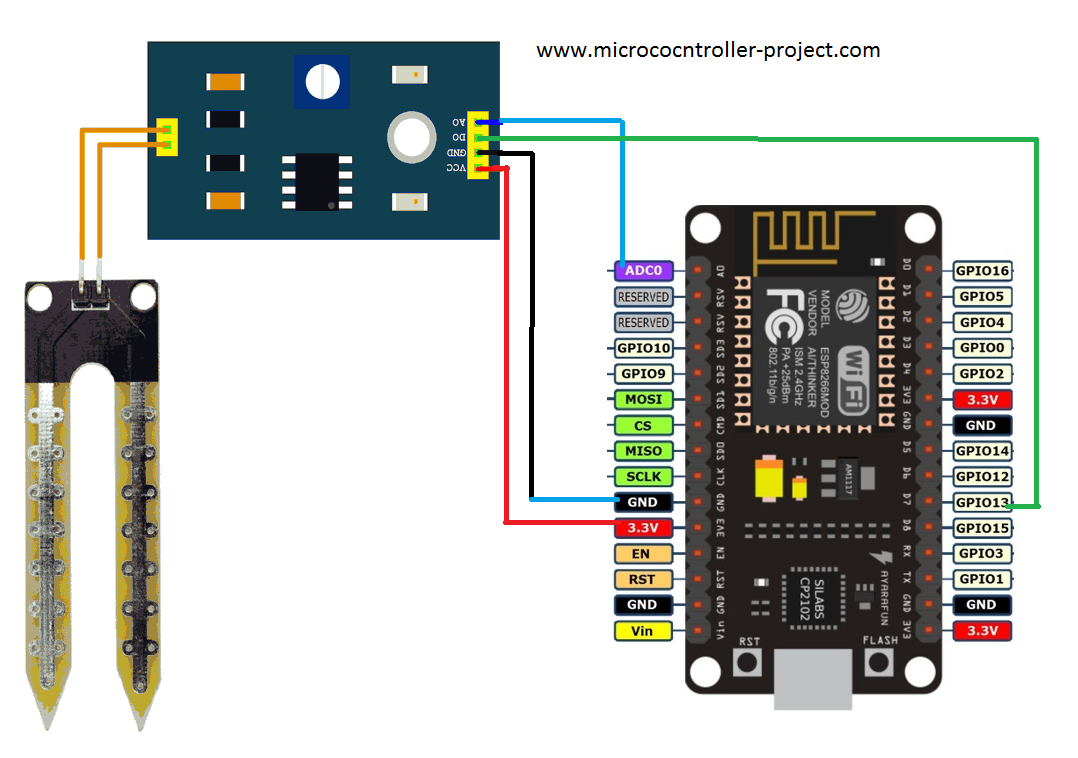
Rain water soil moisture sensor with nodemcu wifi module
Coming to the code. Lets recall the project functionality. When ever a user types in a particular IP in browser of his desktop or mobile, a page will be displayed which contains the status of moisture level or rain water detection. Both the nodemcu and mobile/desktop on which one wants to see the status must be connected to same WiFi network. If any one is on other network the page will not be displayed. Nodemcu is working as a server. It is serving a web page so server and the client must be on the same network in order to communicate properly. First in code enter the SSID and Password of the netwrok to which you want your nodemcu to be connected to.
const char* ssid = “Your SSID”;
const char* password = “Your Wifi Password”;
Then analog channel and digital pins of nodemcu are defined which are used to read data output from the rain water sensor. In the setup function WiFi is turned on and an IP is requested to be assigned by the router to which we are connecting our nodemcu. When success full IP is assigned nodemcu starts its server and outputs the server address on the serial monitor of arduino ide. In the loop function i am waiting for client request when a request arrives i calculate the analog value, convert it to percentage, check if threshold reached and pass on these value to the page. Nodemcu sends back the page to client and closes the connection.
In code the heading and button visible is due to the html code present in the nodemcu arduino ide code.
|
Just make the above circuit and download the code in nodemcu. After downloading the code open the serial monitor from arduino ide at 115200 bps baud rate. You will see the nodemcu is connecting to your router, starting its server and after server initialization it will display and IP on the screen. This address or IP is the page on which nodemccu is displaying soil moisture level status. The IP will look some thing like this. One has to enter this IP in his/her mobile, desktop, laptop or notebook browser to see the garden soil moisture status.
|

|
The end result will be some thing like below
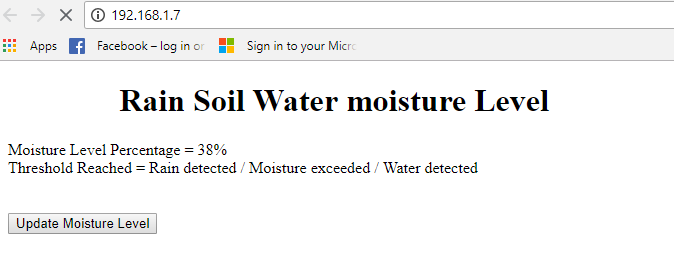
Nodemcu soil moisture water rain sensor over WiFi Monitoring
When ever the button ”Update Moisture Level” is pressed the instant values of the sensor will be displayed on the web page.
Limitations
Soil sensor copper and nickel conductance will vanish soon approximately in 3 months. Every thing in soil is eaten by the bacteria in soil or undergoes a chemical reaction with soil content. Same happens with the soil sensor legs. Their loose their conductance very easily and in few months. You might need to replace the sensor after every 3 months. Another limitation is that user needs to refresh the page(Press the update moisture level button) every time he needs to see the updated value. Page can be refreshed automatically by using node js instead of HTML relaod.
Future Work
One can extend the above project by activating a water valve when ever the moisture level of soil is low. This way one can automatically water his plants in garden. The only thing that needs to be modified is driving a relay with nodemcu to which you can connect a valve. A demo project of interfacing and controlling relay over WiFi with nodemcu is below. You use the code of relay project with this tutorial and can build a smart garden project.
Download the project code. Folder contains arduino ide project .ino file. Please provide us your feedback on the project. Write your queries and comments in the comments section below.
Filed Under: Electronic Projects, ESP8266., Microcontroller Projects

Questions related to this article?
👉Ask and discuss on Electro-Tech-Online.com and EDAboard.com forums.
Tell Us What You Think!!
You must be logged in to post a comment.