Summary:
Thinking of making robots, you might come up with ideas such as line tracking, obstacle avoider, anti-drop Robot, environment monitoring Robots, etc. But what we are going to make today, is a robot that follows an object, relentlessly. The basic function of this robot is simple: it follows you. It goes forward as you go forward; when you stop moving, it stops as well.
I used an Ultrasonic range sensor to identify the moving direction of the object. You can also add more number. The minimum number that will do the job is one. Here by measuring the pulse width of the echo pulse from ultrasonic sensor we can get the range of the object in front of the robot. Here we created an algorithm which will move the robot forward when the object is moving forward within the programmed range and backwards in the same manner. Here we will implement Software Pulse Width Modulation which can convert normal digital outputs to the PWM output pins of the Arduino.

Fig. 1: Prototype of Arduino based Object Following Robot
Description:
Prerequisites & Equipment:
You are going to need the following:
-
An Arduino Board or Arduino clone(Here is a guide if you need)
-
Two DC Motors.
-
An Ultrasonic Sensor.
-
Robot chassis and wheels which suit your chassis size and motor size.
-
Arduino IDE for the programming.
Block Diagram:

Fig. 2: Block Diagram of Arduino based Object Following Robot
Description:
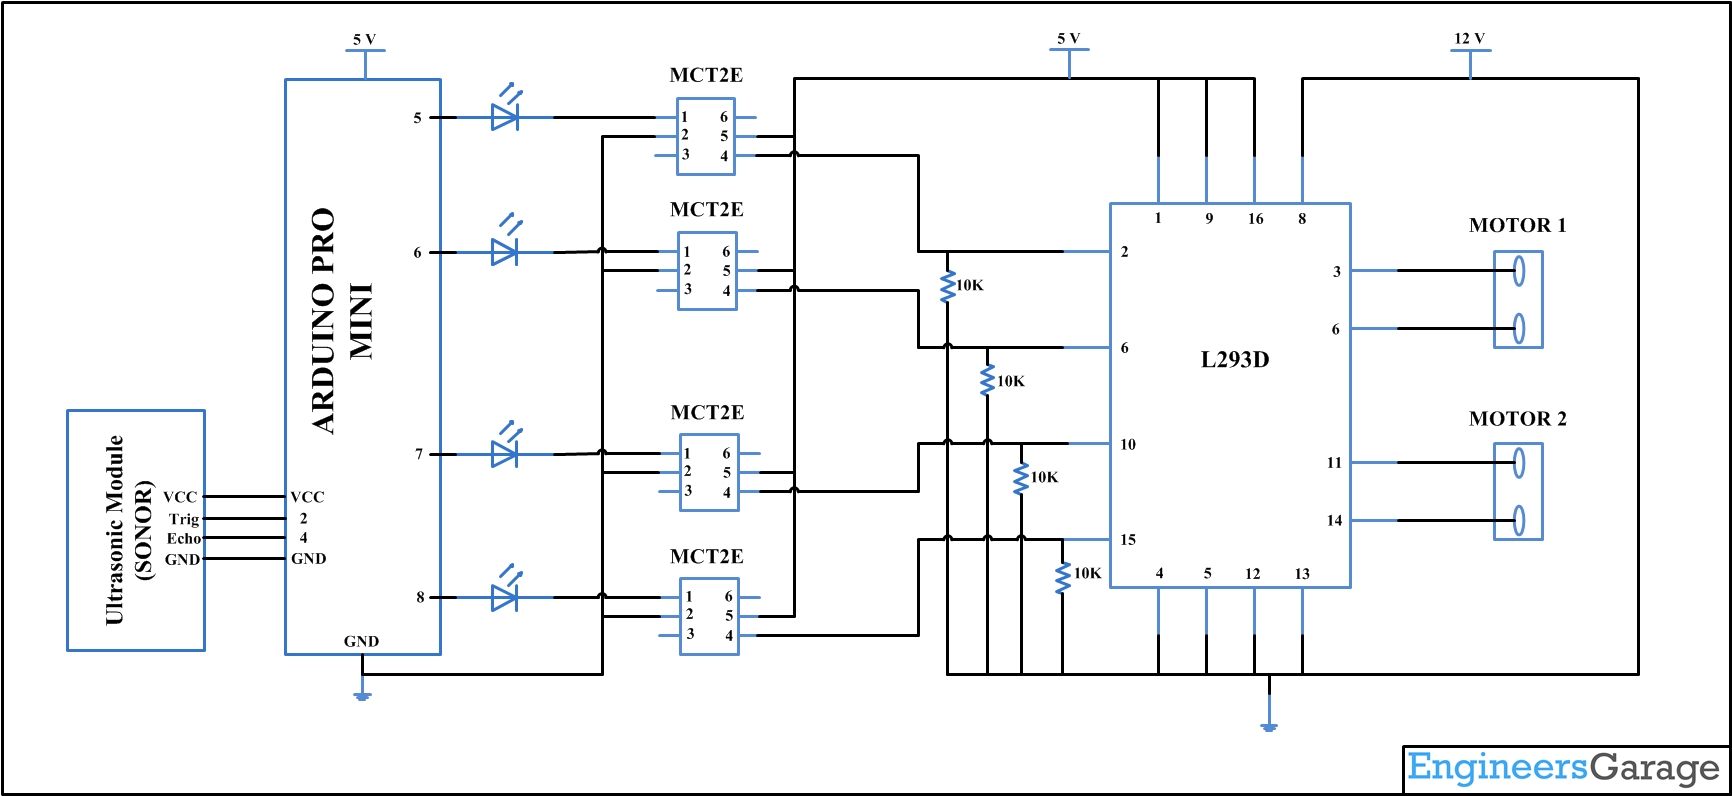
Hardware assembly:
Make the circuit as is given by the circuit diagram. Make the robot assembly with your selected parts and connect the motors to the circuit. Optocouplers are used to safeguard the Arduino from High voltage risks.
Installing the SoftPWM library:
Download this zipped file and unzip it under the library directory of the Arduino IDE folder. For example, for my computer’s setup, the directory is
XXXarduino-1.0.1libraries
After copying files across, the directory
XXXarduino-1.0.1librariesSoftPWM
Load the program code.ino after you save it onto your computer and open it in the Arduino IDE. (Link for code.ino is available at the bottom)
Coding description:
Setup and initializations:
SoftPWMBegin();
SoftPWMSet(pin, 0);
SoftPWMSetFadeTime(pin, rt, ft);
These are the functions used to initialize Software PWM in the Arduino. “pin” can be replaced with any pin number available on the Arduino board you are using. “rt” refers to the rising time of the starting of pulse which is represented in milliseconds and “ft” which refers to the falling time of the end of a pulse which is also represented in milliseconds.
Here, I used SoftPWM to reduce the speed of the Motor, as my motor RPM is high. If you have a less RPM motor you can use the normal digital output of the pins which is given as the comment in the code.
Algorithm:
Distance of the object is measured in centimeters.
if (cm < 25 && cm > 14) {
This condition is to move forward the robot when the object is in the range of 14 to 25 centimeters.
}
if (cm < 14 && cm > 12){
This condition is to make the robot stable when the object is in the range of 12 to 14 centimeters.
}
if (cm < 12 && cm > 2) {
This condition is to move backward the robot when the object is in the range of 2 to 12 centimeters.
}
if (cm > 25){
This condition is to stop the robot when the object is in the out of range i.e greater than 25 centimeters.
}
Circuit Diagrams
Project Video
Filed Under: Electronic Projects
Filed Under: Electronic Projects

Questions related to this article?
👉Ask and discuss on EDAboard.com and Electro-Tech-Online.com forums.
Tell Us What You Think!!
You must be logged in to post a comment.